Tutorial Two And Three

to
to

> Photoshop CS3.
> Not translatable.
> No PSD's.
> Need help, just ask.
Tutorial Two - Bright Greens & Blues.
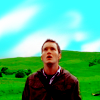
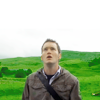
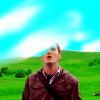
1. Take this image -
.
2. Duplicate this layer and set it to Screen, 86%.
3. Go to Layer > New Adjustment Layer > Selective Color.
Reds -
Cyans: -100%.
Magentas: -71%.
Yellows: +100%.
Black: -76%.
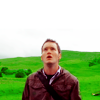
4. You should end up with this -
.
5. Click OK; we can't do the Selective Color all in one layer because we're going to erase some of it.
6. Another Selective Color Layer.
Neutrals -
Cyans: +57%.
Magentas: -22%.
Yellows: +56%.
Black: +26%.
7. You should have this -
.
8. Take a small eraser tool (with no blurring, straight up eraser) and simply erase the Neutral Selective Color layer from Ianto's face, so that the green color is still in the background, on the grass.
9. Now you should have this -
.
10. Another Selective Color Layer.
Greens -
Cyans: +100%.
Magentas: -100%.
Yellows: +100%.
Black: +100%.
Reds -
Cyans: -100%.
Magentas: +29%.
Yellows: +37%.
Black: +26%.
Blacks -
Cyans: +100%.
Magentas: +100%.
Yellows: +100%.
Black: +100%.
Neutrals -
Cyans: -16%.
Magentas: +17%.
Yellows: +7%.
Black: +12%.
11. You should now have this -
.
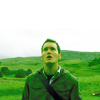
12. Go to Layer > New > Layer.
13. Use a small paint brush with 00ffff as the color, and paint the white blank space behind Ianto (the sky), but make sure you do it on the new layer you just made.
14. You should now have this -
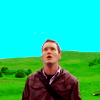
.
15. Now to add some clouds. Use the same brush you used to make the blue sky, but with white as your color. Simply paint small white blobs onto the same layer you painted the sky on.
16. Like this -
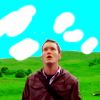
.
17. Take the Smudge Tool, and just smudge this layer (with the sky and white blobs on) in whatever way you want.
18. Now you should have this -
.
19. As you can see, the layer has blurred across the character's face. Oops. Just take a small eraser and erase where the layer has smudged across his face.
20. So you'll have this -
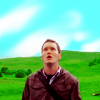
.
21. You can finish the picture now if you want, but I usually add a Color Burn Layer with cccccc as the color, at 100%.
22. Finished result is this -
.
--
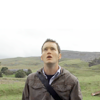
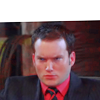
1. Take this image -
.
2. Duplicate this layer, and set it to Screen, 100%.
3. Go to Layer > New Adjustment Layer > Selective Color.
Reds -
Cyans: -100%.
Magentas: +46%.
Yellows: +35%.
Black: +16%.
4. Now you should have this -

.
5. Make another Selective Color Layer.
Reds -
Cyans: -100%.
Magentas: +15%.
Yellows: +12%.
Black: -12%.
6. This is what it should look like -
.
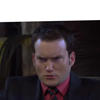
7. Make another Selective Color Layer.
Blacks -
Cyans: +100%.
Magentas: +100%.
Yellows: +100%.
Black: +100%.
Whites -
Cyans: +100%.
Magentas: -86%.
Yellows: -100%.
Black: +31%.
8. Now you'll have this -
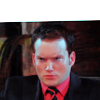
.
9. Make a new layer, and simply paint around Ianto with a black brush. It doesn't have to be really perfect, because we're gonna make a Color Burn Layer to go on top.
10. Make a Color Burn Layer (Layer > New Fill Layer > Solid Color) with cccccc as your color, at 100%.
11. And this is the finished product -
.