Tutorial: Andrew Garfield Outline (for landofart)
TUTORIAL

>>
Made in: PSP XI
Level: A little more advanced
♪ step 1: coloring original image
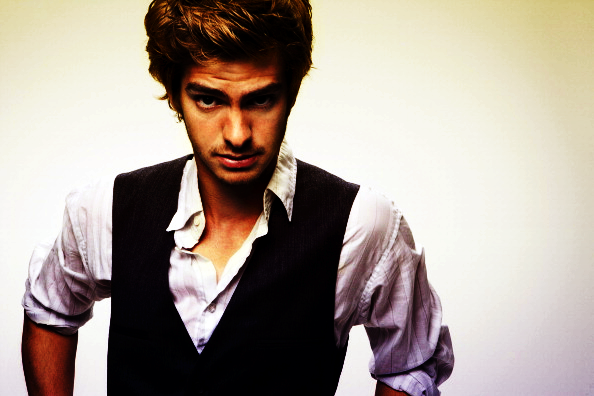
Okay, the first thing I did was find a subject. I wanted a person on a light-colored background. So I went to http://www.andrew-garfield.com and found this picture:

Then time to color! Okay, I'm going to sort of speed through this part, because all that really matters is the end product. First I copied the background about four times and set the first two layers to Multiply at 100%, the third to Screen at about 10% opacity, and the top one at Soft Light at 40% opacity. That makes it darker and the colors deeper.

Then I brightened it up with a curves layer (160>>206), and then upped the Saturation to about 23. Which gives us:

I wanted to add some yellow, and maybe bring out a little more color, too (I chose purple because I like purple with yellow), so I made a new layer with a gradient, #f3c011 to #75527e. (I tried to pull a purple that was just a little lighter than a purple from the picture.) Then I set that to Soft Light 100% opacity and masked away a lot of the parts covering his hair and face. That gives us:

Wanted a little darker/deeper color, so I copied a merged layer on top and set it to Multiply at about 70% or so. Then I wanted to brighten it up just a bit, so I made another curves layer (175>>198). And we have our base for the next bit!
♪ step 2: making the outline
Now, it's probably easier to work on a bigger canvas, but I wanted to see what it looked like at final size, so I went ahead and resized it to 100px (height, because we're going to crop it to 100px width later). First, I copied the background and pasted it as a new layer.
I went to Effects>>Edge Effects>>Find All. That gave me:
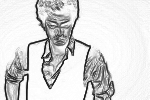
I set that to Multiply, and moved the layer over a little to the right. As such:
I erased all the parts covering him. Gave me something like this:

Then, because between his body and the outline there are still some noisy bits, I used a layer mask to get rid of that. (I set the group to about 36% opacity at this point.) Here's the mask, and the image after the mask:


♪ step 3: texture
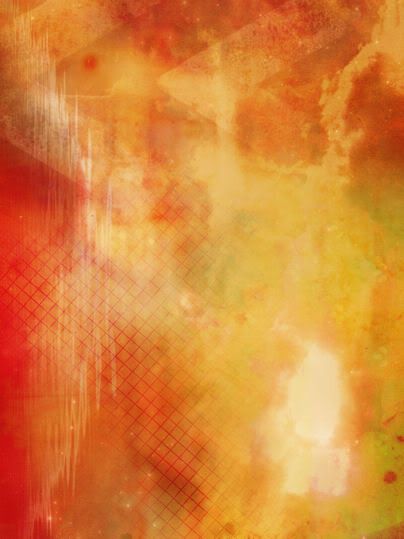
I wanted a yellow background instead of the white, so I went digging through my textures folder and found this texture by paperjunk on DA (tle_lovie69 on LJ). I rotated it and resized it, and wound up with this. I pasted that on top of the picture, moved it around until I found a nice yellow spot I liked, and then set it to darken. (The outline was a little hard to see, so it's darker here just so it'd show up. I set it back down in the next step.) Then I cropped it to 100x100 and wound up with:

Needed to get the yellow off him, and off the white bit between him and the outline, so time for another layer mask! This time I did Hide All instead of Show All, which I think made it easier. This is the mask, and the result:

♪ step 4: finishing touches
Then I copied a merged layer and pasted it on top, setting it to Screen at a little less than 50% opacity.
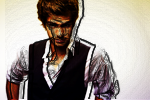
I copied a merged layer again and sharpened it (just a little bit). That gave me:

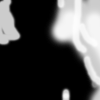
I wanted a nice, shiny effect, so I made painted some light blobs on a new layer. I stuck them on a black background so you could see them here. I used Gaussian Blur on the blobs, with a radius of 14, and BAM! Icon.
You can do this for pretty much any picture like this (like this icon I made), and probably tweak it to make it easier. I tried it again, and got an almost exact replica, so hopefully the tutorial should work! I'm not sure I went into enough detail, though, so absolutely ask questions if I have not explained something or said something that didn't make sense. I have the .psd for the replica, that I can upload if someone wants to see it. I have a .psd for the first part (the coloring), but that's so simple I don't think anyone will need it; but, again, I don't really mind sharing.
>>
Made in: PSP XI
Level: A little more advanced
♪ step 1: coloring original image
Okay, the first thing I did was find a subject. I wanted a person on a light-colored background. So I went to http://www.andrew-garfield.com and found this picture:
Then time to color! Okay, I'm going to sort of speed through this part, because all that really matters is the end product. First I copied the background about four times and set the first two layers to Multiply at 100%, the third to Screen at about 10% opacity, and the top one at Soft Light at 40% opacity. That makes it darker and the colors deeper.
Then I brightened it up with a curves layer (160>>206), and then upped the Saturation to about 23. Which gives us:
I wanted to add some yellow, and maybe bring out a little more color, too (I chose purple because I like purple with yellow), so I made a new layer with a gradient, #f3c011 to #75527e. (I tried to pull a purple that was just a little lighter than a purple from the picture.) Then I set that to Soft Light 100% opacity and masked away a lot of the parts covering his hair and face. That gives us:
Wanted a little darker/deeper color, so I copied a merged layer on top and set it to Multiply at about 70% or so. Then I wanted to brighten it up just a bit, so I made another curves layer (175>>198). And we have our base for the next bit!
♪ step 2: making the outline
Now, it's probably easier to work on a bigger canvas, but I wanted to see what it looked like at final size, so I went ahead and resized it to 100px (height, because we're going to crop it to 100px width later). First, I copied the background and pasted it as a new layer.
I went to Effects>>Edge Effects>>Find All. That gave me:
I set that to Multiply, and moved the layer over a little to the right. As such:
I erased all the parts covering him. Gave me something like this:
Then, because between his body and the outline there are still some noisy bits, I used a layer mask to get rid of that. (I set the group to about 36% opacity at this point.) Here's the mask, and the image after the mask:
♪ step 3: texture
I wanted a yellow background instead of the white, so I went digging through my textures folder and found this texture by paperjunk on DA (tle_lovie69 on LJ). I rotated it and resized it, and wound up with this. I pasted that on top of the picture, moved it around until I found a nice yellow spot I liked, and then set it to darken. (The outline was a little hard to see, so it's darker here just so it'd show up. I set it back down in the next step.) Then I cropped it to 100x100 and wound up with:
Needed to get the yellow off him, and off the white bit between him and the outline, so time for another layer mask! This time I did Hide All instead of Show All, which I think made it easier. This is the mask, and the result:
♪ step 4: finishing touches
Then I copied a merged layer and pasted it on top, setting it to Screen at a little less than 50% opacity.
I copied a merged layer again and sharpened it (just a little bit). That gave me:
I wanted a nice, shiny effect, so I made painted some light blobs on a new layer. I stuck them on a black background so you could see them here. I used Gaussian Blur on the blobs, with a radius of 14, and BAM! Icon.
You can do this for pretty much any picture like this (like this icon I made), and probably tweak it to make it easier. I tried it again, and got an almost exact replica, so hopefully the tutorial should work! I'm not sure I went into enough detail, though, so absolutely ask questions if I have not explained something or said something that didn't make sense. I have the .psd for the replica, that I can upload if someone wants to see it. I have a .psd for the first part (the coloring), but that's so simple I don't think anyone will need it; but, again, I don't really mind sharing.