Requested Tutorial
Done in PS CS 2. Will Translate.
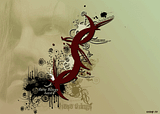
Requested by kumikouk
Make a graphic like this
Click the thumbnails for full size images.
Okay, I started out with a blank 1024x768 canvas and then filled it with this gradient from Paul W

I liked the green, but I wanted to change it just a bit so I took this gradient from the same set and added that on a new layer. I set it to Softlight at 36%. I still wasn't quite satisfied so I duplicated the layer, flipped it and set it to Color Burn at 43%


Next I wanted to add my picture. I chose this gorgeous picture of the Undertaker as it just goes good with the song lyrics that I was basing this graphic off of.

I used the elliptical marquee tool with the feathering set on 10 to copy the picture and then pasted it on my canvas. I set the blend mode on Softlight at 46%

Now for the decoration. I firstly added this brush from Portfelia.com

OH! I quick word about these brushes used in the graphic. They're all made for PS CS 2. Some of them have image packs, some don't. BUT for the ones that don't, if you have the ABR Viewer, you'll be able to use it to make the brushes for your program. So if you don't have it, DL it! It's a handy little program.
Okay, back to where we were. I added the brush in a dark reddish color(#510c0a) and added a drop shadow to it to add some more depth. These are my setting to give you an idea, but mess around to get something of your own


On new layers UNDERNEATH the large brush that I just added, I added these 2 brushes from Dreamon72 in black and set them to Softlight 100%


I next added this brush from LeeDeeYa in white and set the blend mode to Softlight 100%.

It looked a little plain so I added a drop shadow. I then duplicated the layer, moved it down a bit and rotated it.

I added this spatter brush from SmashMethod

And this brush from ca_pris

And these two brushes also from Portfelia.com. The butterfly I did in black and sized it down quite a bit and rotated it some. the other I did in white.


Okay, that's all for the brushes. Now some text. I just took some lyrics from Fuel's 'These Things'. I used Book Antiqua Italic, Trashed, and Will and Grace. On the one like I used the warp text took and put it on lower arc at +16 to make it bend along the line of the brush.
And that's it :)
Requested by kumikouk
Make a graphic like this

Click the thumbnails for full size images.
Okay, I started out with a blank 1024x768 canvas and then filled it with this gradient from Paul W
I liked the green, but I wanted to change it just a bit so I took this gradient from the same set and added that on a new layer. I set it to Softlight at 36%. I still wasn't quite satisfied so I duplicated the layer, flipped it and set it to Color Burn at 43%

Next I wanted to add my picture. I chose this gorgeous picture of the Undertaker as it just goes good with the song lyrics that I was basing this graphic off of.
I used the elliptical marquee tool with the feathering set on 10 to copy the picture and then pasted it on my canvas. I set the blend mode on Softlight at 46%

Now for the decoration. I firstly added this brush from Portfelia.com

OH! I quick word about these brushes used in the graphic. They're all made for PS CS 2. Some of them have image packs, some don't. BUT for the ones that don't, if you have the ABR Viewer, you'll be able to use it to make the brushes for your program. So if you don't have it, DL it! It's a handy little program.
Okay, back to where we were. I added the brush in a dark reddish color(#510c0a) and added a drop shadow to it to add some more depth. These are my setting to give you an idea, but mess around to get something of your own

On new layers UNDERNEATH the large brush that I just added, I added these 2 brushes from Dreamon72 in black and set them to Softlight 100%

I next added this brush from LeeDeeYa in white and set the blend mode to Softlight 100%.
It looked a little plain so I added a drop shadow. I then duplicated the layer, moved it down a bit and rotated it.

I added this spatter brush from SmashMethod
And this brush from ca_pris
And these two brushes also from Portfelia.com. The butterfly I did in black and sized it down quite a bit and rotated it some. the other I did in white.

Okay, that's all for the brushes. Now some text. I just took some lyrics from Fuel's 'These Things'. I used Book Antiqua Italic, Trashed, and Will and Grace. On the one like I used the warp text took and put it on lower arc at +16 to make it bend along the line of the brush.
And that's it :)