How to do a well balanced black and white
From 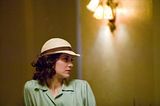
to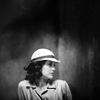
requested by tonicangel
Done on Photoshop CS4.
A little warning : it's not because the settings works well with this icon that it will with yours.
Comments are loved!!!!
You can use the icon as long as you credit; If you snag the textures, don't forget to credit their creators!
If you got questions, don't hesitate!! I know everything is not explained but I like when people just see by themselves what are the effects of the different tools. But don't hesitate to ask questions if you want to know something.
Textures:
by muddi88
by latastic
by reyesphile
Teh layer list is here
1. Resize the picture til it fits you base properly. Then, use the smudge tool to erase the lights and have a background with 2 greenish-yellowish vertical lines. It will look like this.
2. Do a curve layer. Set the opacity to 32%
Output: 150
Input: 89
3. Do a selective color layer.
Whites: -70%, 0%, +6%, 0%
4. Do a channel mixer
Red: +112%, -12%, -12%
Blue: 0%, -12%, +124%
5. Do a color balance layer.
Shadows: -11, 0, +13
Midtones: +22, -6, -19
Highlights: -1, 0, -22
6. Do a brightness/contrast layer
Brightness: 9
Contrast: -39
7. Do a color balance layer
Midtones: +18, -9, +27
8. Use this texture by latastic. Before put it at the top of the layer, rotate it so that the top will be the bottom. (or the lightest part at the top and the darkest at the bottom). Set it to soft light.
9. Duplicate your base. Put it at the top of your layers and set it to soft light, opacity at 43%.
10. Use this texture made by muddi88. Set it to soft light. Duplicate it twice. All set to soft light.
11. Use this texture by reyesphile. Set it to screen, opacity at 23%.
12. Create an exposure layer.
Gamma: 0,88
13. Open a black and white gradient map and set it to normal.
You're done!

to

requested by tonicangel
Done on Photoshop CS4.
A little warning : it's not because the settings works well with this icon that it will with yours.
Comments are loved!!!!
You can use the icon as long as you credit; If you snag the textures, don't forget to credit their creators!
If you got questions, don't hesitate!! I know everything is not explained but I like when people just see by themselves what are the effects of the different tools. But don't hesitate to ask questions if you want to know something.
Textures:
by muddi88

by latastic

by reyesphile

Teh layer list is here
1. Resize the picture til it fits you base properly. Then, use the smudge tool to erase the lights and have a background with 2 greenish-yellowish vertical lines. It will look like this.
2. Do a curve layer. Set the opacity to 32%
Output: 150
Input: 89
3. Do a selective color layer.
Whites: -70%, 0%, +6%, 0%
4. Do a channel mixer
Red: +112%, -12%, -12%
Blue: 0%, -12%, +124%
5. Do a color balance layer.
Shadows: -11, 0, +13
Midtones: +22, -6, -19
Highlights: -1, 0, -22
6. Do a brightness/contrast layer
Brightness: 9
Contrast: -39
7. Do a color balance layer
Midtones: +18, -9, +27
8. Use this texture by latastic. Before put it at the top of the layer, rotate it so that the top will be the bottom. (or the lightest part at the top and the darkest at the bottom). Set it to soft light.
9. Duplicate your base. Put it at the top of your layers and set it to soft light, opacity at 43%.
10. Use this texture made by muddi88. Set it to soft light. Duplicate it twice. All set to soft light.
11. Use this texture by reyesphile. Set it to screen, opacity at 23%.
12. Create an exposure layer.
Gamma: 0,88
13. Open a black and white gradient map and set it to normal.
You're done!