How to discretly use texture to focus the icon on a character...
.... also called the "How to show you love Bale wearing a fedora" tutorial
From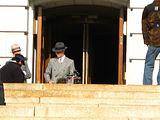
to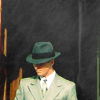
requested by tonicangel
Done on Photoshop CS4.
A little warning : it's not because the settings works well with this icon that it will with yours.
Comments are loved!!!!
You can use the icon as long as you credit; If you snag the textures, don't forget to credit their creators!
If you got questions, don't hesitate!! I know everything is not explained but I like when people just see by themselves what are the effects of the different tools. But don't hesitate to ask questions if you want to know something.
Textures:
by nodazzle
by fullonswayzeed

The entire layer list is here
1. Resize your picture (mine is 367px width and 275px height)and place it in your base (size 100*100px)til you don't see the camera and the people in front of Bale. (it's a behind the scene picture, which is why you saw them)
2. Do a curve Layer, opacity to 27%
Output: 150
Input: 89
3. Do a selective color layer that you put to soft light, 100% of opacity.
Reds: -23%, 0%, +8%, -11%
Whites: 0%, 0%, +15%, +11%
Neutrals: 0%, +3%, 0%, -4%
4. Do another selective color layer. Opacity at 29%
Reds: -20%, 0%, +2%, -1%
Yellows: 0%, 0%, -3%, +3%
Whites: +11%, 0%, +9%, +24%
Neutrals: 0%, +2%, +8%, 0%
Blakcs: 0%, 0%, 0%, +100%
5. Do again a selective color layer (sorry I know it's boring)Opacity to 41%
Reds: -68%, +26%, +76%, -12%
Yellows: +100%, +17%, -51%, -20%
Whites: +100%, 0%, -23%, -10%
Neutrals: +9%, -10%, -6%, +6%
6. Guess what? Create a selective color layer (it's the last one I swear)
Whites: -70%, 0%, +6%, 0%
7. Create a color balance layer, opacity to 25%
Shadows: -11, 0, +13
Midtones: +22, -6, -19
Highlights: -1, 0, -22
8. Create a brightness/contrast layer
Brightness: +9
Contrast: -39
9. Create a new color balance layer
Midtones: -71, -8, -27
10. Create an Exposure layer (in new adjustment layer)
Gamma: 0,58
11. Use this texture made by fullonswayzeed. Set it to screen, opacity at 20%.
12. Use this texture made by nodazzle. Set it to screen.
13. And now, the final touch. Create a brightness/contrast layer.
Brightness: +19
Contrast: -38
And you're done!
From

to

requested by tonicangel
Done on Photoshop CS4.
A little warning : it's not because the settings works well with this icon that it will with yours.
Comments are loved!!!!
You can use the icon as long as you credit; If you snag the textures, don't forget to credit their creators!
If you got questions, don't hesitate!! I know everything is not explained but I like when people just see by themselves what are the effects of the different tools. But don't hesitate to ask questions if you want to know something.
Textures:
by nodazzle

by fullonswayzeed

The entire layer list is here
1. Resize your picture (mine is 367px width and 275px height)and place it in your base (size 100*100px)til you don't see the camera and the people in front of Bale. (it's a behind the scene picture, which is why you saw them)
2. Do a curve Layer, opacity to 27%
Output: 150
Input: 89
3. Do a selective color layer that you put to soft light, 100% of opacity.
Reds: -23%, 0%, +8%, -11%
Whites: 0%, 0%, +15%, +11%
Neutrals: 0%, +3%, 0%, -4%
4. Do another selective color layer. Opacity at 29%
Reds: -20%, 0%, +2%, -1%
Yellows: 0%, 0%, -3%, +3%
Whites: +11%, 0%, +9%, +24%
Neutrals: 0%, +2%, +8%, 0%
Blakcs: 0%, 0%, 0%, +100%
5. Do again a selective color layer (sorry I know it's boring)Opacity to 41%
Reds: -68%, +26%, +76%, -12%
Yellows: +100%, +17%, -51%, -20%
Whites: +100%, 0%, -23%, -10%
Neutrals: +9%, -10%, -6%, +6%
6. Guess what? Create a selective color layer (it's the last one I swear)
Whites: -70%, 0%, +6%, 0%
7. Create a color balance layer, opacity to 25%
Shadows: -11, 0, +13
Midtones: +22, -6, -19
Highlights: -1, 0, -22
8. Create a brightness/contrast layer
Brightness: +9
Contrast: -39
9. Create a new color balance layer
Midtones: -71, -8, -27
10. Create an Exposure layer (in new adjustment layer)
Gamma: 0,58
11. Use this texture made by fullonswayzeed. Set it to screen, opacity at 20%.
12. Use this texture made by nodazzle. Set it to screen.
13. And now, the final touch. Create a brightness/contrast layer.
Brightness: +19
Contrast: -38
And you're done!