Making a Mini Dust Storm
Almost a year ago I shared my cheap dust collector. albionwood couldn't leave well enough alone, though, and gave me reference to a fascinating page by Bill Pentz. This poor woodworker suffered from chronic lung problems brought on by years of wood dust he inhaled in his shop, and decided to try engineering a solution.
From his site:
All fine invisible dust poses a serious long term problem and fine wood dust is particularly bad. The peer reviewed medical research clearly shows every fine invisible dust exposure causes a tiny but measurable respiratory capacity loss and some of this loss becomes permanent, so all exposed to fine invisible dust develop respiratory damage and capacity loss. This dust poses so much health risk that just two tiny thimblefuls of fine invisible is enough for a large two-car garage based shop to fail an EPA air quality test.
(Emphasis Bill's. Actually, he emphasized in red letters.)
He developed a cyclonic dust collector that manipulated the exhaust and allowed the dust within the airflow to settle quite a bit before reaching the filter. His design and build uses bent sheet metal, a medium I've worked with a bit in the past but find altogether too sharp and unforgiving and expensive and sharp. Did I mention sharp?
Bill has another distinctive advantage over me. Head over to his site and marvel at the space he has available in his shop. I, by contrast, am forced to squeeze my work into a single-car garage. Were I to actually clean this garage, I might be able to cut, fold, roll and bleed my way around a 4'X 8' sheet of metal, but it's doubtful. The previous owner of this house installed shelves and workbenches that, while wonderful to use, suck up the available elbow room. A full sheet of metal was pretty much out of the question.
Which leads to follow-up question: What other material would serve to form a crude but effective simulacrum of Mr. Pentz's design? To answer that question, all one has to do is look around the house.
Why not cardboard?
I'll give you a moment to control your outburst of incredulous laughter. Remember, Dear Readers, my first dust collector used a cardboard concrete form tube as a filter housing, and it worked just fine, thank you very much. It also cost a fraction of what sheet metal would have set me back, not including stitches and time in the emergency room.
Here's a quick semi-cut away sketch of my first collector:
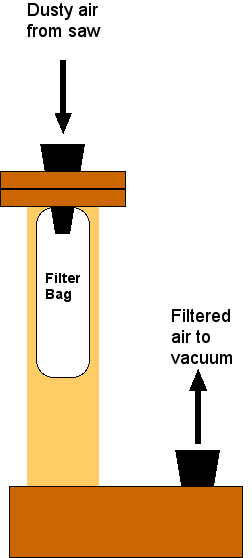
In this configuration, the air moved down the tube, through the plenum box and into the suction hose to the vacuum, trapping as much of the dust in the filter bag as the fabric would allow. Dust got through, of course, since there are bound to be particulates fine enough to pass through the threads of the bag. No worries, though, since any particulates that get stopped before they reach the vacuum don't have to be cleaned from the vac's filter, increasing the life of these more expensive disposable filters and reducing the number of times they must be replaced, a double win.
Here's a sketch of my Pentz attempt:
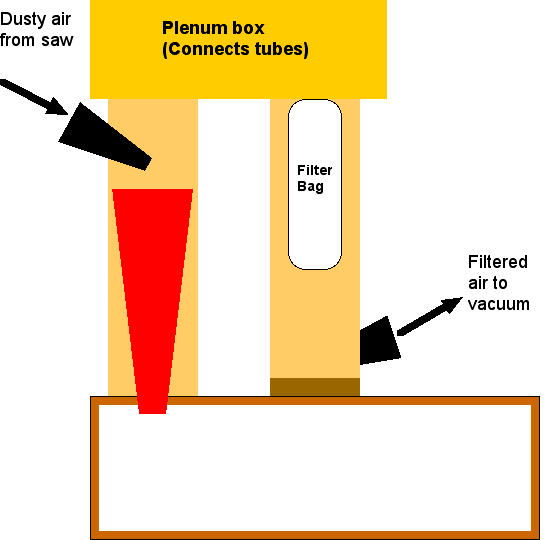
Things are very different here. First, the inlet and outlet hoses are cut into the sides of the tubes. This gives me the ability to angle the inlet nozzle downward toward the inverted red cone, which sits within the first tube. As the air rushes into the cone, the cone's shape forces the air into a cyclone against the outer edges of the cone before it can regroup in the center of the cone and continue upwards, following the suction's path to the upper plenum box and down again into the second tube.
I've put a different colored base to this second tube to show I've blocked that base with a piece of plywood glued to the tube's walls. Thus both tubes are open at the top, but only the first tube is connected below. Notice that the cone pierces the lower box; this is the dust plenum. The first tube mounts to this box with a (relatively) airtight seal around another circular piece of ply, this one with a hole. This hole seats the cone, allowing air and particulates to drop into the box.
Think of a fast moving narrow river that opens into a wider area; the speed of the water slows. This is also where any silt suspended in the water falls away from the slowed water and settles. Likewise, when dust enters the first tube with the drawn air, the air speed immediately drops owing to the increase in space. Instead of following the air back up the tube, larger pieces are carried by their downward-angled momentum and fall instead through the narrow tip of the cone to the box. The larger the box, the less it has to be mucked out, and - very, very importantly - the fewer particles make their way up the suction to clog the filter.
That's the theory. I decided to build a prototype to test it.
Phase One - collect cardboard. And by "collect" I mean literally collect any non-corrugated boxes that carry our many consumable items big enough to contribute to the project. Once I gathered enough, on to the form.
I decided to re-use the tube from the first collector, along with the round ply base that connected it to the original plenum. This base I mounted to an old shop vac (with the motor removed). I cut a ring of the tube and seated it on the ply base. Using old lath strips, I formed a cone defined by the inner diameter of that ring and a bit of plywood.
Clickee if you wishee.
Threaded rods run between the top and bottom ply bases, compressing the lath boards outward to the base ring and that wrap of blue tape at the top. My cone will form around this mold.
Wanna bigger look?
You can still see drying Elmer's glue on the surface in that second pic. This is not a high-tech endeavor. In that spirit, the tool used to cut the tubes was a simple hand saw. I made the cuts at an angle, as I said, to aim the nozzles downward. Two parallel cuts and a single joining cut allowed me to force a flap of the tube enough to jam a nozzle into the opening.
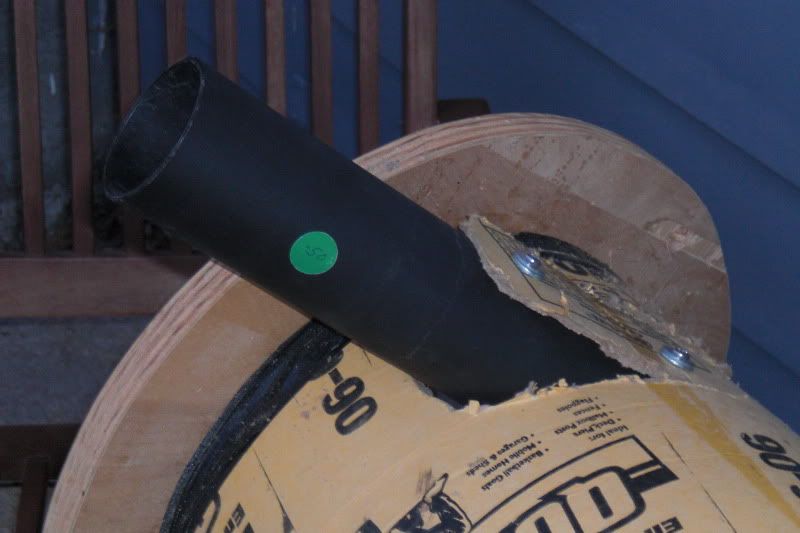
If you want detail.
Later I sealed the gaps left by the cut with a crap load of black vinyl electrical tape. I like how cheap it's gotten. For some reason, I didn't bother taking pictures of the plenum box build. It was messier, with squared corners that needed to be cut and folded. I used a thin ply base for the upper box base and formed the cardboard around that. The thin ply was necessary to allow compression of that base to the thicker ply piece that joined the tubes (which you can see in the pic just above the inserted nozzle); a simple cardboard base would likely deform if I tried to compress it, allowing gaps that leak suction.
And the final product?
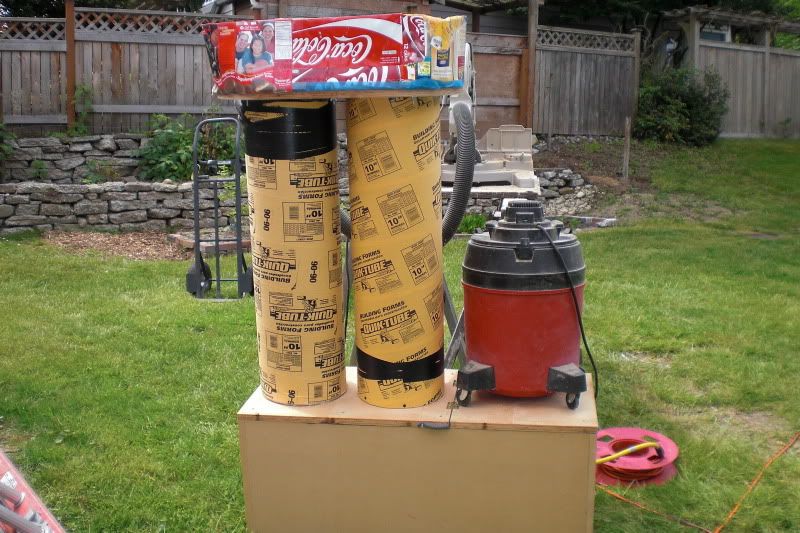
Bigger?
This one too?
I learned some lessons after my first assembled cut run. First of all, I should have used either a lot more layers of cardboard on the plenum box, or inserted a top plywood support form. The suction, though from a simple and small vac, managed to crush the box.

More collapse for you?
Like the box itself, I buckled and added even more structure to the ceiling and walls with glued bits of plywood. Though I liked the light weight and simplicity of a self-formed box of layered cardboard, I wasn't willing through trial and error to discover exactly how many layers would be required before I found the perfect number. Oh, and what if I eventually have to replace my shop vac and upgrade to one with a stronger suction? My trial and error could be tested anew, and with it my patience. More wood proved far easier.
There's another issue with the plenum box; I discovered it to be the first place for dust that follows the airflow to gather. Lots and lots of dust can jamb into the nooks and crannies offered in every corner. And lots and lots of that dust can fall out when I break the assembly down for cleaning. Since the assembly is just at eye level, you can imagine what happened when I lifted the box from the tubes and ever so briefly held it just above my head to have a look down the tube. . . .
Sadly, eliminating those nooks and crannies would require far more effort than I am willing to expend. Maybe down the line I'll make a second plenum box with a formed and shaped interior that allows dust to slide safely down the right hole with just a gentle tap.
Also, we must remember that cardboard is hydrophilic, meaning that it likes to suck up water. Anyone who's tried to pick a heavily laden cardboard box off a wet floor has learned that lesson the messy, if not disastrous way. Water will wick into the fibers of the board from any convenient source, even from damp air. Since in my first run with this setup I decided to cut wood found not from milled and kiln-dried sources (like construction remains) but wood from recently felled trees and limbs, I discovered that the wet stuff will stick.
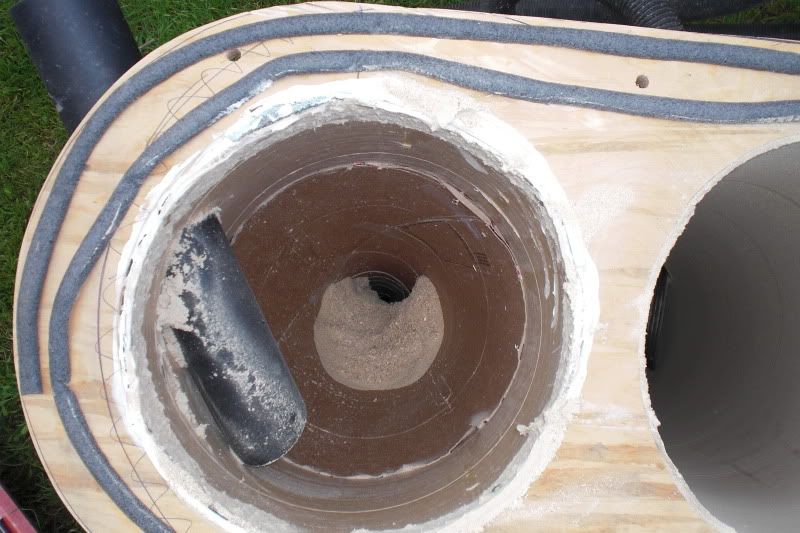
Look at that clog!
Actually, two things are happening here. One is what I mentioned above, where a bit of wet dust, left to settle for a few minutes, transfers a bit of its water to the lining of the cone and sticks. Later pieces, stopped by those first few motes, start a mini log jam. Second, despite the log jam, you'll notice there is still a path through, and that it kinda makes a swirly pattern. This tells me that air is leaking from the collector box. Even a slight flow upward will order the dust as we see. On one hand, this keeps a path for dust to follow rather than simply sticking to the cone sides and blocking the tip. Sadly, though, it means less dust falls and more gathers closer to the suction, meaning in and near the disposable filter. I had to do a bit of caulking after I made this discovery, finding air leaks in the collector box with a lit stick of incense. Where the smoke was drawn, I gooped.
Ah, but what of the hydrophilia? Yesterday I applied the first of at least three layers of polyurethane to the inside of the cone. This should give the inner cone the slickness and non-stickiness the factory-installed layer of something shiny gives to the concrete form tubes.
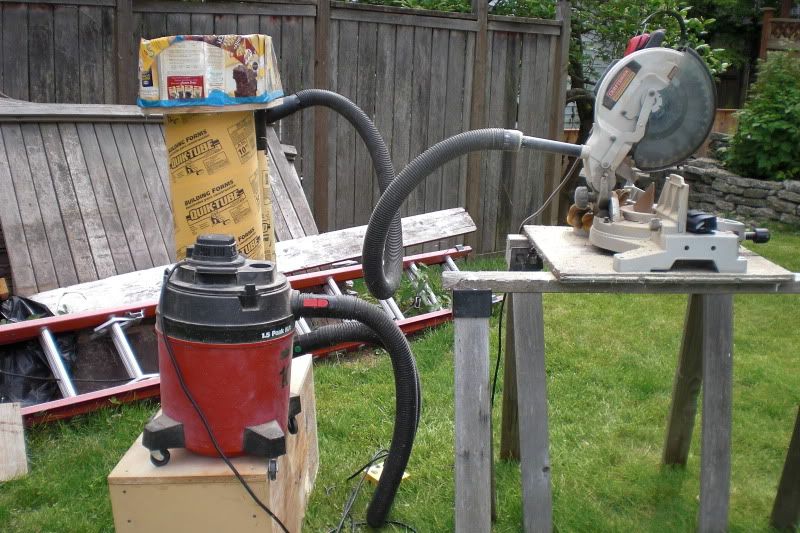
Still, observe the success!
A Closer Look at a Successful Pile of Dust!
Seeing that just made me happy.
Folks, this design works. Given that most of the wood, glue and cardboard was just lying around already, I added just a few bucks to my original design but got from the final a world of improvement. There are a few more additions to make. For example, Mr. Pentz notes that, to be truly effective, the cone and tube should be wider, the suction must be greater and exhausted outside the shop. I might punch a hole in my garage later for this vent, but I luckily have the advantage of moving a lot of cutting projects outside.
Still, take heart. With some extra time instead of extra money, you too could cut and glue your way to a better dust collector.
I send my thanks to albionwood for turning me on to Mr. Pentz's work, and to Mr. Pentz himself for making the plans available.
From his site:
All fine invisible dust poses a serious long term problem and fine wood dust is particularly bad. The peer reviewed medical research clearly shows every fine invisible dust exposure causes a tiny but measurable respiratory capacity loss and some of this loss becomes permanent, so all exposed to fine invisible dust develop respiratory damage and capacity loss. This dust poses so much health risk that just two tiny thimblefuls of fine invisible is enough for a large two-car garage based shop to fail an EPA air quality test.
(Emphasis Bill's. Actually, he emphasized in red letters.)
He developed a cyclonic dust collector that manipulated the exhaust and allowed the dust within the airflow to settle quite a bit before reaching the filter. His design and build uses bent sheet metal, a medium I've worked with a bit in the past but find altogether too sharp and unforgiving and expensive and sharp. Did I mention sharp?
Bill has another distinctive advantage over me. Head over to his site and marvel at the space he has available in his shop. I, by contrast, am forced to squeeze my work into a single-car garage. Were I to actually clean this garage, I might be able to cut, fold, roll and bleed my way around a 4'X 8' sheet of metal, but it's doubtful. The previous owner of this house installed shelves and workbenches that, while wonderful to use, suck up the available elbow room. A full sheet of metal was pretty much out of the question.
Which leads to follow-up question: What other material would serve to form a crude but effective simulacrum of Mr. Pentz's design? To answer that question, all one has to do is look around the house.
Why not cardboard?
I'll give you a moment to control your outburst of incredulous laughter. Remember, Dear Readers, my first dust collector used a cardboard concrete form tube as a filter housing, and it worked just fine, thank you very much. It also cost a fraction of what sheet metal would have set me back, not including stitches and time in the emergency room.
Here's a quick semi-cut away sketch of my first collector:
In this configuration, the air moved down the tube, through the plenum box and into the suction hose to the vacuum, trapping as much of the dust in the filter bag as the fabric would allow. Dust got through, of course, since there are bound to be particulates fine enough to pass through the threads of the bag. No worries, though, since any particulates that get stopped before they reach the vacuum don't have to be cleaned from the vac's filter, increasing the life of these more expensive disposable filters and reducing the number of times they must be replaced, a double win.
Here's a sketch of my Pentz attempt:
Things are very different here. First, the inlet and outlet hoses are cut into the sides of the tubes. This gives me the ability to angle the inlet nozzle downward toward the inverted red cone, which sits within the first tube. As the air rushes into the cone, the cone's shape forces the air into a cyclone against the outer edges of the cone before it can regroup in the center of the cone and continue upwards, following the suction's path to the upper plenum box and down again into the second tube.
I've put a different colored base to this second tube to show I've blocked that base with a piece of plywood glued to the tube's walls. Thus both tubes are open at the top, but only the first tube is connected below. Notice that the cone pierces the lower box; this is the dust plenum. The first tube mounts to this box with a (relatively) airtight seal around another circular piece of ply, this one with a hole. This hole seats the cone, allowing air and particulates to drop into the box.
Think of a fast moving narrow river that opens into a wider area; the speed of the water slows. This is also where any silt suspended in the water falls away from the slowed water and settles. Likewise, when dust enters the first tube with the drawn air, the air speed immediately drops owing to the increase in space. Instead of following the air back up the tube, larger pieces are carried by their downward-angled momentum and fall instead through the narrow tip of the cone to the box. The larger the box, the less it has to be mucked out, and - very, very importantly - the fewer particles make their way up the suction to clog the filter.
That's the theory. I decided to build a prototype to test it.
Phase One - collect cardboard. And by "collect" I mean literally collect any non-corrugated boxes that carry our many consumable items big enough to contribute to the project. Once I gathered enough, on to the form.
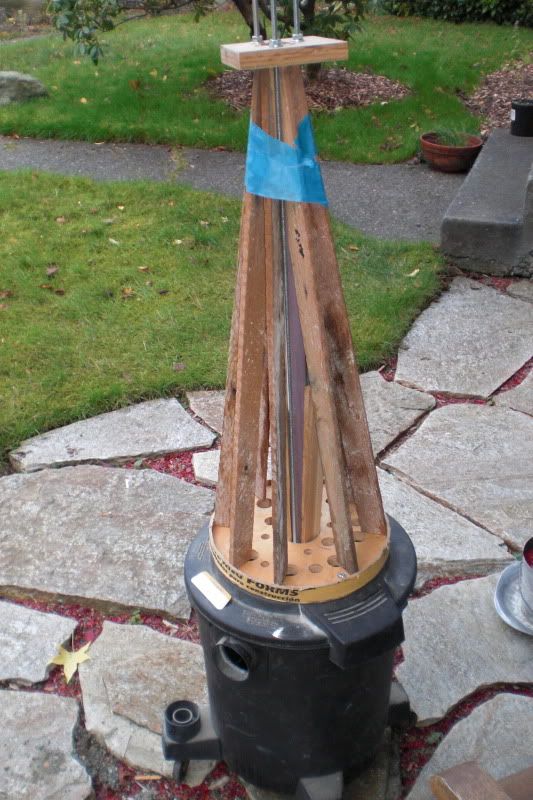
I decided to re-use the tube from the first collector, along with the round ply base that connected it to the original plenum. This base I mounted to an old shop vac (with the motor removed). I cut a ring of the tube and seated it on the ply base. Using old lath strips, I formed a cone defined by the inner diameter of that ring and a bit of plywood.
Clickee if you wishee.
Threaded rods run between the top and bottom ply bases, compressing the lath boards outward to the base ring and that wrap of blue tape at the top. My cone will form around this mold.
Wanna bigger look?
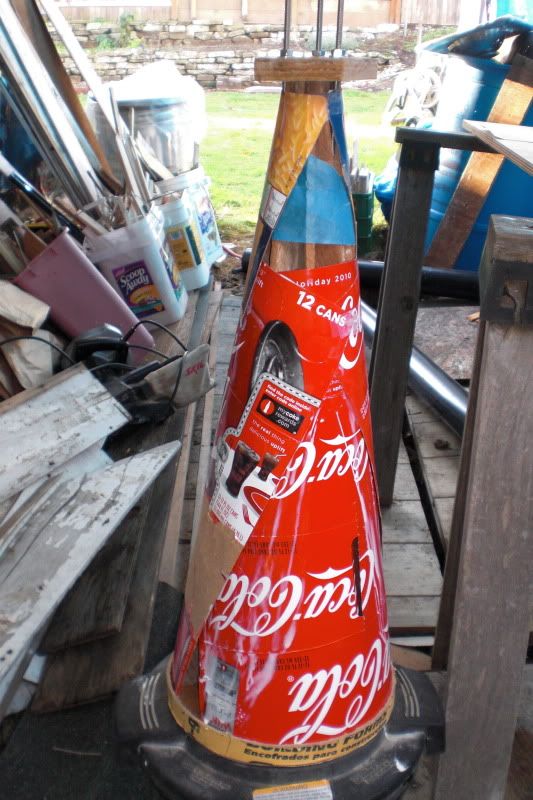
You can still see drying Elmer's glue on the surface in that second pic. This is not a high-tech endeavor. In that spirit, the tool used to cut the tubes was a simple hand saw. I made the cuts at an angle, as I said, to aim the nozzles downward. Two parallel cuts and a single joining cut allowed me to force a flap of the tube enough to jam a nozzle into the opening.
If you want detail.
Later I sealed the gaps left by the cut with a crap load of black vinyl electrical tape. I like how cheap it's gotten. For some reason, I didn't bother taking pictures of the plenum box build. It was messier, with squared corners that needed to be cut and folded. I used a thin ply base for the upper box base and formed the cardboard around that. The thin ply was necessary to allow compression of that base to the thicker ply piece that joined the tubes (which you can see in the pic just above the inserted nozzle); a simple cardboard base would likely deform if I tried to compress it, allowing gaps that leak suction.
And the final product?
Bigger?
This one too?
I learned some lessons after my first assembled cut run. First of all, I should have used either a lot more layers of cardboard on the plenum box, or inserted a top plywood support form. The suction, though from a simple and small vac, managed to crush the box.
More collapse for you?
Like the box itself, I buckled and added even more structure to the ceiling and walls with glued bits of plywood. Though I liked the light weight and simplicity of a self-formed box of layered cardboard, I wasn't willing through trial and error to discover exactly how many layers would be required before I found the perfect number. Oh, and what if I eventually have to replace my shop vac and upgrade to one with a stronger suction? My trial and error could be tested anew, and with it my patience. More wood proved far easier.
There's another issue with the plenum box; I discovered it to be the first place for dust that follows the airflow to gather. Lots and lots of dust can jamb into the nooks and crannies offered in every corner. And lots and lots of that dust can fall out when I break the assembly down for cleaning. Since the assembly is just at eye level, you can imagine what happened when I lifted the box from the tubes and ever so briefly held it just above my head to have a look down the tube. . . .
Sadly, eliminating those nooks and crannies would require far more effort than I am willing to expend. Maybe down the line I'll make a second plenum box with a formed and shaped interior that allows dust to slide safely down the right hole with just a gentle tap.
Also, we must remember that cardboard is hydrophilic, meaning that it likes to suck up water. Anyone who's tried to pick a heavily laden cardboard box off a wet floor has learned that lesson the messy, if not disastrous way. Water will wick into the fibers of the board from any convenient source, even from damp air. Since in my first run with this setup I decided to cut wood found not from milled and kiln-dried sources (like construction remains) but wood from recently felled trees and limbs, I discovered that the wet stuff will stick.
Look at that clog!
Actually, two things are happening here. One is what I mentioned above, where a bit of wet dust, left to settle for a few minutes, transfers a bit of its water to the lining of the cone and sticks. Later pieces, stopped by those first few motes, start a mini log jam. Second, despite the log jam, you'll notice there is still a path through, and that it kinda makes a swirly pattern. This tells me that air is leaking from the collector box. Even a slight flow upward will order the dust as we see. On one hand, this keeps a path for dust to follow rather than simply sticking to the cone sides and blocking the tip. Sadly, though, it means less dust falls and more gathers closer to the suction, meaning in and near the disposable filter. I had to do a bit of caulking after I made this discovery, finding air leaks in the collector box with a lit stick of incense. Where the smoke was drawn, I gooped.
Ah, but what of the hydrophilia? Yesterday I applied the first of at least three layers of polyurethane to the inside of the cone. This should give the inner cone the slickness and non-stickiness the factory-installed layer of something shiny gives to the concrete form tubes.
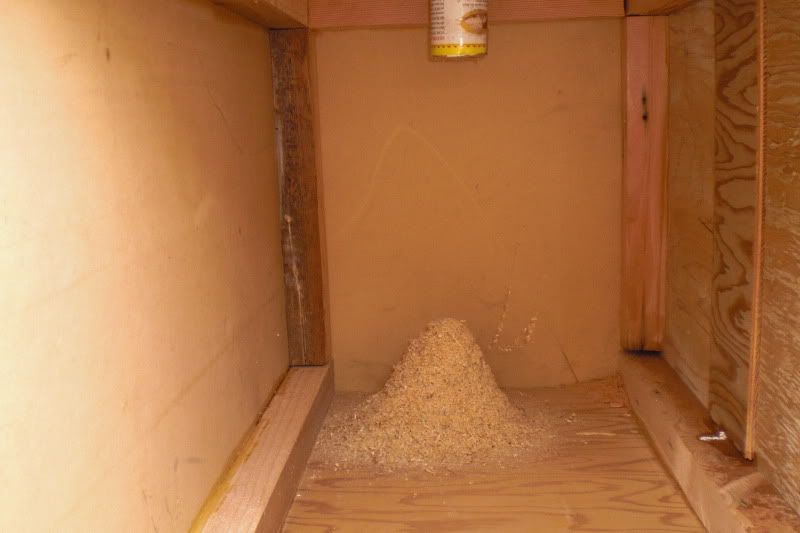
Still, observe the success!
A Closer Look at a Successful Pile of Dust!
Seeing that just made me happy.
Folks, this design works. Given that most of the wood, glue and cardboard was just lying around already, I added just a few bucks to my original design but got from the final a world of improvement. There are a few more additions to make. For example, Mr. Pentz notes that, to be truly effective, the cone and tube should be wider, the suction must be greater and exhausted outside the shop. I might punch a hole in my garage later for this vent, but I luckily have the advantage of moving a lot of cutting projects outside.
Still, take heart. With some extra time instead of extra money, you too could cut and glue your way to a better dust collector.
I send my thanks to albionwood for turning me on to Mr. Pentz's work, and to Mr. Pentz himself for making the plans available.