Icon Tutorial - Marion Raven
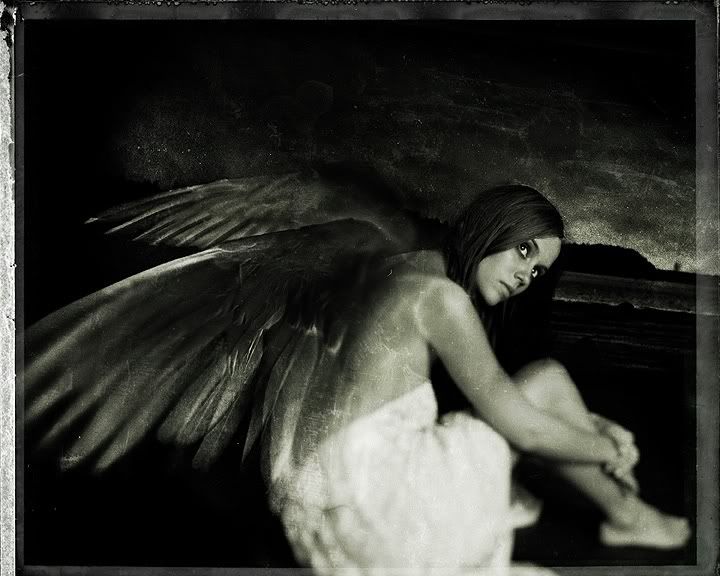
I chose this picture of Marion Raven. We'll get to this: 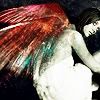
First of all, select your area and crop it down/resize down to 100x100 pixels. I chose a wider cropping, to concentrate mainly on the wings in the picture, and sharpened it. I liked the cropping/sharpening, because it washes out her eyes, making her look hollow-eyed. (let's assume from here out that everyone understands i'm strange and leave it at that, shall we?)
I had wanted the picture brighter, so I duplicated the background layer twice, set the middle one to 'screen' and the top one to 'soft light'.
I took this texture by ~sparkling-eye and set it to screen.
Now, I want the colors to only really be over her wings(and tiny wispies behind her), so next I grabbed a soft-edge brush, and started carefully erasing around the wings. If you need to, turn down the opacity on the light texture layer so you can see more clearly the image beneath that you need to edge around, then when you're done, simply kick it back up to 100%.
This leaves tiny sparklies down from the wings and her hair, which I liked the effect of, so they stayed. I also turned up the color saturation on the texture layer. image>adjustments>hue/saturation
I just kicked it up to +20.
Making a new layer above the light texture layer, and setting it to exclusion, I took another soft-edge brush, and colored around the edges of the picture, only in the background of her. I used a dark blue, #03062D.
From here you can do whatever you'd like, add text, brushes, etc. I didn't think the picture needed it, personally, but yours might! And that's it!