#16 - Angel Tutorial
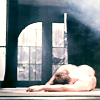
Going from:

to
Translatable. No selective coloring or curves.
Begin with base:
Create a new layer filled with #faddba and set the layer to MULTIPLY 100%:

>
Now, duplicate the base, drag to the top, and DESATURATE it. Set the layer to SCREEN (the opacity depends on your icon, although I recommend changing it at the end of the tutorial). My icon's SCREEN layer is at 78%:

Duplicate the DESATURATED layer and set that layer to SOFTLIGHT 100%:

Create a new layer filled with #ffe1bd and set the layer to MULTIPLY 54%:

>
Create a new layer filled with #f9cde0 and set the layer to SOFTLIGHT 59%:

>
Now, duplicate the base, drag it to the top, and set the layer to SOFTLIGHT 100% (please note that this layer is NOT DESATURATED):

Now, go to Layers>New Adjustment Layer>BRIGHTNESS/SATURATION and enter in:
BRIGHTNESS: 10
CONTRAST: 5

Go to Layers>New Adjustment Layer>COLORBALANCE and enter in:
MIDTONES: -6, -10, 6
SHADOWS: -26, 29, 17
NO HIGHLIGHTS
And it's done!
Now, since every icon is different, you may want to duplicate some of the duplicated base SCREEN or SOFTLIGHT layers. Or, at the beginning, you can always duplicate the base (and don't desaturate) and set that layer to SCREEN at the very beginning. It all depends on your picture! Try a lot of things to see how it comes out!
Other examples:


I love comments and results, and questions are always welcome!
-Kelsey
to
Translatable. No selective coloring or curves.
Begin with base:
Create a new layer filled with #faddba and set the layer to MULTIPLY 100%:
>
Now, duplicate the base, drag to the top, and DESATURATE it. Set the layer to SCREEN (the opacity depends on your icon, although I recommend changing it at the end of the tutorial). My icon's SCREEN layer is at 78%:
Duplicate the DESATURATED layer and set that layer to SOFTLIGHT 100%:
Create a new layer filled with #ffe1bd and set the layer to MULTIPLY 54%:
>
Create a new layer filled with #f9cde0 and set the layer to SOFTLIGHT 59%:
>
Now, duplicate the base, drag it to the top, and set the layer to SOFTLIGHT 100% (please note that this layer is NOT DESATURATED):
Now, go to Layers>New Adjustment Layer>BRIGHTNESS/SATURATION and enter in:
BRIGHTNESS: 10
CONTRAST: 5
Go to Layers>New Adjustment Layer>COLORBALANCE and enter in:
MIDTONES: -6, -10, 6
SHADOWS: -26, 29, 17
NO HIGHLIGHTS
And it's done!
Now, since every icon is different, you may want to duplicate some of the duplicated base SCREEN or SOFTLIGHT layers. Or, at the beginning, you can always duplicate the base (and don't desaturate) and set that layer to SCREEN at the very beginning. It all depends on your picture! Try a lot of things to see how it comes out!
Other examples:
I love comments and results, and questions are always welcome!
-Kelsey