Art Tutorial II - Full Body Robin
To reiterate from last time -
1. I usually doodle with random starting points (i.e. I'll sometimes start with the head or body or feet first);
2. I'm a remarkably inconsistent sketcher; and
3. I didn't want to do a tutorial that *I* would get frustrated with if I were trying to follow. I've looked at one too many tutorials where I couldn't figure out how the artist got from point A to point B.
I know this isn't perfect. I'm not a perfect artist (duh), so any and all criticisms are welcome and wanted.
My methodology was straight forward - I sat down and every time I added a little to the doodle, I stopped and scanned. I will try to be as detailed as possible in each step's commentary.
For visibility purposes - I'm going to use colored pencil for each tutorial. Next up: General Head Study.
If you would like to see something more - please comment.
WARNING: GRAPHIC INTENSIVE
Part I: The Head (I started with the head for both cuz it seems to be the easiest method to determine perspective and proportion)

Step 1. The Facial outline (again it's somewhat to the side - but more so than Raven's) can be versatile. I've decided on an older, more manly Robin hence his brow line is angular, forehead straight, and chin squared.
Step 2. Again, use your cross lines (here the horizontal line indicates the BROW LINE, NOT THE EYE LINE) to guide the facial features and remember to curve the lines to create dimension. The face is not a flat plane. Here, Robin's eyes will be level rather than looking up or down, so there's a subtle up-curve to reference the peak of his brow (RATHER THAN HIS EYES) in relation to the eye line. The center line is curved to the left because his face is turned to the left.

Step 3. Taking a note from the animated series, Nightwing has a very straight, pointed nose. Start at the brow, a wee bit above and to the left of where your cross lines connect and curve inward so that the very top of the bridge begins at the cross line and flows out towards the left cheek. You want the initial curve to be just under and not quite parallel to the brow curve of the facial outline because you have to make room for the curvature of the eye brow.
Step 4. The mouth here is grinning. Despite common misconception, everyone smiles in a different way. I wanted Robin to look a bit cocky, so his mouth is almost a straight line - slightly curved down through the central lip line only to curve up at the very edge. A tiny triangle just below the mouth demarcates the indention of the chin.
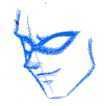
Step 5. Because Robin has not made that transition to Nightwing just yet, he still has his domino mask. You might note that the mask does not rest ON the eye line. Rather, it dips a little BELOW the eye line. For the top of the domino mask, follows the horizontal guideline - use the facial outline as a reference. The left side of the domino mask should appear barely thinner than the right. The mask comes to an central apex at the nose. Remember to make a smooth curve at the underside to account for the projection of the nose bridge.
Step 6. To add to his expression, you might want to add a few accents such as a few lines to indicate drawing of the brows or maybe a wrinkle between the brows depending on what mood you want to communicate.
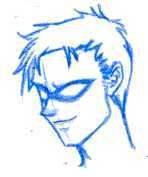
Step 7. The HAIR. I've decided to TOTALLY IGNORE Robin's hairstyle on the series. I would hope that as he grew older, he'd get that the more product you use does not a better hairstyle make. Here his hair is cropped closer to his skull (again, if you need to, outline the entire skull - it should curve up and out) with some longer strands falling across his forehead. HAVE FUN with it - if you want to make his hair long, go wild.
Step 8. For men, I usually draw a bit of a sideburn in order to help me decide where the ear falls - however, a good rule of thumb is that the ears are usually parallel to the eyes. I can't really explain HOW to draw ears because this is the one place where there is so much detail yet you can create the illusion of detail with only a few lines. The ear should meet the edge of the jaw line or - if you decide not to draw the entire jaw line like I have here, it should APPEAR to meet it.
Note: My advice is to look at someone's ear and try to duplicate what you see as best you can; but if you want to simplify the outer ear and give teh illusion of detail, simply draw a top heavy cursive 3 with a little loop at the bottom for the ear hole. IF it's the right ear, the 3 will be backwards.
Step 9: The neck is slightly angled forward and the lines accomodate the perspective by coming down from the chin and flowing out from the hair line. Note that the Adam's apple is like a backwards comma. Always remember the your neck is the SAME WIDTH as your head. It is an optical illusion that it is thinner and somehow men always seem to have thick necks compared to women.
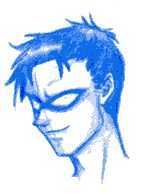
Step 10: Shading. The hair is dark - of course. Keep in mind your light source and go from there. Also note the line referencing the connection between the neck and collar bone. This is an important line since it can help you locate the line of the shoulder.
Part II: The Torso
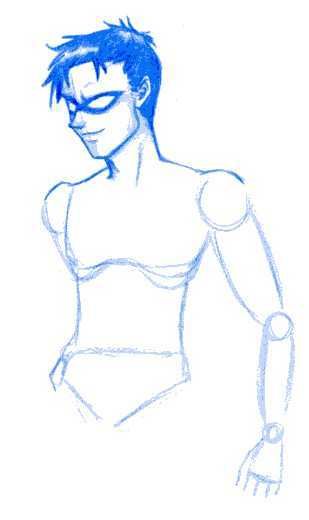
Step 11. Outlining the male body is - obviously - a bit different than outlining a female. First of all, think of the male body as a large upside down triangle whereas a female is an hourglass. The male body is broad up top and thin of hip. Start by oulining the ribs - also note that I layered the ribs somewhat to help me define musculature. The outline should then flow down to create a sort of cylindrical abdomen while the pelvis is only VERY SLIGHTLY wider than the waist.
Step I2. The arms you'll outline along the same lines as how we outlined Raven's. A circle for each shoulder (size according to preference, I like my men big but not bulky so a good rule of thumb is about HALF the size of the head) and elbow joint, elliptial references for for the upper and lower arms, circle for the wrist, and a rectangular palm outline. Here Robin's left elbow is shifted back so all you see his part of his shoulder and the thumb of his left hand on his hip. The right arm is hanging out from his side. The fingers of the right hand are SHORT because he will be fisting his hand.
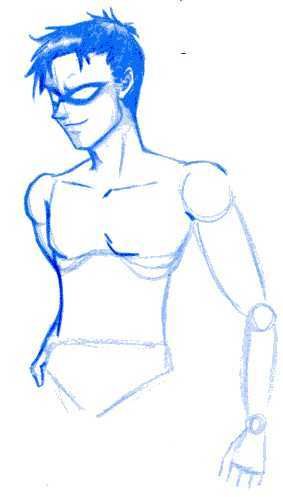
Step 13. Draw the clavicles to reinforce the line of the shoulders. Also, refine his left side and chest using your outlines. Unlike female breasts which are conical and round at the same time, male breasts are usually depicted as squared.
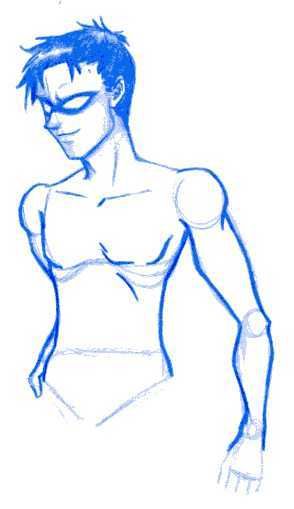
Step 14. Refine the right side and right arm. The shape of a muscled arm should be tightly curved to give the illusion of angularity.
Step 15. Feel free to add more detail to the chest and abdomen. I chose to be economical here. But if you want to make him so ripped that his uniform molds perfectly to his abs and obliques, be my guest ^_~
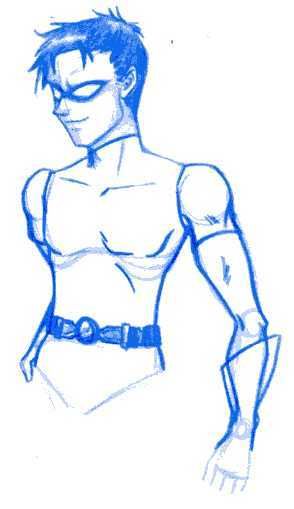
Step 16. Robin's utility belt is insanely shaped, I tried to get it as close to the actual animated one as possible though it's admittedly undersized . . . and shaded XD
Step 17. Prepare his costume - turtleneck, gloves, and sleeves. His gloves are not quite elbow length and they seem to flow AWAY from the arm and into a wicked pointed flare. Here his sleeves are fitted to his shoulder and bicep. I also took the opportunity to detail said bicep as well as the shoulder muscle.
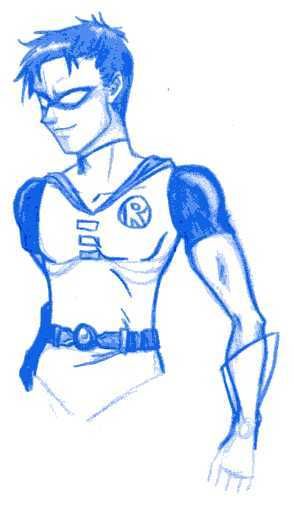
Step 18. Robin's cape seems to be little more than a v neck collar here, but that will change as we get further into this. Color in his sleeves but remember that they're made of a reflective material. Shade in his left arm/hand (what you can see of it) to indicate his green glove. Also add in other details of his uniform - the R badge and fasteners. See a reference pic of him if you need to.
Step 19. Note that I added a little detail to his pelvic region - he always seems to have a little bit of room at the waist.

Step 20. Shade the shirt, badge, neck, and what we have of the cape. Also, I decided to define the abdominal muscles. If you don't feel comfortable or you're not sure how the muscles come together, keep it simple. The fangirl imagination will fill in the blanks.
Part III. The Lower Body
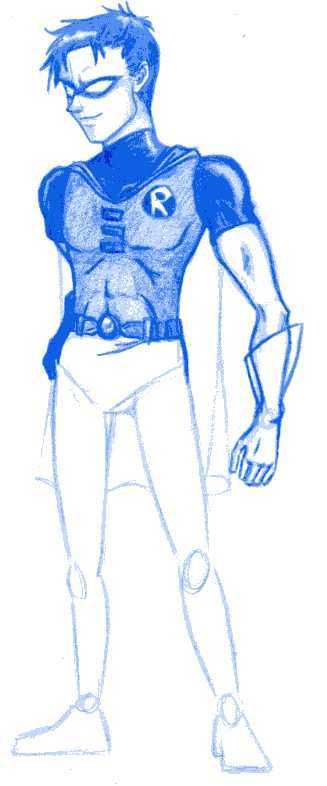
Step 22. Refine the hand. Again, hands are usually the most difficult thing to draw. Practice by modeling your own hand or watching someone else's. Practice, practice, practice. And used your guidelines.
Step 21. Outline the legs. You might notice that the positioning of the legs is very similar to what we did with Raven; however, since Robin's a guy, his stance is a lot wider. Also, male legs usually flow straight down from the hips, whereas women's - who have wider, curvier hips - outer legs curve in while the inner thighs fall straight. Again use circles for the knees (the right knee should appear high and out than while the left will be lower and turned left) and ankles. The left foot is turned out while the right is turned very slightly to the right, just enough that you can see the very edge of the heel.
Step 22: Outline the cape - it should fall in line with the draping over the shoulders. Robin's cape is short, but you can vary length however you like according to your preference. As always, have fun with it.
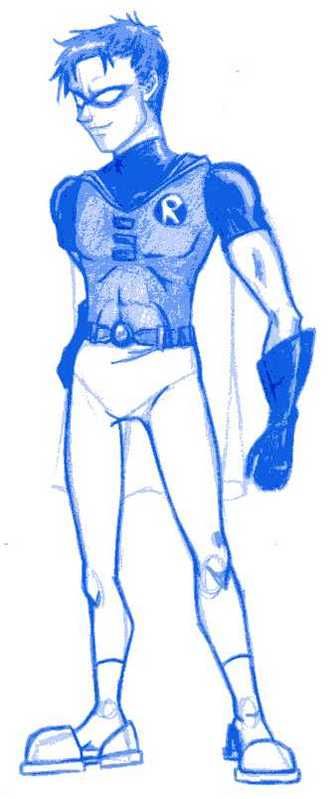
Step 23. Color in the left glove and try to highlight the knuckles to indicate where the fingers are. Refine the legs, mostly following your outline but - again, hard curves to indicate the musculature. Notice how the left knee appears significantly lower because of how the right one is outlined. Always remember that your knee caps are shaped like an upside down triangle and keep in mind that the knee should ALWAYS point toward the toes. Since Robin's right foot is angled slightly right, so is his knee. Note the crease detail at the right groin, this creates the illusion that the left hip is jutting out a bit and gives the viewer a sense of weight distribution.
Step 24. Robin seems to wear black socks (or maybe some sort of ankle supportive material?) over his feet with the steel casing around his toes and heels. Please see a reference pic of Robin if you're not sure how it should look. And remember that the right foot is flat but turned at an angle. The heel should appear slightly lifted from the ball of the foot to create dimension.
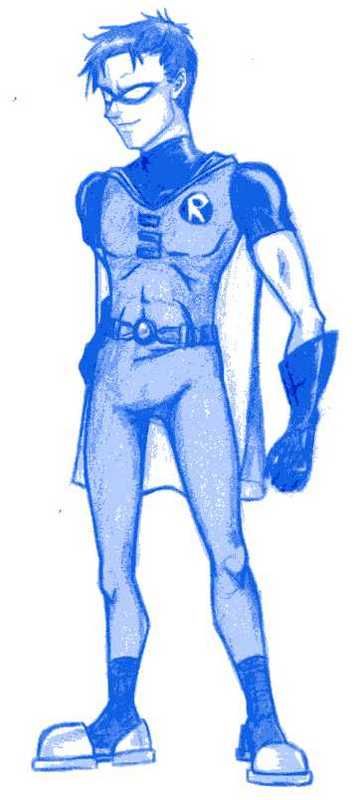
Step 25. Shade the legs, feet and cape. The interior of the cape is light because it's yellow ^_^ And remember that the steel foot casing is metal - reflective.
AND YOU'RE DONE!!! CONGRATS!!
- Kysra
1. I usually doodle with random starting points (i.e. I'll sometimes start with the head or body or feet first);
2. I'm a remarkably inconsistent sketcher; and
3. I didn't want to do a tutorial that *I* would get frustrated with if I were trying to follow. I've looked at one too many tutorials where I couldn't figure out how the artist got from point A to point B.
I know this isn't perfect. I'm not a perfect artist (duh), so any and all criticisms are welcome and wanted.
My methodology was straight forward - I sat down and every time I added a little to the doodle, I stopped and scanned. I will try to be as detailed as possible in each step's commentary.
For visibility purposes - I'm going to use colored pencil for each tutorial. Next up: General Head Study.
If you would like to see something more - please comment.
WARNING: GRAPHIC INTENSIVE
Part I: The Head (I started with the head for both cuz it seems to be the easiest method to determine perspective and proportion)

Step 1. The Facial outline (again it's somewhat to the side - but more so than Raven's) can be versatile. I've decided on an older, more manly Robin hence his brow line is angular, forehead straight, and chin squared.
Step 2. Again, use your cross lines (here the horizontal line indicates the BROW LINE, NOT THE EYE LINE) to guide the facial features and remember to curve the lines to create dimension. The face is not a flat plane. Here, Robin's eyes will be level rather than looking up or down, so there's a subtle up-curve to reference the peak of his brow (RATHER THAN HIS EYES) in relation to the eye line. The center line is curved to the left because his face is turned to the left.

Step 3. Taking a note from the animated series, Nightwing has a very straight, pointed nose. Start at the brow, a wee bit above and to the left of where your cross lines connect and curve inward so that the very top of the bridge begins at the cross line and flows out towards the left cheek. You want the initial curve to be just under and not quite parallel to the brow curve of the facial outline because you have to make room for the curvature of the eye brow.
Step 4. The mouth here is grinning. Despite common misconception, everyone smiles in a different way. I wanted Robin to look a bit cocky, so his mouth is almost a straight line - slightly curved down through the central lip line only to curve up at the very edge. A tiny triangle just below the mouth demarcates the indention of the chin.

Step 5. Because Robin has not made that transition to Nightwing just yet, he still has his domino mask. You might note that the mask does not rest ON the eye line. Rather, it dips a little BELOW the eye line. For the top of the domino mask, follows the horizontal guideline - use the facial outline as a reference. The left side of the domino mask should appear barely thinner than the right. The mask comes to an central apex at the nose. Remember to make a smooth curve at the underside to account for the projection of the nose bridge.
Step 6. To add to his expression, you might want to add a few accents such as a few lines to indicate drawing of the brows or maybe a wrinkle between the brows depending on what mood you want to communicate.

Step 7. The HAIR. I've decided to TOTALLY IGNORE Robin's hairstyle on the series. I would hope that as he grew older, he'd get that the more product you use does not a better hairstyle make. Here his hair is cropped closer to his skull (again, if you need to, outline the entire skull - it should curve up and out) with some longer strands falling across his forehead. HAVE FUN with it - if you want to make his hair long, go wild.
Step 8. For men, I usually draw a bit of a sideburn in order to help me decide where the ear falls - however, a good rule of thumb is that the ears are usually parallel to the eyes. I can't really explain HOW to draw ears because this is the one place where there is so much detail yet you can create the illusion of detail with only a few lines. The ear should meet the edge of the jaw line or - if you decide not to draw the entire jaw line like I have here, it should APPEAR to meet it.
Note: My advice is to look at someone's ear and try to duplicate what you see as best you can; but if you want to simplify the outer ear and give teh illusion of detail, simply draw a top heavy cursive 3 with a little loop at the bottom for the ear hole. IF it's the right ear, the 3 will be backwards.
Step 9: The neck is slightly angled forward and the lines accomodate the perspective by coming down from the chin and flowing out from the hair line. Note that the Adam's apple is like a backwards comma. Always remember the your neck is the SAME WIDTH as your head. It is an optical illusion that it is thinner and somehow men always seem to have thick necks compared to women.

Step 10: Shading. The hair is dark - of course. Keep in mind your light source and go from there. Also note the line referencing the connection between the neck and collar bone. This is an important line since it can help you locate the line of the shoulder.
Part II: The Torso

Step 11. Outlining the male body is - obviously - a bit different than outlining a female. First of all, think of the male body as a large upside down triangle whereas a female is an hourglass. The male body is broad up top and thin of hip. Start by oulining the ribs - also note that I layered the ribs somewhat to help me define musculature. The outline should then flow down to create a sort of cylindrical abdomen while the pelvis is only VERY SLIGHTLY wider than the waist.
Step I2. The arms you'll outline along the same lines as how we outlined Raven's. A circle for each shoulder (size according to preference, I like my men big but not bulky so a good rule of thumb is about HALF the size of the head) and elbow joint, elliptial references for for the upper and lower arms, circle for the wrist, and a rectangular palm outline. Here Robin's left elbow is shifted back so all you see his part of his shoulder and the thumb of his left hand on his hip. The right arm is hanging out from his side. The fingers of the right hand are SHORT because he will be fisting his hand.

Step 13. Draw the clavicles to reinforce the line of the shoulders. Also, refine his left side and chest using your outlines. Unlike female breasts which are conical and round at the same time, male breasts are usually depicted as squared.

Step 14. Refine the right side and right arm. The shape of a muscled arm should be tightly curved to give the illusion of angularity.
Step 15. Feel free to add more detail to the chest and abdomen. I chose to be economical here. But if you want to make him so ripped that his uniform molds perfectly to his abs and obliques, be my guest ^_~

Step 16. Robin's utility belt is insanely shaped, I tried to get it as close to the actual animated one as possible though it's admittedly undersized . . . and shaded XD
Step 17. Prepare his costume - turtleneck, gloves, and sleeves. His gloves are not quite elbow length and they seem to flow AWAY from the arm and into a wicked pointed flare. Here his sleeves are fitted to his shoulder and bicep. I also took the opportunity to detail said bicep as well as the shoulder muscle.

Step 18. Robin's cape seems to be little more than a v neck collar here, but that will change as we get further into this. Color in his sleeves but remember that they're made of a reflective material. Shade in his left arm/hand (what you can see of it) to indicate his green glove. Also add in other details of his uniform - the R badge and fasteners. See a reference pic of him if you need to.
Step 19. Note that I added a little detail to his pelvic region - he always seems to have a little bit of room at the waist.

Step 20. Shade the shirt, badge, neck, and what we have of the cape. Also, I decided to define the abdominal muscles. If you don't feel comfortable or you're not sure how the muscles come together, keep it simple. The fangirl imagination will fill in the blanks.
Part III. The Lower Body

Step 22. Refine the hand. Again, hands are usually the most difficult thing to draw. Practice by modeling your own hand or watching someone else's. Practice, practice, practice. And used your guidelines.
Step 21. Outline the legs. You might notice that the positioning of the legs is very similar to what we did with Raven; however, since Robin's a guy, his stance is a lot wider. Also, male legs usually flow straight down from the hips, whereas women's - who have wider, curvier hips - outer legs curve in while the inner thighs fall straight. Again use circles for the knees (the right knee should appear high and out than while the left will be lower and turned left) and ankles. The left foot is turned out while the right is turned very slightly to the right, just enough that you can see the very edge of the heel.
Step 22: Outline the cape - it should fall in line with the draping over the shoulders. Robin's cape is short, but you can vary length however you like according to your preference. As always, have fun with it.

Step 23. Color in the left glove and try to highlight the knuckles to indicate where the fingers are. Refine the legs, mostly following your outline but - again, hard curves to indicate the musculature. Notice how the left knee appears significantly lower because of how the right one is outlined. Always remember that your knee caps are shaped like an upside down triangle and keep in mind that the knee should ALWAYS point toward the toes. Since Robin's right foot is angled slightly right, so is his knee. Note the crease detail at the right groin, this creates the illusion that the left hip is jutting out a bit and gives the viewer a sense of weight distribution.
Step 24. Robin seems to wear black socks (or maybe some sort of ankle supportive material?) over his feet with the steel casing around his toes and heels. Please see a reference pic of Robin if you're not sure how it should look. And remember that the right foot is flat but turned at an angle. The heel should appear slightly lifted from the ball of the foot to create dimension.

Step 25. Shade the legs, feet and cape. The interior of the cape is light because it's yellow ^_^ And remember that the steel foot casing is metal - reflective.
AND YOU'RE DONE!!! CONGRATS!!
- Kysra