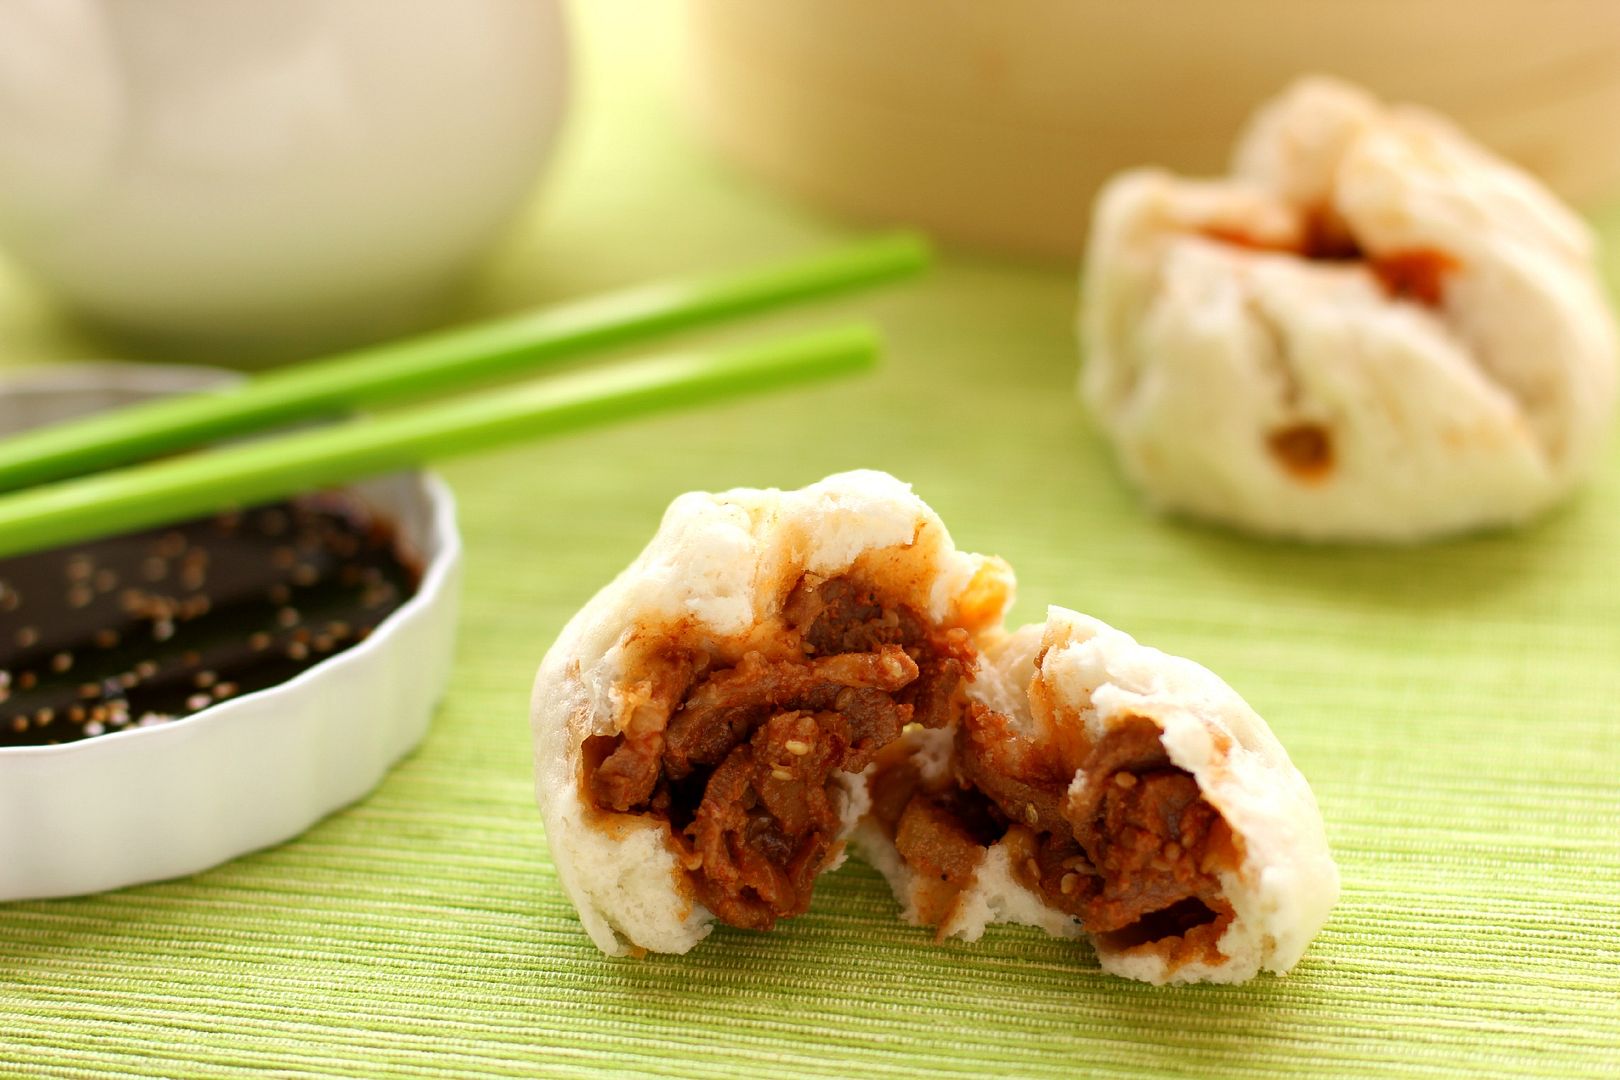
Pork Bulgogi Bāozi (Steamed Korean BBQ Buns)
Korean BBQ, or bulgogi, is a delicious combination of salty, sweet, and spicy. Bulgogi combines the spice of Korean Pepper Paste with sultry sesame, fruity Korean pear, and garlic. It's amazing served over rice, but even better stuffed inside these slightly sweet, light-as-a-feather steamed buns.
I did lots of legwork for this recipe, trying multiple bun recipes and tweaking quantities until they were just right. It took me three tries to make the perfect bāozi, but this version really is the tops. I can honestly say that pulling my Fluffy McFluffypants buns out of my new bamboo steamer was one of my proudest kitchen moments to date. Even better, these buns were one of my most delicious kitchen moments to date!
It may require an initial investment to begin cooking and enjoying Asian food if you aren’t used to doing so (I had to buy soy sauce, rice wine, rice vinegar, Korean pepper paste, sesame oil, sesame seeds, and potato starch to stock my pantry). But these ingredients can be used over and over again, and meals like this are so worth the investment! If you don't have a steamer, here's an easy way to make one.
Anyway, the point is: you should make these. You should really, truly, definitely make these.

Pork Bulgogi Bāozi (Steamed Korean BBQ Buns)
Recipe by: Willow Bird Baking with bun recipe adapted from Rasa Malaysia and bulgogi recipe adapted from Food.com
Yield: 12 pork bulgogi buns
Bun Ingredients*:
8 grams instant dry yeast
160 milliliters lukewarm water
½ teaspoon white vinegar
280 grams low-protein flour (Hong Kong Flour or Cake Flour)
100 grams wheat or potato starch (I used potato)
100 grams icing sugar
30 grams shortening
10 grams baking powder
10 milliliters cold water
*I measured the bun ingredients by weight for accuracy. You can convert them to imperial measures using an online calculator, but I'd use weights if you can.
Pork Bulgogi Ingredients:
1 pound pork loin (cut into thin, wide slices)
5 tablespoons soy sauce
2 cloves garlic, minced
2 sprigs green onions, chopped
1/2 yellow onion, sliced
2 tablespoons McCormick toasted sesame seeds
black pepper
1 tablespoon and 1 1/2 teaspoons honey
2 1/2 - 4 tablespoons Korean red pepper paste (gochujang)
1 tablespoon McCormick red pepper flakes
1 1/2 teaspoons sesame oil
1 teaspoon vegetable oil for cooking
1/2 cup chopped Korean pear
Sauce Ingredients:
1 tablespoon + 1/4 teaspoon soy sauce
1 1/2 teaspoons honey
1 1/2 teaspoons sweet soy sauce
1 1/4 teaspoons sesame oil
1 teaspoon Korean red pepper paste (gochujang)
3/4 teaspoon rice vinegar
1/4 teaspoon packed brown sugar
1/4 teaspoon McCormick toasted sesame seeds
chopped green onions
Directions:
Make Pork Bulgogi: Whisk together marinade ingredients (soy sauce, garlic, green onions, onion, sesame seeds, pepper, honey, pepper paste, and pepper flakes) and toss pork in marinade. Cover and let the pork marinate overnight in the refrigerator (for at least 8 hours).
Heat a skillet over medium heat and add vegetable oil. When oil is shimmery, add some of the pork mixture (don't crowd the pan -- I cooked about 4 slices at a time) and cook, turning occasionally, for about 5 minutes or until brown and done. Remove this pork to a cutting board. Cut all pork into small bite-sized pieces and place it in a bowl. Toss in chopped Korean pear.
Make Sauce: Whisk all sauce ingredients together except green onions. Pour about half of the sauce over your pork bulgogi (you want it lightly coated, not swimming in the sauce) and reserve the other half (with green onions sprinkled in) for dipping.
Make bāozi: Sift together the flour, wheat or potato starch, and powdered sugar into a mixing bowl. Make a well in the center and gently combine the yeast, vinegar, and warm water in the well. Let this sit and proof for around 10 minutes before slowly mixing in the surrounding flour mixture bit by bit, forming a dough. Add in the shortening and then knead (on a KitchenAid mixer at about speed 4-6, knead for about 4 minutes; by hand, knead for about 10 minutes) until the dough is smooth and elastic. It shouldn't be sticky to the touch.
Transfer the dough to a bowl lightly coated with vegetable oil. Cover it with a damp cloth and place it somewhere warm to rise (I always put mine into an oven that has been warmed for a few minutes and then left open to drop to just above room temperature) for 30 minutes. I never noticed too much rise, so don't worry if it doesn't seem like a huge difference.
After 30 minutes, dissolve the baking powder completely in the water and sprinkle this mixture over the bao dough. Knead it in to fully combine it (I used the dough to mop up any of the mixture that was still on the bowl and kneaded it in well -- an uneven distribution of baking powder can cause discoloration of your buns). Recover the dough and let it rest for 10 more minutes.
Turn the dough out onto wax paper and pat it into an even width. Use a dough cutter or sharp knife to divide it into 12 roughly equal sections. Take one section and gently roll it out to about 1/4 inch thick with a rolling pin (I keep the sections I'm not working with covered with a damp cloth so they don't dry out.) Holding the dough in your non-dominant hand, place the pork bulgogi filling in the center and carefully pleat the edges of the dough together at the top, turning the bun as you work, until it is fully closed (see the video below for a demonstration of to shape the buns -- and jokes about the word 'buns,' of course). Place each bun on a square of wax or parchment paper.
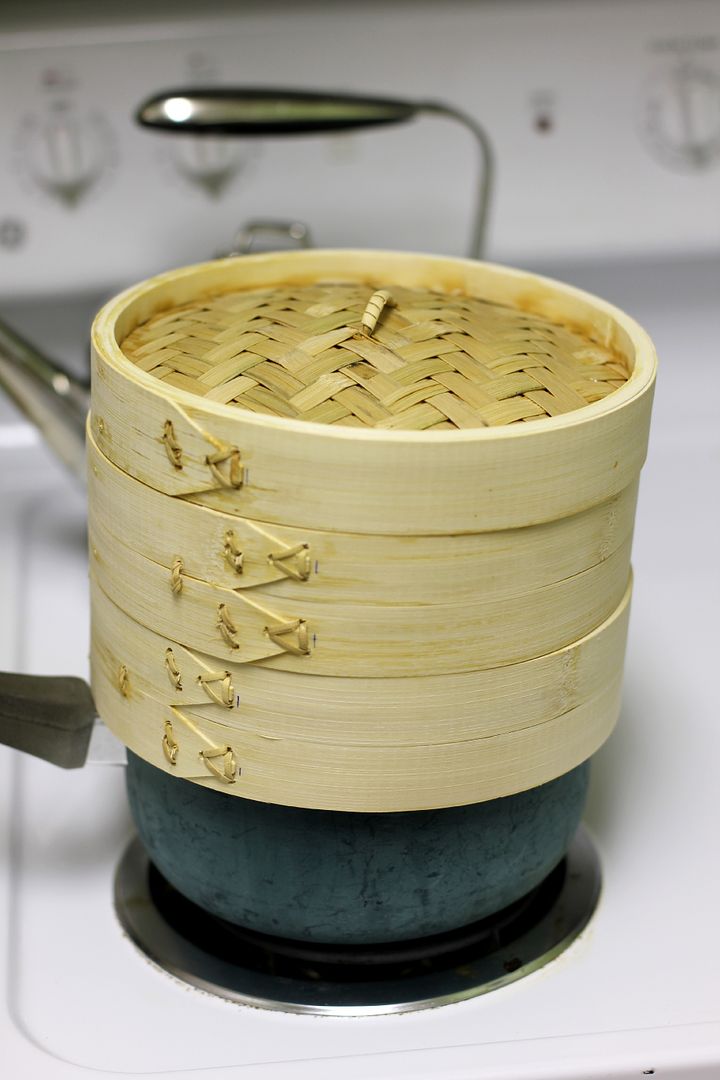
Preheat your steamer: Boil water and a teaspoon of vinegar over medium-high heat in a saucepan with your steamer on top (here's a photo of how your steamer setup should look). Preheating the steamer ensures your buns will fully rise. Once it's steaming, place buns in each tier (being careful not to crowd them), spray them with a bit of water, and close the steamer. Cook for 12 minutes without opening the lid. Remove the buns to a cooling rack to let them cool. Serve warm with reserved dipping sauce.
To see my video tutorial on how to shape your buns (LOL!) complete with lots of sophomoric bun jokes, read about my terrifying first experience with dim sum, and see more photos of these buns, please head over to Willow Bird Baking!
x-posted to food_porn, cooking, picturing_food, and cookingupastorm
I did lots of legwork for this recipe, trying multiple bun recipes and tweaking quantities until they were just right. It took me three tries to make the perfect bāozi, but this version really is the tops. I can honestly say that pulling my Fluffy McFluffypants buns out of my new bamboo steamer was one of my proudest kitchen moments to date. Even better, these buns were one of my most delicious kitchen moments to date!
It may require an initial investment to begin cooking and enjoying Asian food if you aren’t used to doing so (I had to buy soy sauce, rice wine, rice vinegar, Korean pepper paste, sesame oil, sesame seeds, and potato starch to stock my pantry). But these ingredients can be used over and over again, and meals like this are so worth the investment! If you don't have a steamer, here's an easy way to make one.
Anyway, the point is: you should make these. You should really, truly, definitely make these.
Pork Bulgogi Bāozi (Steamed Korean BBQ Buns)
Recipe by: Willow Bird Baking with bun recipe adapted from Rasa Malaysia and bulgogi recipe adapted from Food.com
Yield: 12 pork bulgogi buns
Bun Ingredients*:
8 grams instant dry yeast
160 milliliters lukewarm water
½ teaspoon white vinegar
280 grams low-protein flour (Hong Kong Flour or Cake Flour)
100 grams wheat or potato starch (I used potato)
100 grams icing sugar
30 grams shortening
10 grams baking powder
10 milliliters cold water
*I measured the bun ingredients by weight for accuracy. You can convert them to imperial measures using an online calculator, but I'd use weights if you can.
Pork Bulgogi Ingredients:
1 pound pork loin (cut into thin, wide slices)
5 tablespoons soy sauce
2 cloves garlic, minced
2 sprigs green onions, chopped
1/2 yellow onion, sliced
2 tablespoons McCormick toasted sesame seeds
black pepper
1 tablespoon and 1 1/2 teaspoons honey
2 1/2 - 4 tablespoons Korean red pepper paste (gochujang)
1 tablespoon McCormick red pepper flakes
1 1/2 teaspoons sesame oil
1 teaspoon vegetable oil for cooking
1/2 cup chopped Korean pear
Sauce Ingredients:
1 tablespoon + 1/4 teaspoon soy sauce
1 1/2 teaspoons honey
1 1/2 teaspoons sweet soy sauce
1 1/4 teaspoons sesame oil
1 teaspoon Korean red pepper paste (gochujang)
3/4 teaspoon rice vinegar
1/4 teaspoon packed brown sugar
1/4 teaspoon McCormick toasted sesame seeds
chopped green onions
Directions:
Make Pork Bulgogi: Whisk together marinade ingredients (soy sauce, garlic, green onions, onion, sesame seeds, pepper, honey, pepper paste, and pepper flakes) and toss pork in marinade. Cover and let the pork marinate overnight in the refrigerator (for at least 8 hours).
Heat a skillet over medium heat and add vegetable oil. When oil is shimmery, add some of the pork mixture (don't crowd the pan -- I cooked about 4 slices at a time) and cook, turning occasionally, for about 5 minutes or until brown and done. Remove this pork to a cutting board. Cut all pork into small bite-sized pieces and place it in a bowl. Toss in chopped Korean pear.
Make Sauce: Whisk all sauce ingredients together except green onions. Pour about half of the sauce over your pork bulgogi (you want it lightly coated, not swimming in the sauce) and reserve the other half (with green onions sprinkled in) for dipping.
Make bāozi: Sift together the flour, wheat or potato starch, and powdered sugar into a mixing bowl. Make a well in the center and gently combine the yeast, vinegar, and warm water in the well. Let this sit and proof for around 10 minutes before slowly mixing in the surrounding flour mixture bit by bit, forming a dough. Add in the shortening and then knead (on a KitchenAid mixer at about speed 4-6, knead for about 4 minutes; by hand, knead for about 10 minutes) until the dough is smooth and elastic. It shouldn't be sticky to the touch.
Transfer the dough to a bowl lightly coated with vegetable oil. Cover it with a damp cloth and place it somewhere warm to rise (I always put mine into an oven that has been warmed for a few minutes and then left open to drop to just above room temperature) for 30 minutes. I never noticed too much rise, so don't worry if it doesn't seem like a huge difference.
After 30 minutes, dissolve the baking powder completely in the water and sprinkle this mixture over the bao dough. Knead it in to fully combine it (I used the dough to mop up any of the mixture that was still on the bowl and kneaded it in well -- an uneven distribution of baking powder can cause discoloration of your buns). Recover the dough and let it rest for 10 more minutes.
Turn the dough out onto wax paper and pat it into an even width. Use a dough cutter or sharp knife to divide it into 12 roughly equal sections. Take one section and gently roll it out to about 1/4 inch thick with a rolling pin (I keep the sections I'm not working with covered with a damp cloth so they don't dry out.) Holding the dough in your non-dominant hand, place the pork bulgogi filling in the center and carefully pleat the edges of the dough together at the top, turning the bun as you work, until it is fully closed (see the video below for a demonstration of to shape the buns -- and jokes about the word 'buns,' of course). Place each bun on a square of wax or parchment paper.
Preheat your steamer: Boil water and a teaspoon of vinegar over medium-high heat in a saucepan with your steamer on top (here's a photo of how your steamer setup should look). Preheating the steamer ensures your buns will fully rise. Once it's steaming, place buns in each tier (being careful not to crowd them), spray them with a bit of water, and close the steamer. Cook for 12 minutes without opening the lid. Remove the buns to a cooling rack to let them cool. Serve warm with reserved dipping sauce.
To see my video tutorial on how to shape your buns (LOL!) complete with lots of sophomoric bun jokes, read about my terrifying first experience with dim sum, and see more photos of these buns, please head over to Willow Bird Baking!
x-posted to food_porn, cooking, picturing_food, and cookingupastorm