Tutorial #2 - Image Maps
My artistic muse seems to have ditched me following the horrendous 2005 I’ve had so far. However, the outlook has brightened considerably so hopefully it’ll be back soon! Until then I have to find other ways to channel my need to play graphics. So, I sat myself down and finally wrote the tutorial alia612 asked me for months ago. Sorry about the wait, Ali, I hope it was worth it :)
Image Maps
The following tutorial is in two parts. One - the compiling of the code for the image map itself, and two - how to incorporate it into LJ overrides. The first part is universal and can be applied almost everywhere - even outside LJ. As far as I know, even Mozilla is okay with it. The second part is shown using Generator overrides as these are the most versatile out of all the freely available LJ styles. However, an image map can be incorporated into any LJ style (ex. Magazine and Notepad - I think) within reason. Be sure you know what you want and if it is achievable at your level of expertise. Also know of your limitations within LJ, especially if you have a free account. That being said, if you do come across problems using this code, feel free to ask me or head over to everything_lj.
PART 1. The map
Step 1 - Open your final image in your software of choice. Personally, I use photoshop (currently PS7 ‘cos I’m too lazy to re-jig my system and upgrade it), but this can be done with any other graphics software, including MS Paint. You just need to know where to look.
Here’s my piccie:
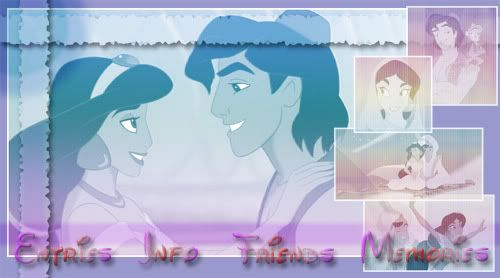
(I did the text quickly for this tutorial, but it’s a WIP for a future layout I’ll make available here)
As this is indeed a map, I need co-ordinates to put into the code. Quite simply, I need to find out the (x,y) in pixels at the bottom left and the top right corner of every word and/or picture within the image that I want to be a link to elsewhere. (Remember, anything within your picture can be a link - rather that just the text I’ve put in, I can make the Al’s hat a link, or Jasmine’s earring. It’s totally up to you.) To confuse you further, the link can be any shape, as dictated by the number of co-ords and the name you give the shape in the code. But for simplicity’s sake, I’m going to stick to a rectangle, as it’s the easiest one and can be used anywhere (unless you have tiny tiny links in your image).
Still with me? Good. Now I’ll show you how to get the co-ords using PS7, PSP8 and MSPaint.
*~*~*
PHOTOSHOP
Step 2 - Go to Window>Info. Make sure it’s ticked and you can see the Info panel.
Step 3 - Select the rectangular marquee tool.
Step 4 - Take your cursor and put it in the bottom left corner of the first word. Leave it there. The info window will now display the co-ords you need to take down:

Step 5 - Make a note of the X and Y. Label this set accordingly so you don’t get confused later on. I’m going to call this set (X1a,Y1a).
Step 6 - Now take the cursor and reposition it at the top right corner. Note the co-ords (X1b, Y1b).
Step 7 - Repeat the last three steps for every word/picture you want in your map, labelling the co-ords appropriately. (X2a, Y2a) (X2b, Y2b) (X3a, Y3a) etc…
Now jump on ahead to step 18.
*~*~*
PAINTSHOP PRO:
Step 8 - Select the rectangular selection tool from the tools palette
Step 9 - Place your cursor at the bottom left corner of the first word. Leave it there.
Step 10 - Look to the bottom right corner of your PSP window itself. You’ll see displayed a set of numbers:

Make a note of X and Y. Label accordingly for less confusion later on. I’m going to call this set (X1a,Y1a).
Step 11 - Now take your cursor and reposition at the top right corner. Note the co-ords. (X1b, Y1b).
Step 12 - Repeat the last three steps for all the links in your image map. Don’t forget your labels. (X2a, Y2a) (X2b, Y2b) (X3a, Y3a) etc…
Now jump on ahead to step 18.
*~*~*
MSPAINT
Step 13 - Select the rectangular selection tool from the tools palette
Step 14 - Place your cursor at the bottom left corner of the first word. Leave it there.
Step 15 - Look to the bottom right corner of your paint window itself. You’ll see displayed a set of numbers:

Make a note of X and Y. Label accordingly for less confusion later on. I’m going to call this set (X1a,Y1a).
Step 16 - Now take your cursor and reposition at the top right corner. Note the co-ords. (X1b, Y1b).
Step 17 - Repeat the last three steps for all the links in your image map. Don’t forget to label the co-ords appropriately. (X2a, Y2a) (X2b, Y2b) (X3a, Y3a) etc…
*~*~*
Okay so far? Got your co-ords? Moving on…
Step 18 - The code! This bit is simple. Believe it or not, the hard part is over. Here’s what the code should look like when we’re done:
***
< map name=" map1 " >
< AREA SHAPE = "rect" ALT="Entries" COORDS="26,445,168,406" HREF=" http:// www.livejournal.com/~username " >
< AREA SHAPE = "rect" ALT="Userinfo" COORDS="382,441,541,400" HREF=" http:// www.livejournal.com/userinfo.bml?userinfo " >
< AREA SHAPE = "rect" ALT="Friends" COORDS="198,442,346,405" HREF=" http:// www.livejournal.com/~username/friends " >
< AREA SHAPE = "rect" ALT="Memories" COORDS="567,446,733,404" HREF=" http:// www.livejournal.com/tools/memories.bml?user=username " >
< / map >
(remove all spaces in the opening and closing tags of the code when using)
***
As is my way, the only variables you can change are in bold. Do not alter the rest
The explanation:
MAP NAME: name your map. You’ll need this bit later on. You can creative as you like, but simple works just as well - no one else is gonna know what you called it!
AREA SHAPE: always leave as “rect” (unless you know what you’re doing and have the appropriate cords for other shapes)
ALT: ingenious little bugger - when you hover over the map, a little window will come up with whatever message you write here. You can be as obvious as you like, snarky as you like or leave it out all together (delete it).
COORDS: you can see four numbers. Using my labels, these are X1a, Y1a, X1b, Y1b for ‘entries’, X2a, Y2a, X2b, Y2b for ‘info’ and so on. (The numbers I’ve got are for the full sized version of the example) So plug in the co-ords you’ve just collected here. Remember to add or take away as many lines as you need. In this example I only have four links but you can have as many as you like.
HREF: doesn’t need much explanation as it’s quite obvious, but this is where you put in your target url.
And that’s that! Your map is complete. Gettit? Gottit? Good.
*~*~*
PART 2 - Working with the map code and LJ overrides
I just want to stress again, I’m only demonstrating using overrides compatible with Generator. Don’t plug this into Magazine or Disjointed and expect it to work! Also, even within Generator this will only work if you have a website listed in your userinfo. If you don’t have a website per se, you can always put in the URL to your LJ or www.livejournal.com, but you must have something.
The map code goes under the GLOBAL_WEBSITE head. Technically, there’s no such head as GLOBAL_WEBSITE, you have to change the GLOBAL to LASTN for your entries page, FRIENDS for your friends page and DAY for your calendar page. I’m only doing one copy of the code - but for your image map to be seen (never mind work) on your entries, friends and calender pages don’t forget to triplicate the code and makes sure the *_WEBSITE is labelled correctly.
***
< div style = " position:absolute; top: 500; left: 40; width: 150; height: 100%; visibility: visible; " >
< / div >
< img src="http://www.yourhost.com/header.jpg" border="0" usemap="#map1" class="x" >
< map name = " map1 " >
< AREA SHAPE = "rect" ALT="Entries" COORDS="116,467,233,432" HREF=" http:// www.livejournal.com/~username " >
< AREA SHAPE = "rect" ALT="Info" COORDS="263,470,346,427" HREF=" http:// www.livejournal.com/userinfo.bml?username " >
< AREA SHAPE = "rect" ALT="Friends" COORDS="377,473,506,430" HREF=" http:// www.livejournal.com/~username/friends " >
< AREA SHAPE = "rect" ALT="Memories" COORDS="703,475,866,435" HREF=" http:// www.livejournal.com/tools/memories.bml?user=username " >
< / map >
< style type = " text/css " >
< ! --
.x {
position:absolute; left:0; top:0; z-index: 10; }
-- >
< / style>
(remove all spaces in the opening and closing tags of the code when using)
***
As is my way, the only variables you can change are in bold. Do not alter the rest
The explanation:
* The first part (div style) is the code for a sidebar. Do not delete this - even if you don’t wish to use the sidebar. If you do, you can place whatever you wish between the opening and closing div tags - but remember the LJ limitations. The bold parts imply what can be changed: how many pixels from the top and left hand side the sidebar should begin and how wide it should be.
* The next line controls your image url (‘img src’), the border around it (leave it at 0 or you’ll get an icky blue border), directions to your map (where it says ‘usemap’ make sure it’s pointing to your map, ie put in your map name here and leave in the #) and the LJ directions (‘class=x’) for the image position. Only change the URL and the map name.
* Next, put in your map code we compiled earlier.
* Finally, the LJ directions for your image. Again, change only the bold parts: left implies how many pixels from the left hand side the image should be placed and top dictates the position in pixels from the top. Standard is 0, 0 so the image starts in the top left corner.
***************************************************************************************
And now you are done! You’re ready to incorporate this into your codes and make funky layouts complete with image maps. I hope this was helpful as it took a long a$$ time to write!
Feedback is an essential vitamin - I’ll wither and die without it. And we can’t have that can we? Ha ha. Again, if you have questions, ask me or ask over at everything_lj. I’ll try my best to help!
PS. If there’s something you’ve seen me do and would like a tutorial on how to do it, drop me a comment and I’ll see what I can do :)
Image Maps
The following tutorial is in two parts. One - the compiling of the code for the image map itself, and two - how to incorporate it into LJ overrides. The first part is universal and can be applied almost everywhere - even outside LJ. As far as I know, even Mozilla is okay with it. The second part is shown using Generator overrides as these are the most versatile out of all the freely available LJ styles. However, an image map can be incorporated into any LJ style (ex. Magazine and Notepad - I think) within reason. Be sure you know what you want and if it is achievable at your level of expertise. Also know of your limitations within LJ, especially if you have a free account. That being said, if you do come across problems using this code, feel free to ask me or head over to everything_lj.
PART 1. The map
Step 1 - Open your final image in your software of choice. Personally, I use photoshop (currently PS7 ‘cos I’m too lazy to re-jig my system and upgrade it), but this can be done with any other graphics software, including MS Paint. You just need to know where to look.
Here’s my piccie:
(I did the text quickly for this tutorial, but it’s a WIP for a future layout I’ll make available here)
As this is indeed a map, I need co-ordinates to put into the code. Quite simply, I need to find out the (x,y) in pixels at the bottom left and the top right corner of every word and/or picture within the image that I want to be a link to elsewhere. (Remember, anything within your picture can be a link - rather that just the text I’ve put in, I can make the Al’s hat a link, or Jasmine’s earring. It’s totally up to you.) To confuse you further, the link can be any shape, as dictated by the number of co-ords and the name you give the shape in the code. But for simplicity’s sake, I’m going to stick to a rectangle, as it’s the easiest one and can be used anywhere (unless you have tiny tiny links in your image).
Still with me? Good. Now I’ll show you how to get the co-ords using PS7, PSP8 and MSPaint.
*~*~*
PHOTOSHOP
Step 2 - Go to Window>Info. Make sure it’s ticked and you can see the Info panel.
Step 3 - Select the rectangular marquee tool.
Step 4 - Take your cursor and put it in the bottom left corner of the first word. Leave it there. The info window will now display the co-ords you need to take down:
Step 5 - Make a note of the X and Y. Label this set accordingly so you don’t get confused later on. I’m going to call this set (X1a,Y1a).
Step 6 - Now take the cursor and reposition it at the top right corner. Note the co-ords (X1b, Y1b).
Step 7 - Repeat the last three steps for every word/picture you want in your map, labelling the co-ords appropriately. (X2a, Y2a) (X2b, Y2b) (X3a, Y3a) etc…
Now jump on ahead to step 18.
*~*~*
PAINTSHOP PRO:
Step 8 - Select the rectangular selection tool from the tools palette
Step 9 - Place your cursor at the bottom left corner of the first word. Leave it there.
Step 10 - Look to the bottom right corner of your PSP window itself. You’ll see displayed a set of numbers:
Make a note of X and Y. Label accordingly for less confusion later on. I’m going to call this set (X1a,Y1a).
Step 11 - Now take your cursor and reposition at the top right corner. Note the co-ords. (X1b, Y1b).
Step 12 - Repeat the last three steps for all the links in your image map. Don’t forget your labels. (X2a, Y2a) (X2b, Y2b) (X3a, Y3a) etc…
Now jump on ahead to step 18.
*~*~*
MSPAINT
Step 13 - Select the rectangular selection tool from the tools palette
Step 14 - Place your cursor at the bottom left corner of the first word. Leave it there.
Step 15 - Look to the bottom right corner of your paint window itself. You’ll see displayed a set of numbers:
Make a note of X and Y. Label accordingly for less confusion later on. I’m going to call this set (X1a,Y1a).
Step 16 - Now take your cursor and reposition at the top right corner. Note the co-ords. (X1b, Y1b).
Step 17 - Repeat the last three steps for all the links in your image map. Don’t forget to label the co-ords appropriately. (X2a, Y2a) (X2b, Y2b) (X3a, Y3a) etc…
*~*~*
Okay so far? Got your co-ords? Moving on…
Step 18 - The code! This bit is simple. Believe it or not, the hard part is over. Here’s what the code should look like when we’re done:
***
< map name=" map1 " >
< AREA SHAPE = "rect" ALT="Entries" COORDS="26,445,168,406" HREF=" http:// www.livejournal.com/~username " >
< AREA SHAPE = "rect" ALT="Userinfo" COORDS="382,441,541,400" HREF=" http:// www.livejournal.com/userinfo.bml?userinfo " >
< AREA SHAPE = "rect" ALT="Friends" COORDS="198,442,346,405" HREF=" http:// www.livejournal.com/~username/friends " >
< AREA SHAPE = "rect" ALT="Memories" COORDS="567,446,733,404" HREF=" http:// www.livejournal.com/tools/memories.bml?user=username " >
< / map >
(remove all spaces in the opening and closing tags of the code when using)
***
As is my way, the only variables you can change are in bold. Do not alter the rest
The explanation:
MAP NAME: name your map. You’ll need this bit later on. You can creative as you like, but simple works just as well - no one else is gonna know what you called it!
AREA SHAPE: always leave as “rect” (unless you know what you’re doing and have the appropriate cords for other shapes)
ALT: ingenious little bugger - when you hover over the map, a little window will come up with whatever message you write here. You can be as obvious as you like, snarky as you like or leave it out all together (delete it).
COORDS: you can see four numbers. Using my labels, these are X1a, Y1a, X1b, Y1b for ‘entries’, X2a, Y2a, X2b, Y2b for ‘info’ and so on. (The numbers I’ve got are for the full sized version of the example) So plug in the co-ords you’ve just collected here. Remember to add or take away as many lines as you need. In this example I only have four links but you can have as many as you like.
HREF: doesn’t need much explanation as it’s quite obvious, but this is where you put in your target url.
And that’s that! Your map is complete. Gettit? Gottit? Good.
*~*~*
PART 2 - Working with the map code and LJ overrides
I just want to stress again, I’m only demonstrating using overrides compatible with Generator. Don’t plug this into Magazine or Disjointed and expect it to work! Also, even within Generator this will only work if you have a website listed in your userinfo. If you don’t have a website per se, you can always put in the URL to your LJ or www.livejournal.com, but you must have something.
The map code goes under the GLOBAL_WEBSITE head. Technically, there’s no such head as GLOBAL_WEBSITE, you have to change the GLOBAL to LASTN for your entries page, FRIENDS for your friends page and DAY for your calendar page. I’m only doing one copy of the code - but for your image map to be seen (never mind work) on your entries, friends and calender pages don’t forget to triplicate the code and makes sure the *_WEBSITE is labelled correctly.
***
< div style = " position:absolute; top: 500; left: 40; width: 150; height: 100%; visibility: visible; " >
< / div >
< img src="http://www.yourhost.com/header.jpg" border="0" usemap="#map1" class="x" >
< map name = " map1 " >
< AREA SHAPE = "rect" ALT="Entries" COORDS="116,467,233,432" HREF=" http:// www.livejournal.com/~username " >
< AREA SHAPE = "rect" ALT="Info" COORDS="263,470,346,427" HREF=" http:// www.livejournal.com/userinfo.bml?username " >
< AREA SHAPE = "rect" ALT="Friends" COORDS="377,473,506,430" HREF=" http:// www.livejournal.com/~username/friends " >
< AREA SHAPE = "rect" ALT="Memories" COORDS="703,475,866,435" HREF=" http:// www.livejournal.com/tools/memories.bml?user=username " >
< / map >
< style type = " text/css " >
< ! --
.x {
position:absolute; left:0; top:0; z-index: 10; }
-- >
< / style>
(remove all spaces in the opening and closing tags of the code when using)
***
As is my way, the only variables you can change are in bold. Do not alter the rest
The explanation:
* The first part (div style) is the code for a sidebar. Do not delete this - even if you don’t wish to use the sidebar. If you do, you can place whatever you wish between the opening and closing div tags - but remember the LJ limitations. The bold parts imply what can be changed: how many pixels from the top and left hand side the sidebar should begin and how wide it should be.
* The next line controls your image url (‘img src’), the border around it (leave it at 0 or you’ll get an icky blue border), directions to your map (where it says ‘usemap’ make sure it’s pointing to your map, ie put in your map name here and leave in the #) and the LJ directions (‘class=x’) for the image position. Only change the URL and the map name.
* Next, put in your map code we compiled earlier.
* Finally, the LJ directions for your image. Again, change only the bold parts: left implies how many pixels from the left hand side the image should be placed and top dictates the position in pixels from the top. Standard is 0, 0 so the image starts in the top left corner.
***************************************************************************************
And now you are done! You’re ready to incorporate this into your codes and make funky layouts complete with image maps. I hope this was helpful as it took a long a$$ time to write!
Feedback is an essential vitamin - I’ll wither and die without it. And we can’t have that can we? Ha ha. Again, if you have questions, ask me or ask over at everything_lj. I’ll try my best to help!
PS. If there’s something you’ve seen me do and would like a tutorial on how to do it, drop me a comment and I’ll see what I can do :)