006.
For iamellie, ze Dean to mah Sam ♥
From
to
.
Note: images are scaled down so no one bitches about me clogging their f-list =p
001. Start off with your image (in this case, I chose this one of our lovely Sam, from ibedesign), crop if desired (some people don't like cropping until later - I usually do it later).
002. Duplicate your base layer three times and hide the Background layer (so you still have your original incase you mess up). Set Layer 1 copy to Screen, 100% and Layer 1 copy 2 to Soft Light.
003. Sharpen (FILTER > SHARPEN > SHARPEN (or) FILTER > SHARPEN > SHARPEN EDGES) your image, then merge.
004. Grab your texture (I used this one from brasaremean at _sinelinea) and set it on a new blank document (CTRL N).
005. Paste your image onto the texture, and set to Multiply, 100%. Here is where I start my cropping/resizing. The image is clearly bigger than the texture, so I used EDIT > TRANSFORM > SCALE to make the image about the same size as the texture.
006. Select the texture layer, and use the Magic Wand Tool to select spots outside of your texture:
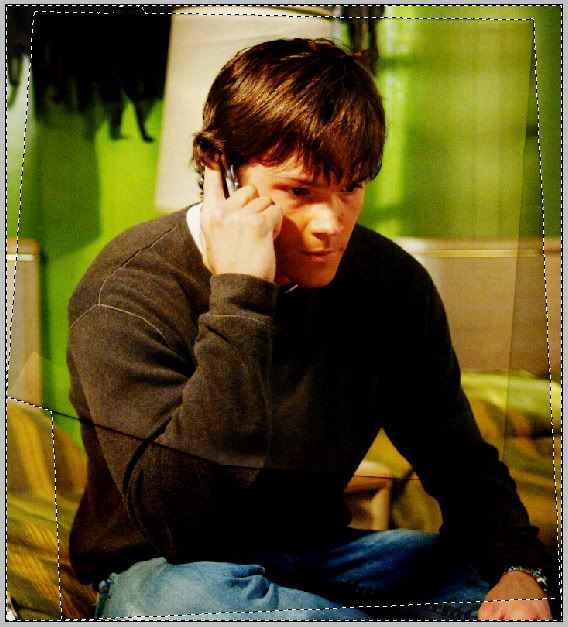
Then click back to your image layer and press DELETE. Voila! Excess image be gone!
007. Once you've deleted the excess image from your texture, hide the background layer then merge the texture and image (you should have the grey/white checked background from PS in behind your texture/image merge now):
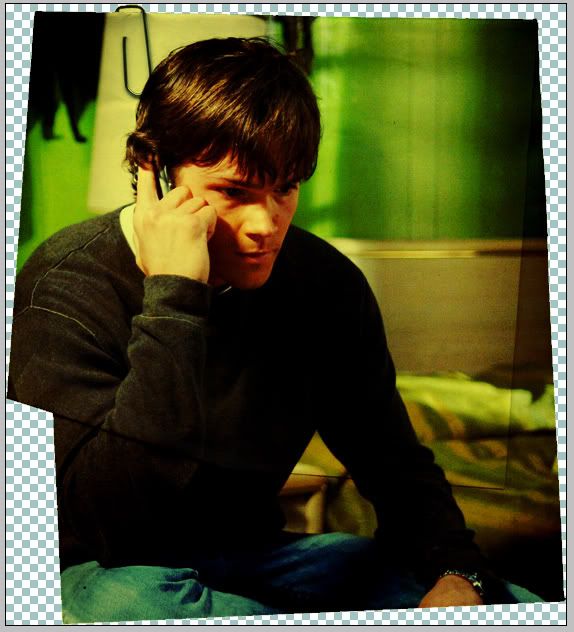
008. Un-hide the background layer, then make a new color fill layer (LAYER > NEW FILL LAYER > SOLID COLOR) on top of everything and put in #8ac100. Set this to colorburn, and fiddle with the opacity until it's dark, but not too dark (I used 51%).
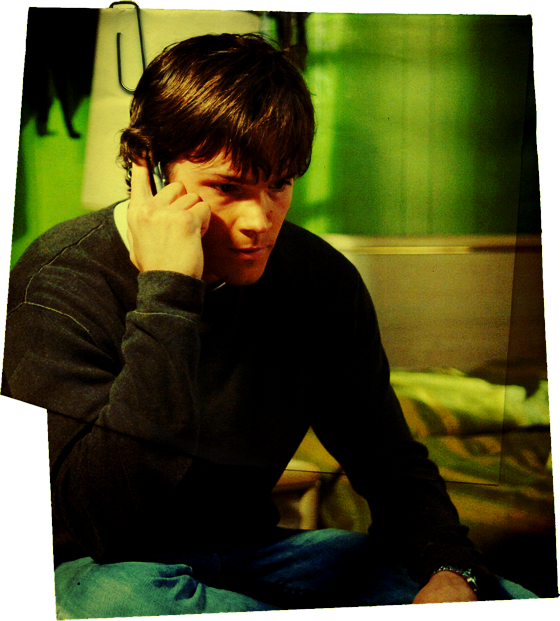
009. Voila! Easy and quick. Feel free to smooth out any roughness in your image now, etc.
SOME IMAGES ARE UPLOADED TO MY DOMAIN. DON'T LET ME CATCH YOU HOTLINKING. IM SERIOUS.
From

to

.
Note: images are scaled down so no one bitches about me clogging their f-list =p
001. Start off with your image (in this case, I chose this one of our lovely Sam, from ibedesign), crop if desired (some people don't like cropping until later - I usually do it later).
002. Duplicate your base layer three times and hide the Background layer (so you still have your original incase you mess up). Set Layer 1 copy to Screen, 100% and Layer 1 copy 2 to Soft Light.
003. Sharpen (FILTER > SHARPEN > SHARPEN (or) FILTER > SHARPEN > SHARPEN EDGES) your image, then merge.
004. Grab your texture (I used this one from brasaremean at _sinelinea) and set it on a new blank document (CTRL N).
005. Paste your image onto the texture, and set to Multiply, 100%. Here is where I start my cropping/resizing. The image is clearly bigger than the texture, so I used EDIT > TRANSFORM > SCALE to make the image about the same size as the texture.
006. Select the texture layer, and use the Magic Wand Tool to select spots outside of your texture:

Then click back to your image layer and press DELETE. Voila! Excess image be gone!
007. Once you've deleted the excess image from your texture, hide the background layer then merge the texture and image (you should have the grey/white checked background from PS in behind your texture/image merge now):

008. Un-hide the background layer, then make a new color fill layer (LAYER > NEW FILL LAYER > SOLID COLOR) on top of everything and put in #8ac100. Set this to colorburn, and fiddle with the opacity until it's dark, but not too dark (I used 51%).

009. Voila! Easy and quick. Feel free to smooth out any roughness in your image now, etc.
SOME IMAGES ARE UPLOADED TO MY DOMAIN. DON'T LET ME CATCH YOU HOTLINKING. IM SERIOUS.