tutorial 004.
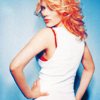
Subject- Scarlett Johansson
Difficulty- Beginner/Intermediate
Program- Photoshop CS2
Translatable- N/A
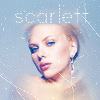
Going from...
TO
This tutorial will NOT work for every icon. It is meant to be used as a guide, and to help you come up with techniques of your own as a result of fiddling with colors and layers. Please do not replicate the example exactly for posting purposes, but feel free to practice with this base.
EXTRA NOTE
The selective coloring in this tutorial is extremely heavy on darker images.
Tweaking settings is especially important in this case.
001.
Duplicate your base and set it to screen at 55%.
Sharpen if needed.
002.
Create a new selective coloring layer.
Input the following.
Reds
-100
+100
+100
0
Yellows
-100
+100
+100
0
Neutrals
+50
0
-45
0
003.
Create a new selective coloring layer.
Input the following.
Reds
-100
+15
+100
0
Yellows
-100
+100
+15
0
Neutrals
+40
0
-15
0
004.
Flatten your image.
Use your elliptical marquee tool to select an area of your base that you do NOT wish to blur.
Scarlett's face was the obvious choice in this example.
Make your selection and go to...
layer >> new >> new layer via copy.
For best look, do NOT resize or move it.
Select your background base layer.
Go to...
filter >> blur >> radial blur.
I used the settings...
Amount- 30
Blur Method- Spin
Quality- Best
005.
To finish off, use a scratch or a dust speckle texture.
I chose the following by
peoplemachines
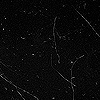
Set it screen.
If you're image is especially light, you may want to duplicate the texture a couple of times and rotate it so it covers more.
Helpful? Comments/Questions? Hateful put downs?
Well...keep the last one to yourselves.
If its useful to you, I'd love to see what you come up with.
Others made using this technique...
(Minor tweaking involved.)
001
002
EDIT - 1/25/07
Someone asked if I could translate this.
Its not *exactly* the same, but very close. I probably made it a bit more complicated than it actually is =/
Any questions, just ask.
001.
Duplicate your base and set it to screen at 30%.
Sharpen if needed.
002.
Create a new layer and fill it with (#040C3E) - exclusion at 100%.
Duplicate this layer once.
003.
Create a hue/saturation adjustment layer.
Red: +50
Blue: +50
Magenta: +50
004.
Duplicate your base twice and drag to the top.
Set the bottom on softlight at 100%.
Set the top on screen at 60%.
005.
Create a new layer and fill it with (#1E68CC).
Set it to softlight at 100%.
006.
Create a hue/saturation adjustment layer.
Master: +20
007.
Create another hue/saturation adjustment layer.
Red: +58.
Set this layer to lighten.
008.
Create a new layer and fill it with (#E22736).
Set to overlay at 40%.
For the base of Scarlett, I erased all of this layer except the part that covered her hair.
009.
Follow the rest of the original tut for the radial blur and texture.
End result....

hopefully it will work just as well :D