3 ~ tutorial
This is a tutorial for this icon requested by justonebeat
I use CS5. There is Selective Coloring and Vibrance Layers involved that may not be transferable.
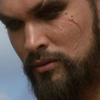
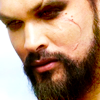
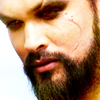
1. First you start with this Picture from rawr-caps
-It was cropped to look like this
-Duplicate this layer three times
-Set the first duplicated layer to soft light 100% opacity
-Set the second duplicated layer to screen 100% opacity
-Set the third duplicated layer to screen 50% opacity
-This is going to really lighten up your icon without making it overly bright.
-Get this -->
2. Levels Layer
-RGB: 32/1.22/230
-This is going to add some much needed contrast and depth to the cap.
-We are here now

3. Vibrance Layer
-Vibrance +41/Saturation +4
-This is going to add a little more flesh colored tones to his face and make it a little less washed out in
appearance.
-Leads us here -->

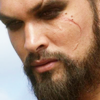
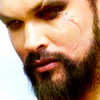
4. Brightness/Contrast Layer
- Brightness +13/Contrast +6
- This does the obvious, adds some brightness and a little more contrast.
- Adds a little light to the icon -->
5. Stamp Visible Layer - Ctrl+alt+shift+E
6. Black & White Layer
-Layer 4 represents Step 5 above
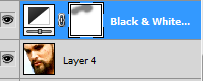
-You are just adding a black & white layer here
-Set the black & white layer to soft light at 26% opacity
-I like using a black and white layer set to soft light a lot because it defines things a bit more and adds little bit
more contrast without being overpowering.
-

7. Texture Layer
-I used this texture
by realmofsilence.
-Set this layer at Soft Light 66% opacity
-This brings out his eyes a bit more and gives him a soft light pink coloring on around the cheek and jaw
-
8. Vibrance Layer
- Vibrance +15/Saturation +1
-
9. Brightness/Contrast Layer
-Brightness +12/Contrast +5
-
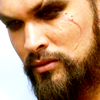
10. Stamp Visible Layer - Ctrl+alt+shift+E
11. Sharpen
-I tend to use the Smart Sharpen option, which I have set as follows:
-Amount 33% / Radius 0.5 / Remove Gaussian Blur
-
