TUTORIAL 2.5: B&W/COLOR
Requirements: Photoshop
Info: Black and white pictures, adding color to certain spots. Essentially the same as tutorial #2 (hence, #2.5!), but cool enough to deserve its own entry. ;)
We'll be going from this:

to this:

Let's start off with this picture of Penelope Cruz (again).
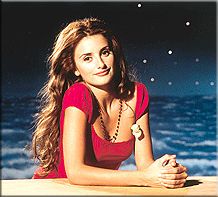
Sharpen it using the Unsharp Mask (Filter --> Sharpen -- Unsharp Mask). Play around with the settings, although mine is usually set to: amount = 35%, radius = 1.0 pixels, and threshold = 0. Once you're done with that, crop it down to 100x100. If it looks kind of grainy, use the smudge tool with a small sized brush and low strength (e.g. size 11, 13% strength) and use it over her face. Make sure you don't blur the lines of her nose etc. otherwise it'll end up looking blurry instead of the smooth effect you want.

Next, I duplicated the layer and desaturated it (Ctrl + Shift + U, or Image --> Adjustments --> Desaturate). Then, duplicate the layer once. DO NOT delete the colored layer! You'll need it later for adding color. Set the duplicated layer to overlay.
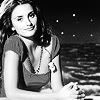
Duplicate the colored layer on the very bottom, and bring it on top of the black and white layers. Decide where you want color to show up, and start erasing, focusing on one object. This time, I decided I wanted her dress, lips, and the flower on her dress. So on this layer, I erased everything but the dress.
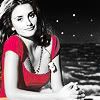
Duplicate the colored layer on the very bottom again, and set it on top of all the layers. This time, I wanted her lips, so I erased everything on this layer lips. They're pretty small in the picture, so I magnified the picture and used a small round solid brush to erase the area around her lips. Using variations (Image --> Adjustments --> Variations), I changed her lip color to a more red shade.

The flower on the dress isn't that important, but it does have some color to it. So, duplicate the bottom colored layer, put it on top of all the layers, and then erase everything but the flower.

This looks okay, but I think there is too much black and white background. So I duplicated the bottom colored layer, brought it on top, and erased the top part of the background (the sky). Next, I chose a moderatedly sized feathered round brush, lowered the opacity of it, and erased the sky. So now I have a lightly colored sea in the background.
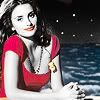
I then added a light texture by dorky_duck, and set it on screen. It looked nice, but it blocked out some parts of her erase, so I took my trusty eraser tool, and erased the parts that covered her face.


Still a bit plain, so I added a new blank layer, and I used a heart brush by jeweledicecream, and a baby text brush by ohpaintbrush in a darker color than her dress (use the eyedropper tool [or "I" on your keyboard] to get the color of her dress). And you're done!

I'd love to see any icons that you make with this! :)
Info: Black and white pictures, adding color to certain spots. Essentially the same as tutorial #2 (hence, #2.5!), but cool enough to deserve its own entry. ;)
We'll be going from this:

to this:
Let's start off with this picture of Penelope Cruz (again).

Sharpen it using the Unsharp Mask (Filter --> Sharpen -- Unsharp Mask). Play around with the settings, although mine is usually set to: amount = 35%, radius = 1.0 pixels, and threshold = 0. Once you're done with that, crop it down to 100x100. If it looks kind of grainy, use the smudge tool with a small sized brush and low strength (e.g. size 11, 13% strength) and use it over her face. Make sure you don't blur the lines of her nose etc. otherwise it'll end up looking blurry instead of the smooth effect you want.

Next, I duplicated the layer and desaturated it (Ctrl + Shift + U, or Image --> Adjustments --> Desaturate). Then, duplicate the layer once. DO NOT delete the colored layer! You'll need it later for adding color. Set the duplicated layer to overlay.

Duplicate the colored layer on the very bottom, and bring it on top of the black and white layers. Decide where you want color to show up, and start erasing, focusing on one object. This time, I decided I wanted her dress, lips, and the flower on her dress. So on this layer, I erased everything but the dress.

Duplicate the colored layer on the very bottom again, and set it on top of all the layers. This time, I wanted her lips, so I erased everything on this layer lips. They're pretty small in the picture, so I magnified the picture and used a small round solid brush to erase the area around her lips. Using variations (Image --> Adjustments --> Variations), I changed her lip color to a more red shade.

The flower on the dress isn't that important, but it does have some color to it. So, duplicate the bottom colored layer, put it on top of all the layers, and then erase everything but the flower.

This looks okay, but I think there is too much black and white background. So I duplicated the bottom colored layer, brought it on top, and erased the top part of the background (the sky). Next, I chose a moderatedly sized feathered round brush, lowered the opacity of it, and erased the sky. So now I have a lightly colored sea in the background.

I then added a light texture by dorky_duck, and set it on screen. It looked nice, but it blocked out some parts of her erase, so I took my trusty eraser tool, and erased the parts that covered her face.

Still a bit plain, so I added a new blank layer, and I used a heart brush by jeweledicecream, and a baby text brush by ohpaintbrush in a darker color than her dress (use the eyedropper tool [or "I" on your keyboard] to get the color of her dress). And you're done!
I'd love to see any icons that you make with this! :)