Tutorial 6
Sixth Tutorial :)
In seven steps. :) With only Curves and Channel Mixer.
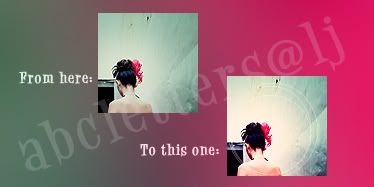
1. Get your prepped base. Duplicate it and set to Softlight@60%. Adjust if needed, make sure it evens out the colors to make it more contrasting and bright.
2. Create a new layer and fill with #07002b then set it to Exclusion@40%
3. New Adjustment Layer: Curves
RGB
(1st) Input: 106 Output: 98
(2nd) Input: 188 Output: 209
Green
(1st) Input: 141 Output: 121
(2nd) Input: 207 Output: 195
4. Duplicate your base, set it on top to Overlay@30%.
5. New Adjustment Layer: Channel Mixer
Red
Red: 100
Green: 4
Constant: 2
6. New Adjustment Layer: Hue/Saturation
Saturation: 35
7. Last but not the least, add whatever you want. I added some circle brushes from the same unknown maker and adjusted the opacity.
And it's finished! ♥
Other icons made from this one:
---
Please visit my DA. If you want a tutorial from one of my works there, just tell me and I'll try to make it. :D Most of the things there are wallpapers and banners. :D
In seven steps. :) With only Curves and Channel Mixer.
1. Get your prepped base. Duplicate it and set to Softlight@60%. Adjust if needed, make sure it evens out the colors to make it more contrasting and bright.
2. Create a new layer and fill with #07002b then set it to Exclusion@40%
3. New Adjustment Layer: Curves
RGB
(1st) Input: 106 Output: 98
(2nd) Input: 188 Output: 209
Green
(1st) Input: 141 Output: 121
(2nd) Input: 207 Output: 195
4. Duplicate your base, set it on top to Overlay@30%.
5. New Adjustment Layer: Channel Mixer
Red
Red: 100
Green: 4
Constant: 2
6. New Adjustment Layer: Hue/Saturation
Saturation: 35
7. Last but not the least, add whatever you want. I added some circle brushes from the same unknown maker and adjusted the opacity.
And it's finished! ♥
Other icons made from this one:
---
Please visit my DA. If you want a tutorial from one of my works there, just tell me and I'll try to make it. :D Most of the things there are wallpapers and banners. :D