mini-movie tutorial for adobe imageready
I no longer use imageready, so this tutorial will no longer be supported.
Another mini-movie tutorial
My friend wanted a mini-movie tutorial, but I couldn't find anything for Imageready so I decided to make one myself. So kids, today we're gonna make this icon:

What you will need:
Adobe Photoshop (This tutorial uses CS 2)
Adobe Imageready (This tutorial uses CS 2)
Some aptitude in both programs
Ability to make caps
1. OK, first we're going to cap our scene of choice using your program of choice. I personally use a program called virtual dub for .avi files and PowerDVD for DVDs. Check the icon_tutorial memories if you're unsure of how to make caps... there are lots of tutorials there. You'll want to make a lot of caps so the animation isn't too jerky. I usually set virtual dub to cap every other frame. With PowerDVD, I slo-mo to make capping easier. Anyway, once you're done capping, put all the caps into a folder.
2. Open Imageready. Go to file >> import >> folder as frames. Choose the folder where you saved your caps.
3. Once the frames are imported, we're gonna crop down to icon size. Choose the crop tool
and crop down to 50x50. If you're unsure how to do that, just enter the values in the status bar.
Your animation palette should now look something like this:

4. OK, now we're going to import into photoshop to do the minimovie part. Go to file >> edit in photoshop. Once your file is loaded in photoshop (BTW, you should save your file now, just in case photoshop goes insane or something).
The following step is optional: sometimes caps end up really dark, so you can use an adjustment layer here adjust the brightness. Making sure the top layer is selected in the layers palette, go to layer >> new adjustment layer >> levels (or just press the
button the layers palette and choose adjustment layer >> levels) . Move the sliders until you've brightened up the picture to your liking. For this particular icon, I just pulled the far right slider back a bit to brighten things up. Your layers palette should now look like this:
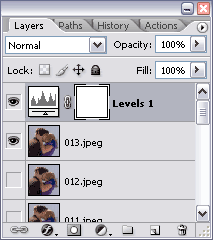
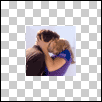
5. Now we're going to add the background and pretty border and stuff. First, we're going to increase the canvas size to icon size. Go to image >> canvas size >> and increase to 100x100 pixels, making sure that the current canvas is centered. Here is a screencap of what i have so far:
6. Select the bottom layer in the layers palette and create a new layer below that. I do this by holding down the control key and pressing the new layer button.
Or you can go to layer >> new >> layer and drag it to the bottom of the layers palette. Choose your method of choice. Anyway, fill this new layer with solid white.

The actual icon shouldn't have a black border... I only added one to separate it from the white background of this page.
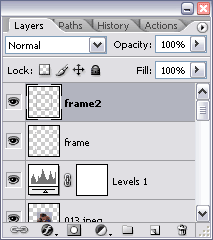
7. I've actually created a mini-movie template that I like to use, but you can do whatever you'd like with the background. In this tutorial, I just added a gray border and some little corner accents. Whatever you decide to do, make sure you put all the border layers and such on the very top. Here's my icon so far and a screen shot of the layers palette:

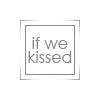
8. Finally, we're going to add the text. Again, do this on the very top layer. You might want to make all the picture layers invisible to make sure the text is positioned where you want it. (To make a picture layer invisible, click the eye thingy on the left of the layer on the layer palette).
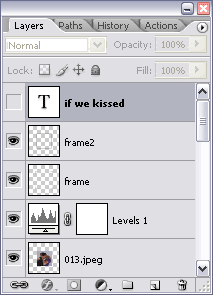
9. Now we're back to imageready to put it all together. Make the text layer invisible and make the final layer of the animation visible again. Here's my layers palette:
Then go to File >> Edit in Imageready.
10. Sometimes when you go to Imageready it screws up the positioning and stuff. I really don't know what else to say about this except to move the layers back where they should be and, if the frames are out of order, to move them back in the proper order. Tedious, I know, but I really don't know how else to fix this. Aaaanyway, once all the moving around is done, this is what my animation palette looks like:

11. Now for the text part. Go the very last frame, which should just show the background, text, and border. Here's my animation palette again:

12. We're going to add one more new frame between the last text frame and the last frame of the animation. Hit the new frame button (second to the last on the right, next to the trash can).

13. Making sure the second to last frame is selected, make the text invisible.

14. Now we're going to add two tween frames to make the transition more subtle. Hit the tween frames button (third from the right, directly to the left of the new frame button) and when the dialog pops up, enter the following values:
Tween with: Next frame
Frames to add: 2
Layers: all layers
All 3 parameters should be checked
Hit OK. This is what my animation palette now looks like.

15. Finally, we're going to change the delay of the very last frame--the text one. Select the frame, then hit the little arrow thingy next to "0 sec." Select 1.0 from the drop-down menu.

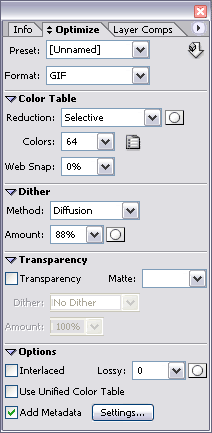
16. You should be done now. Click the play button on the animation palette to preview your animation. If you're happy with it, then go to the optimize window (window >> optimize). Make sure the format is set to .gif. I just left the defaults for everything else.
17. Next, go to file >> save optimized as and save the file. W00t! You're done!
That's it for the imageready mini-movie tutorial. Hopefully you found this helpful. I'm happy to answer any questions you might have!
Another mini-movie tutorial
My friend wanted a mini-movie tutorial, but I couldn't find anything for Imageready so I decided to make one myself. So kids, today we're gonna make this icon:
What you will need:
Adobe Photoshop (This tutorial uses CS 2)
Adobe Imageready (This tutorial uses CS 2)
Some aptitude in both programs
Ability to make caps
1. OK, first we're going to cap our scene of choice using your program of choice. I personally use a program called virtual dub for .avi files and PowerDVD for DVDs. Check the icon_tutorial memories if you're unsure of how to make caps... there are lots of tutorials there. You'll want to make a lot of caps so the animation isn't too jerky. I usually set virtual dub to cap every other frame. With PowerDVD, I slo-mo to make capping easier. Anyway, once you're done capping, put all the caps into a folder.
2. Open Imageready. Go to file >> import >> folder as frames. Choose the folder where you saved your caps.
3. Once the frames are imported, we're gonna crop down to icon size. Choose the crop tool

and crop down to 50x50. If you're unsure how to do that, just enter the values in the status bar.

Your animation palette should now look something like this:

4. OK, now we're going to import into photoshop to do the minimovie part. Go to file >> edit in photoshop. Once your file is loaded in photoshop (BTW, you should save your file now, just in case photoshop goes insane or something).
The following step is optional: sometimes caps end up really dark, so you can use an adjustment layer here adjust the brightness. Making sure the top layer is selected in the layers palette, go to layer >> new adjustment layer >> levels (or just press the

button the layers palette and choose adjustment layer >> levels) . Move the sliders until you've brightened up the picture to your liking. For this particular icon, I just pulled the far right slider back a bit to brighten things up. Your layers palette should now look like this:

5. Now we're going to add the background and pretty border and stuff. First, we're going to increase the canvas size to icon size. Go to image >> canvas size >> and increase to 100x100 pixels, making sure that the current canvas is centered. Here is a screencap of what i have so far:

6. Select the bottom layer in the layers palette and create a new layer below that. I do this by holding down the control key and pressing the new layer button.

Or you can go to layer >> new >> layer and drag it to the bottom of the layers palette. Choose your method of choice. Anyway, fill this new layer with solid white.

The actual icon shouldn't have a black border... I only added one to separate it from the white background of this page.
7. I've actually created a mini-movie template that I like to use, but you can do whatever you'd like with the background. In this tutorial, I just added a gray border and some little corner accents. Whatever you decide to do, make sure you put all the border layers and such on the very top. Here's my icon so far and a screen shot of the layers palette:


8. Finally, we're going to add the text. Again, do this on the very top layer. You might want to make all the picture layers invisible to make sure the text is positioned where you want it. (To make a picture layer invisible, click the eye thingy on the left of the layer on the layer palette).

9. Now we're back to imageready to put it all together. Make the text layer invisible and make the final layer of the animation visible again. Here's my layers palette:

Then go to File >> Edit in Imageready.
10. Sometimes when you go to Imageready it screws up the positioning and stuff. I really don't know what else to say about this except to move the layers back where they should be and, if the frames are out of order, to move them back in the proper order. Tedious, I know, but I really don't know how else to fix this. Aaaanyway, once all the moving around is done, this is what my animation palette looks like:

11. Now for the text part. Go the very last frame, which should just show the background, text, and border. Here's my animation palette again:

12. We're going to add one more new frame between the last text frame and the last frame of the animation. Hit the new frame button (second to the last on the right, next to the trash can).

13. Making sure the second to last frame is selected, make the text invisible.

14. Now we're going to add two tween frames to make the transition more subtle. Hit the tween frames button (third from the right, directly to the left of the new frame button) and when the dialog pops up, enter the following values:
Tween with: Next frame
Frames to add: 2
Layers: all layers
All 3 parameters should be checked
Hit OK. This is what my animation palette now looks like.

15. Finally, we're going to change the delay of the very last frame--the text one. Select the frame, then hit the little arrow thingy next to "0 sec." Select 1.0 from the drop-down menu.

16. You should be done now. Click the play button on the animation palette to preview your animation. If you're happy with it, then go to the optimize window (window >> optimize). Make sure the format is set to .gif. I just left the defaults for everything else.

17. Next, go to file >> save optimized as and save the file. W00t! You're done!
That's it for the imageready mini-movie tutorial. Hopefully you found this helpful. I'm happy to answer any questions you might have!