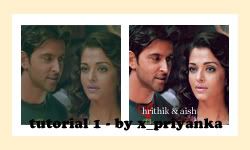
My First Tutorial!
This tutorial works best with pictures that have a greenish tint to them.

other icons made by this tutorial:


-Using PS7
-Involves Selective Color and Color Balance
-PSD Included
*Downloaded 44 times with only 3 comments, please comment if you are taking! or else i will have to take it down!
i started out with this image :
1. take your base, resize it, and place it on a blank 100x100 canvas.
2. if image is too dark, duplicate and set to screen. [the opacity will vary depending on image]
3. open a new selective color layer
layer-new adjustment-selective color
reds:
C -100
M +48
Y +100
B -41
yellows:
C +100
M +42
Y -100
B +37
greens:
C -100
M 0
Y -100
B 0
cyans:
C -100
M 0
Y 0
B 0
neutrals:
C -13
M +1
Y -1
B +38
blacks:
C +19
M 0
Y 0
B +24
4. now open another selective color layer
layer-new adjustment-selective color
reds:
C +1
M -20
Y +9
B 0
yellows:
C +33
M +51
Y +83
B 0
neutrals:
C +22
M 0
Y -10
B +10
5. Now open a color balance layer
layer-new adjustment-color balance
Shadows:-12, -15, -2
Midtones: 26, 11, 12
Highlights: 10, -6, 21
6. now get a new fill layer and fill with #FFF0CD. Set it to soft light 100%
7. Duplicate your base and bring it to the top. Set it to Soft Light 100%
8. add and/or text and you're done!
this is my final result:
'
click for the PSD

other icons made by this tutorial:


-Using PS7
-Involves Selective Color and Color Balance
-PSD Included
*Downloaded 44 times with only 3 comments, please comment if you are taking! or else i will have to take it down!
i started out with this image :

1. take your base, resize it, and place it on a blank 100x100 canvas.
2. if image is too dark, duplicate and set to screen. [the opacity will vary depending on image]
3. open a new selective color layer
layer-new adjustment-selective color
reds:
C -100
M +48
Y +100
B -41
yellows:
C +100
M +42
Y -100
B +37
greens:
C -100
M 0
Y -100
B 0
cyans:
C -100
M 0
Y 0
B 0
neutrals:
C -13
M +1
Y -1
B +38
blacks:
C +19
M 0
Y 0
B +24
4. now open another selective color layer
layer-new adjustment-selective color
reds:
C +1
M -20
Y +9
B 0
yellows:
C +33
M +51
Y +83
B 0
neutrals:
C +22
M 0
Y -10
B +10
5. Now open a color balance layer
layer-new adjustment-color balance
Shadows:-12, -15, -2
Midtones: 26, 11, 12
Highlights: 10, -6, 21
6. now get a new fill layer and fill with #FFF0CD. Set it to soft light 100%
7. Duplicate your base and bring it to the top. Set it to Soft Light 100%
8. add and/or text and you're done!
this is my final result:
'
click for the PSD