rainbow colors
My first icon tutorial. Whooooo~
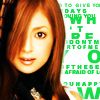
Learn how to make this icon:
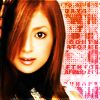
1. Take an image with a fairly easily erasable background. I stole my picture
from Ayu's Wonderland.
Resize it and place it wherever you'd like, and erase the background. You can
leave as much background around the edge of the subject as you'd like.
2. Duplicate that layer and set it to Overlay 100% or whatever opacity works
with your image.

3. UNDER those layers, create a new layer and fill it with text. I used brushes
by swept_off to do this. Choose whatever color you'd like; I used a bright pink, #ED21BA.
Set that layer to Hard Light 100% if you want lighter text or Difference
100%
if you want it darker. (I used Difference)
4. Duplicate that layer and Gaussian Blur it with a radius of 3.5 and set
it to an opacity of 60%. Kept it at the same blending mode as the original
text layer.
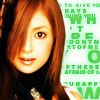
5. Above that layer use a black grungy brush to give the text texture. I used
a brush by someone in my credits (I'm sorry, I forget!). Set the layer to Color Burn 30%.
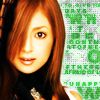
6. Create a new layer and fill with a gradient of whatever colors you'd like the background to have.
Set it to Color 100%. I used this one.


7. ABOVE the layers of your subject, create a new layer and fill it with a
gradient. Set the layer to Vivid Light 35%. Play around with the colors
until you're happy. I used this gradient.


8. Add whatever brushes you'd like to it, and you've got yourself an icon!
I hope this tutorial helped out~ If you've got any questions, feel free to leave a comment!
Learn how to make this icon:
1. Take an image with a fairly easily erasable background. I stole my picture
from Ayu's Wonderland.
Resize it and place it wherever you'd like, and erase the background. You can
leave as much background around the edge of the subject as you'd like.
2. Duplicate that layer and set it to Overlay 100% or whatever opacity works
with your image.
3. UNDER those layers, create a new layer and fill it with text. I used brushes
by swept_off to do this. Choose whatever color you'd like; I used a bright pink, #ED21BA.
Set that layer to Hard Light 100% if you want lighter text or Difference
100%
if you want it darker. (I used Difference)
4. Duplicate that layer and Gaussian Blur it with a radius of 3.5 and set
it to an opacity of 60%. Kept it at the same blending mode as the original
text layer.
5. Above that layer use a black grungy brush to give the text texture. I used
a brush by someone in my credits (I'm sorry, I forget!). Set the layer to Color Burn 30%.
6. Create a new layer and fill with a gradient of whatever colors you'd like the background to have.
Set it to Color 100%. I used this one.
7. ABOVE the layers of your subject, create a new layer and fill it with a
gradient. Set the layer to Vivid Light 35%. Play around with the colors
until you're happy. I used this gradient.
8. Add whatever brushes you'd like to it, and you've got yourself an icon!
I hope this tutorial helped out~ If you've got any questions, feel free to leave a comment!