Slayers Quilt!
I have realised that I am actually two quilts behind in posting to my journal. I know I haven't been very active on the ol' live journal recently... I need to catch up with a couple of things first, and then I'll be around more. I know my Dad misses reading my posts!
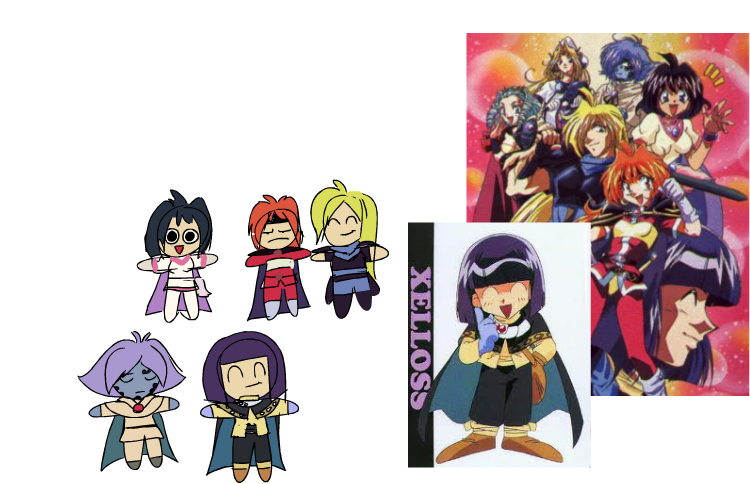
The first quilt I thought I'd share is one I made for my adopted third sister's baby. I know that bunny_moon absolutely loves the anime show Slayers, so I was really excited to do a quilt based around that idea. I absolutely love the show, as ridiculous as it is. It's really great to have a super powerful female lead who's not above blowing stuff up! What is it with girls only ever using magic as shields?
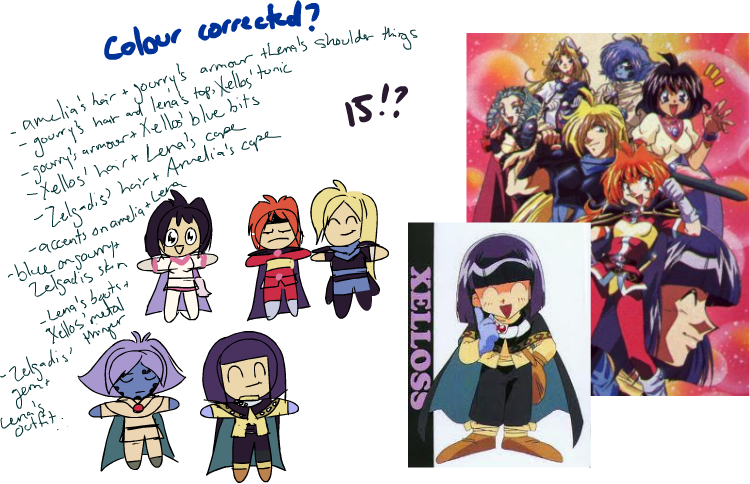
I did a quick sketch at work in flash, trying to figure out the colours I'd need, as well as reducing the sheer amount. It's like they don't design these characters to be reproduced in fabric, or something. Jerks! The reason I used flash was because my cintiq (my beautiful beautiful cintiq) was being rented by my work at the time, so I was limited to the programs they had installed. Since it was a flash show I was working on at the time, I drew it in flash.
Here's after I've reduced the colours. You can't reeeeally tell, so that's encouraging.
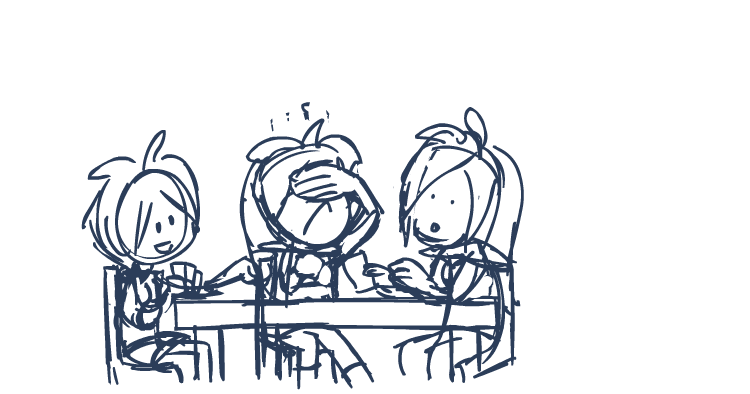
Here are some of my sketches! I wanted to also incorporate the idea of card games (they are playing Munchkin, because the father *loves* that game), so I was trying to get the idea that Lina is explaining the rules of this game to Gourry for the hundreth time. Because that's what she does in the show.
It was really hard to get something I liked for that. I didn't want her to look angry, since this was going to be a baby quilt, but rather exasperated. She went through a lot of changes, let me tell you!
She started off exasperated *and* angry:
Moved to a face palm...
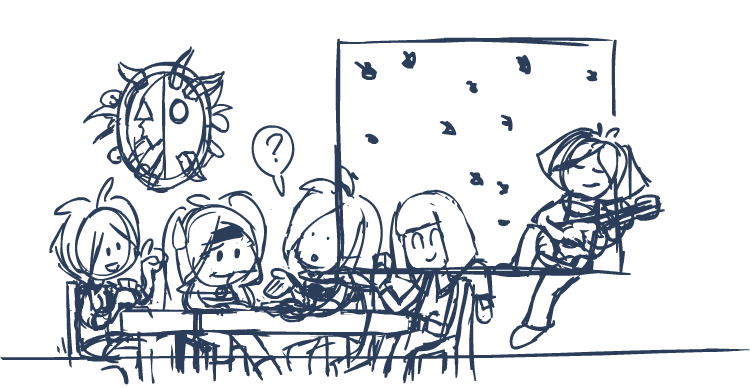
To completely unimpressed...
To... Bored I guess? Resigned?
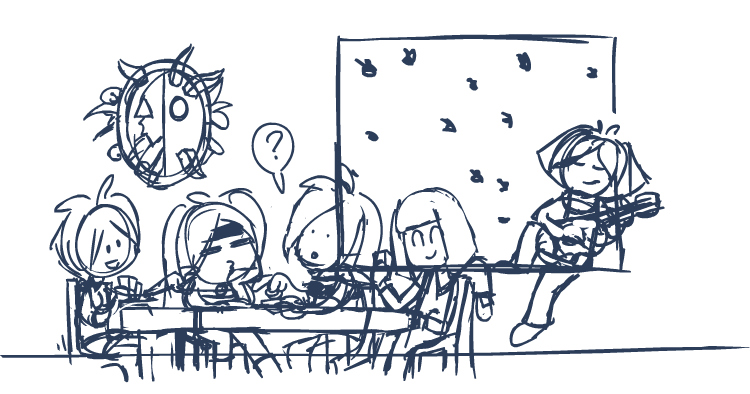
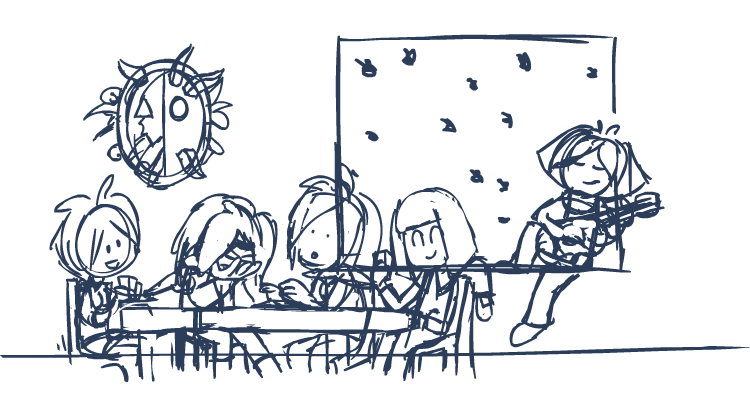
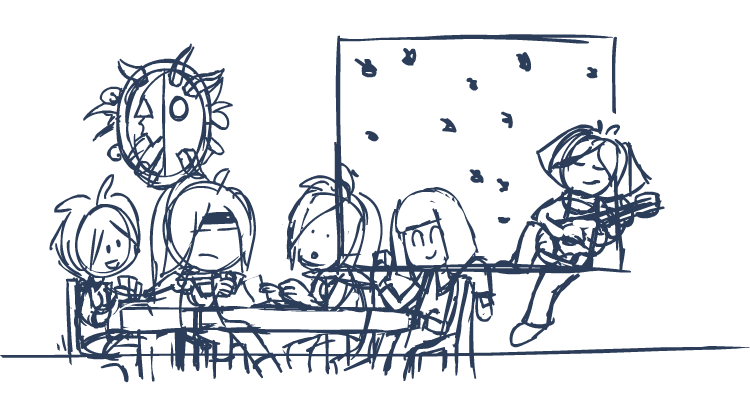
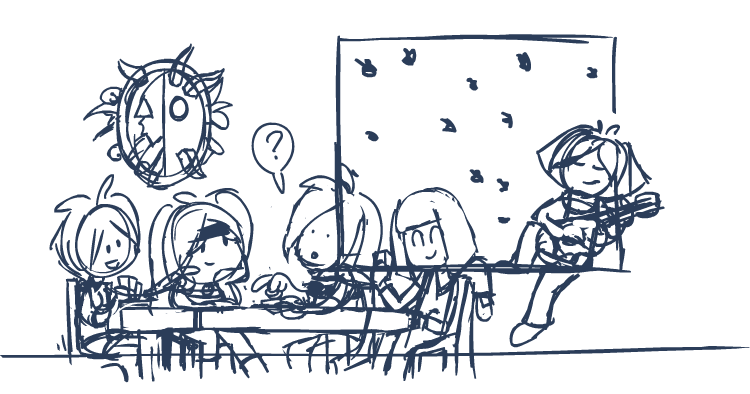
To something actually close to the final design!
To what became the final sketch.
I then moved into photoshop, so I could work with the final size of the quilt, and would be able to print off the design without worrying about having to scale it up or down. I also tried to solid up the characters a bit...
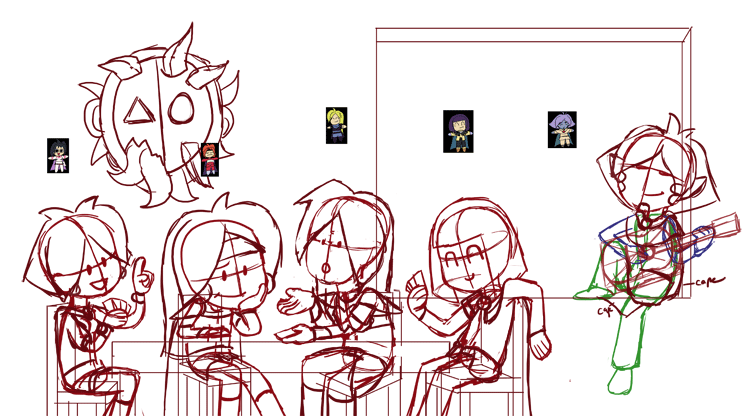
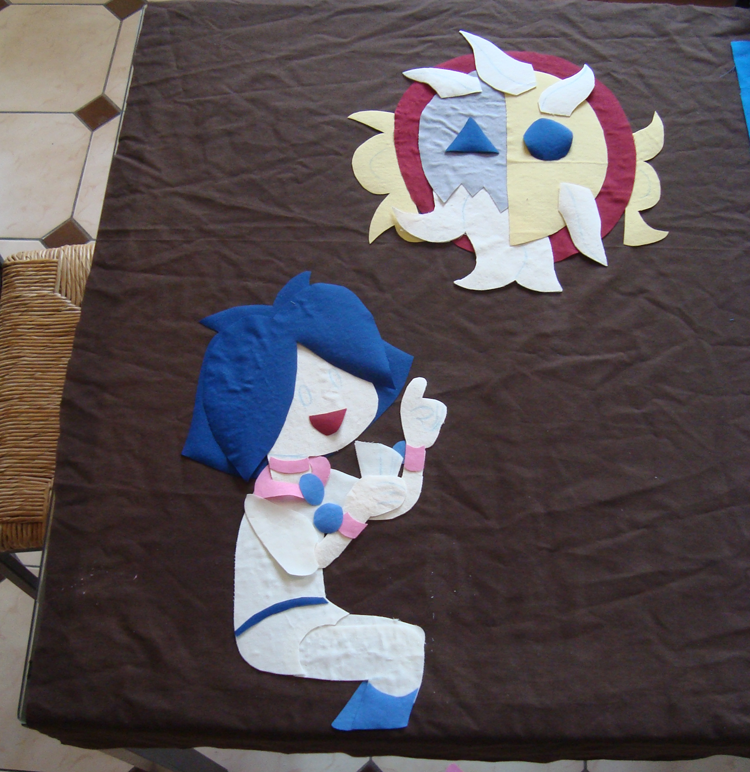
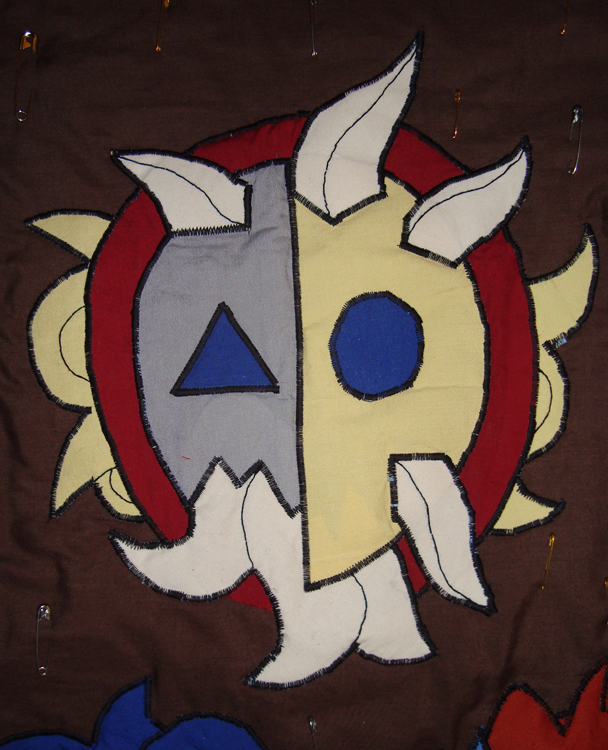
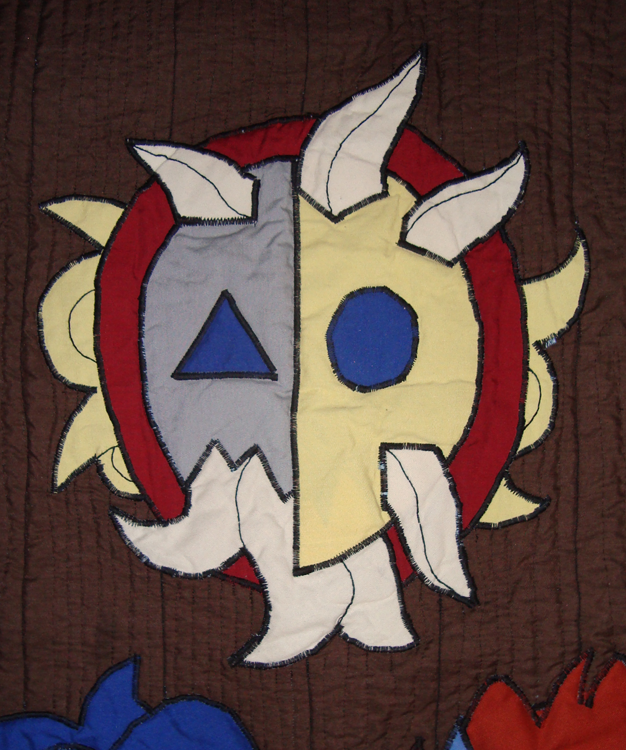
And then, after playing with a couple of background design ideas that eliminated the amazing Zoamelgustar mask, I decided that even though it was going to be a baby quilt, Zoamelgustar was too amazing to leave off. So back on he went!
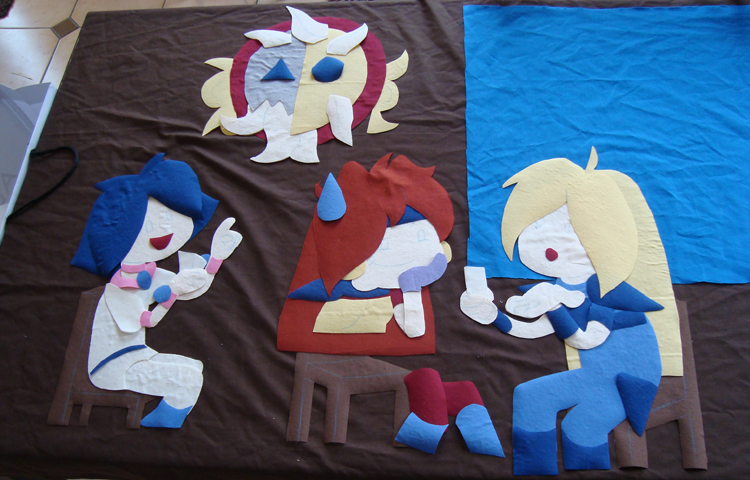
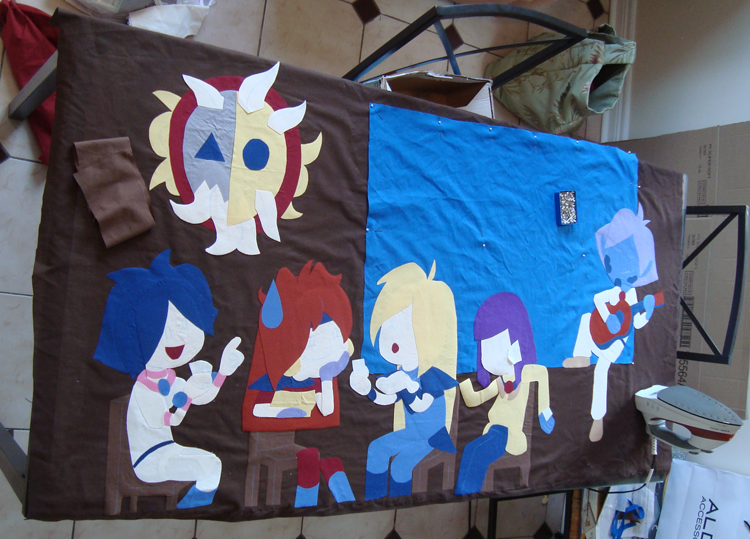
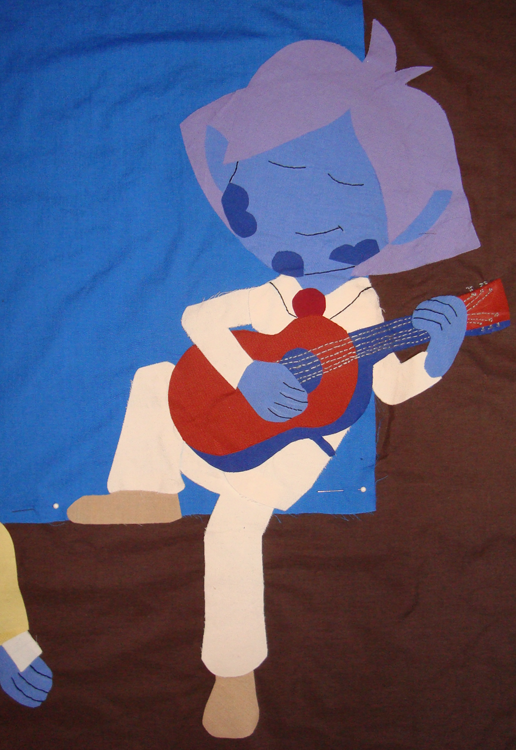
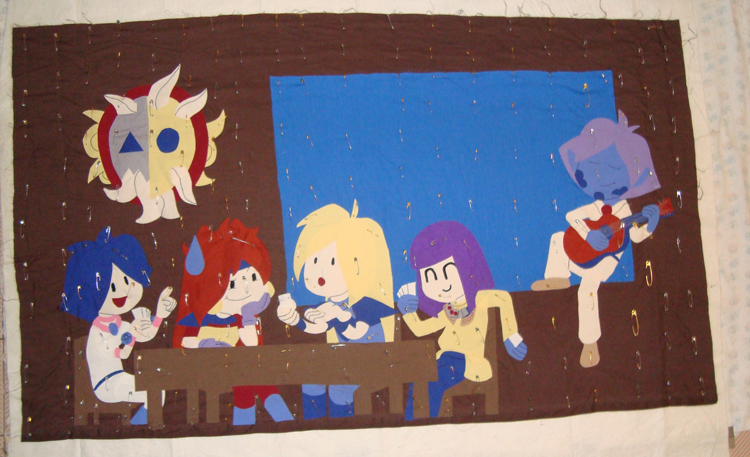
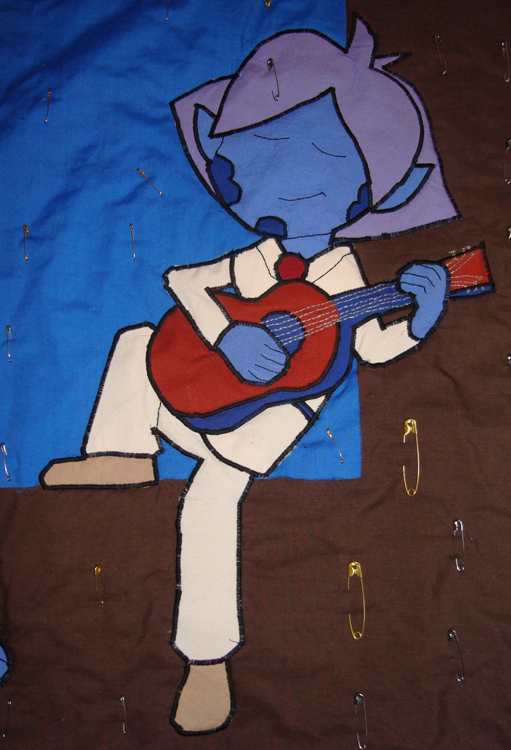
I wanted to have Gourry asking a question, Lina not about to explain it again, so Amelia takes over. Xellos is playing too, but he's cheating! Zelgadis has gone off to do his own thing, and as a renaissance man, would obviously be playing the guitar in the corner. I think he's my favourite part of this whole thing.
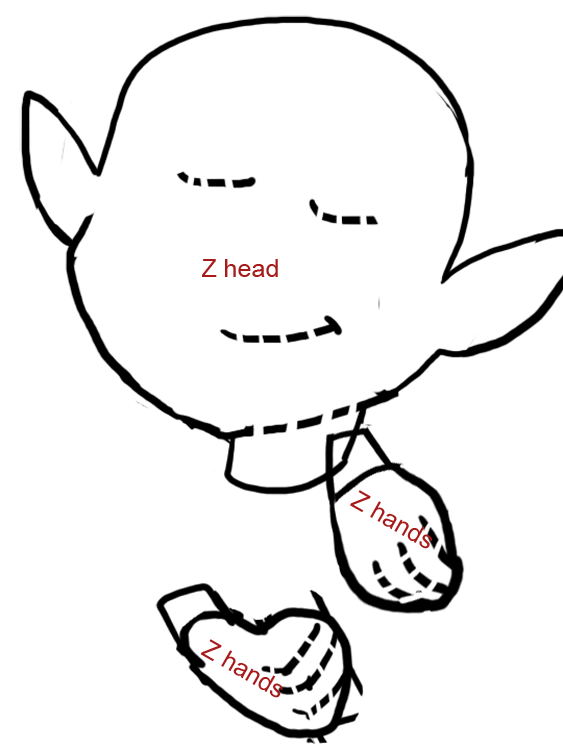
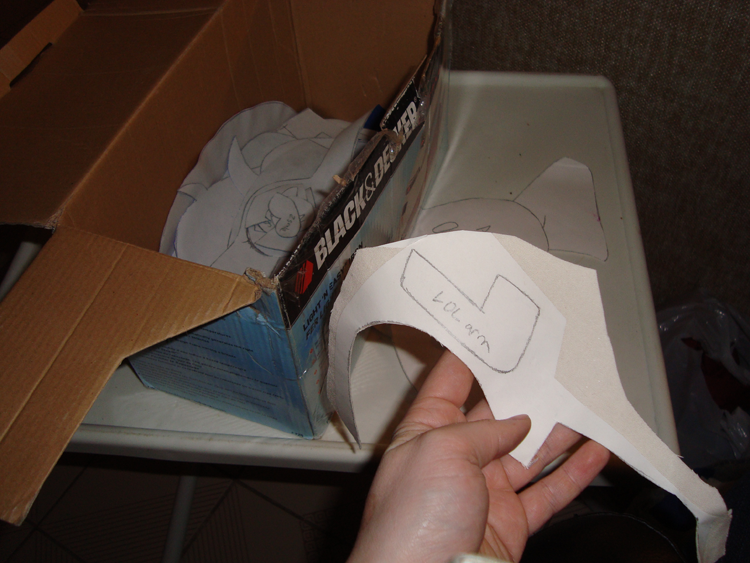
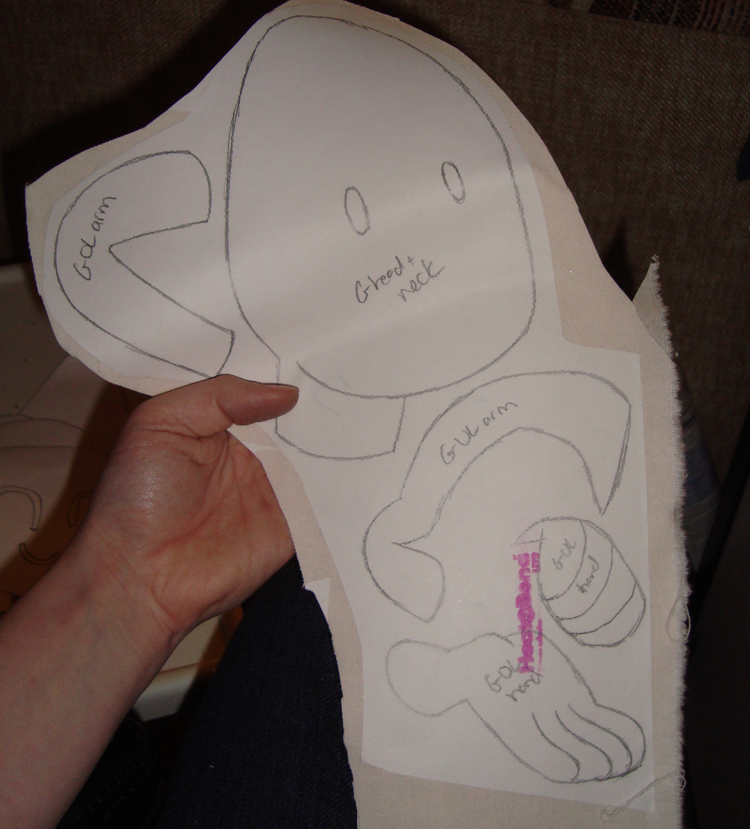
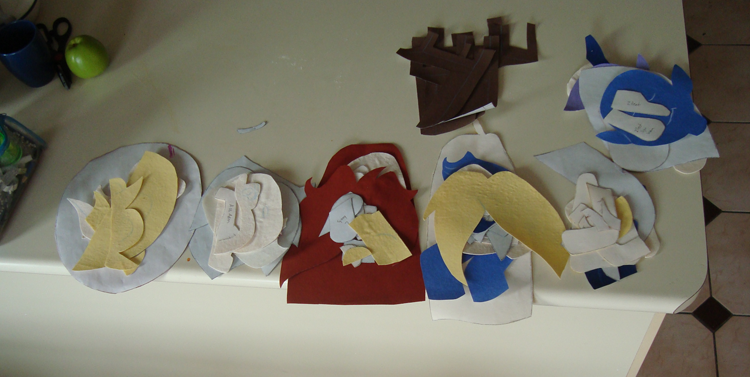
After finishing the drawing, I had to figure out the applique pieces. So I took my drawings, and started to cut them up. As an example, here's Zelgadis with all the layers that went into him.
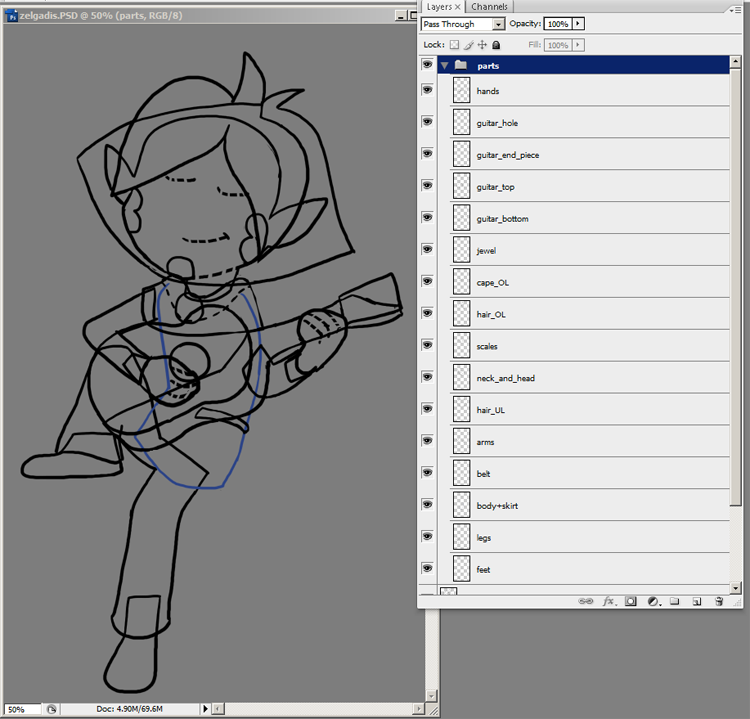
One of the things I am going to do differently next time is not have so much overlap. For example,you can see that the back piece of his hair is a full piece, then his head, then his little scales, then his bangs. Since I was using fusible interfacing, the quilt got a lot stiffer than I would have liked.
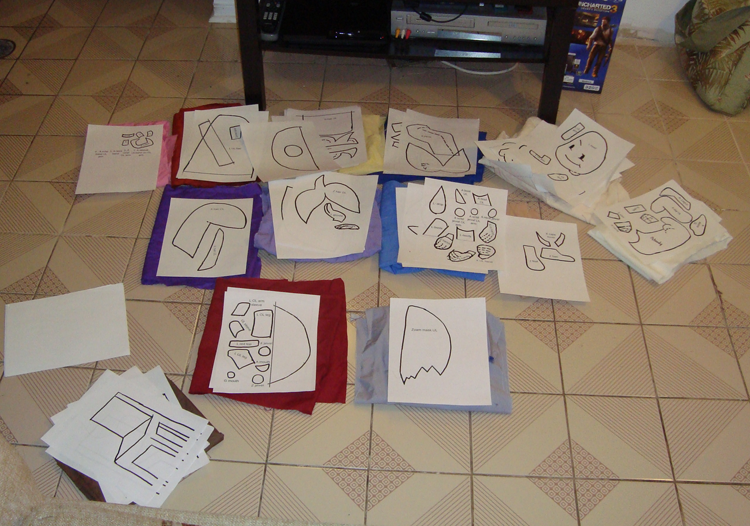
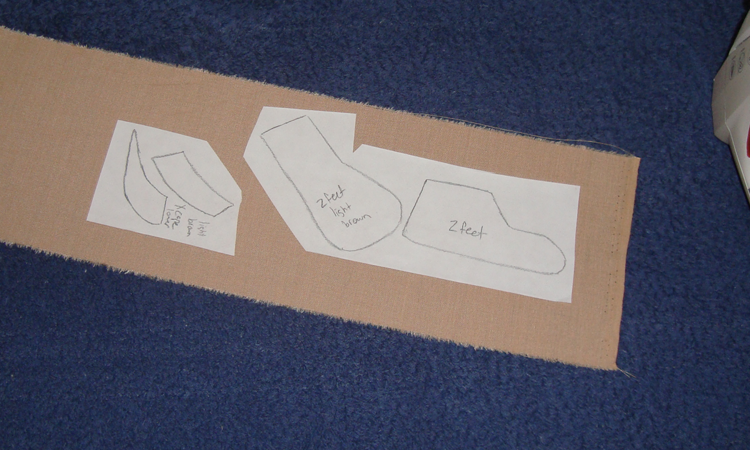
After, I separated out the pieces into fabric colours, and put them in a file that would print on an 8,5 by 11 sheet of printer paper.
... And then I remembered to flip them, so I wouldn't accidentally make a reverse of my design. 9__9;
Now it's time to go and actually buy the fabric! To fabricland! (Fabricland.)
After I bought all the colours that I needed, I was ready to start using the Heat 'n Bond lightweight fusible interfacing that I had picked up from Wal-Mart. That meant I had to trace all the stuff I printed out onto the heat 'n bond, which was a bit of a pain. I also labelled all the pieces, since they were a little ambiguous.
After I had finished tracing it, ironing it down, and cutting it out, I had a huge pile of pieces.
Time to start ironing them onto the backing fabric!
Amelia...
More of them...
All of them!
They actually stuck on the backing fabric pretty well, I was pleasantly surprised.
Having learned from my last quilt that it's best to do the embroidery after you've cut everything out and assembled it so you know how it'll look in the final position, I was now ready to start embroidering.
And embroidering...
And... Well, you get the idea. Lots of details!
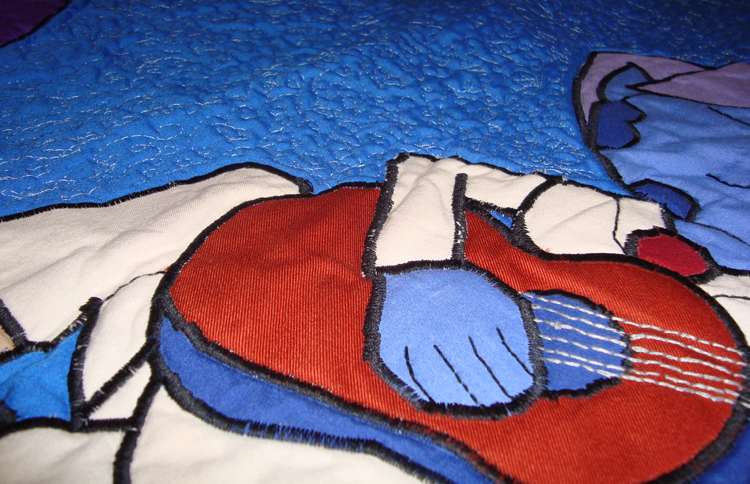
Look at all these strings. ALL THESE STRINGS. Also the little tuning thingers on the end of the guitar there!
Sorry for how blurry the photo is...

All of them together!

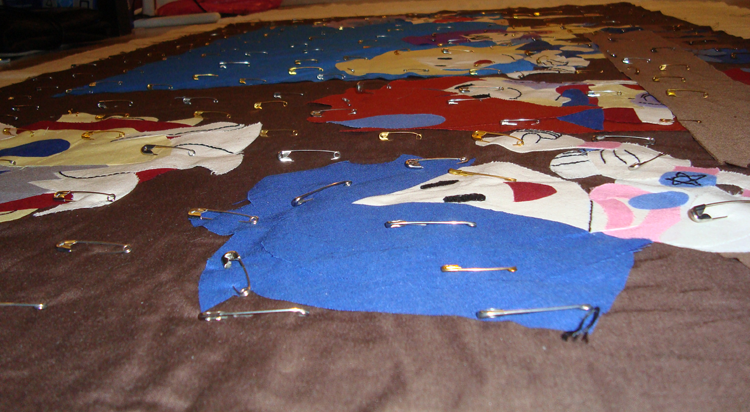
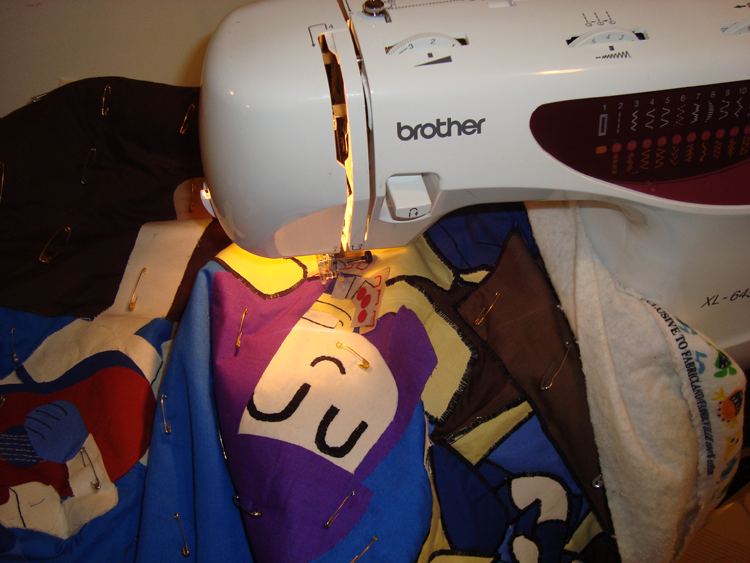
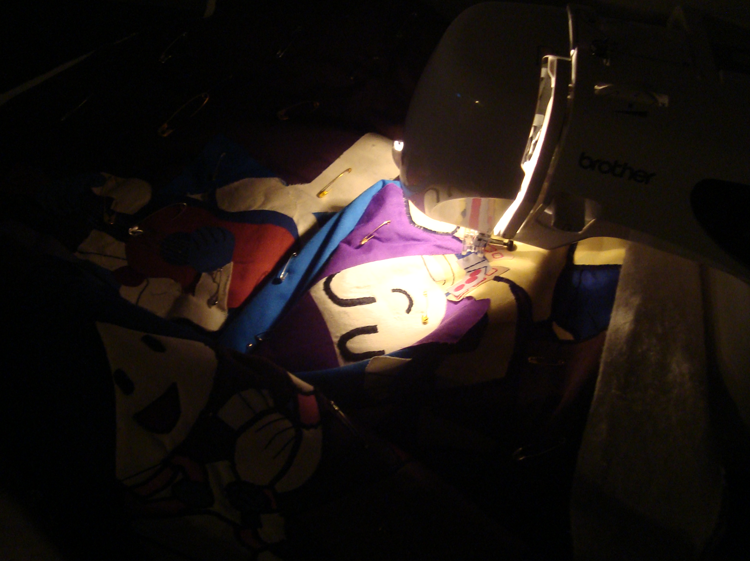
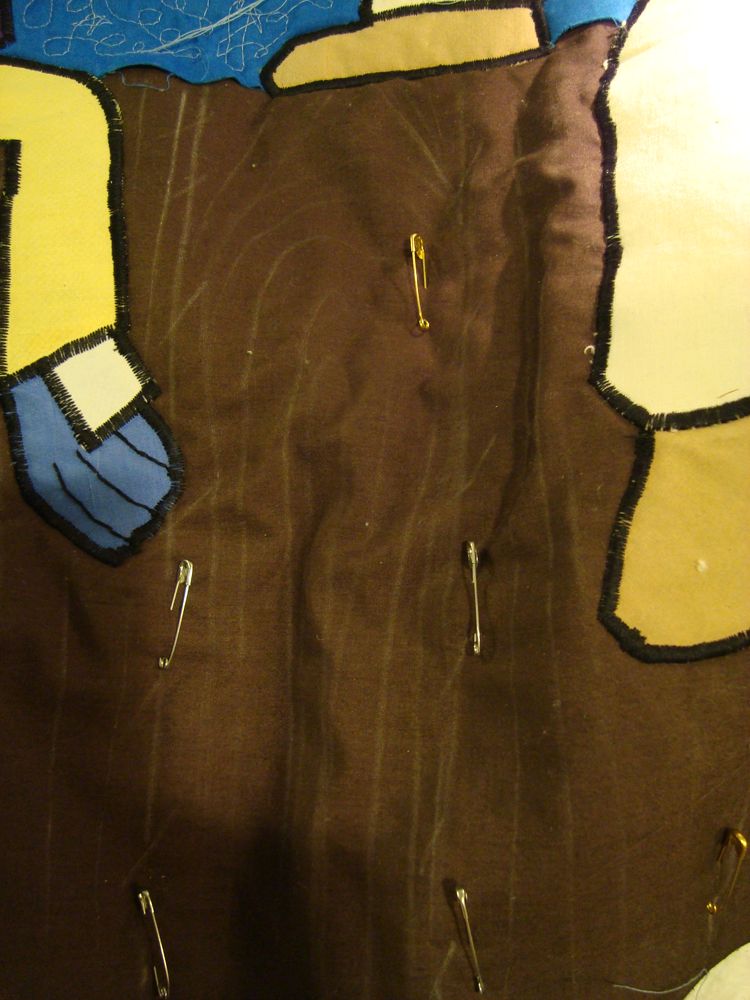
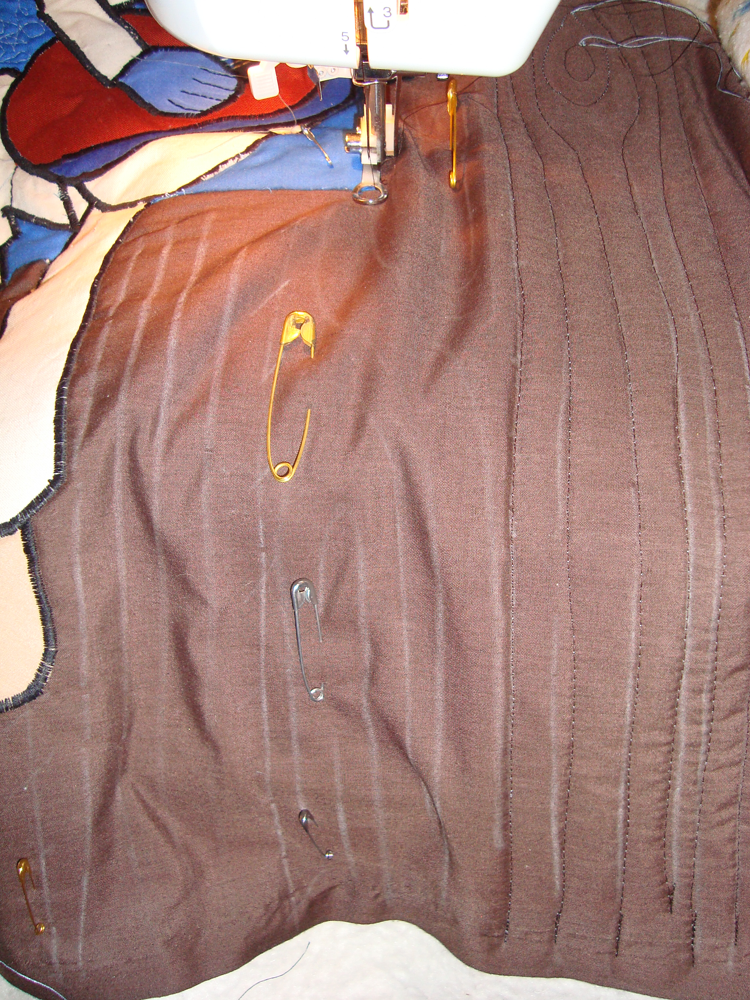
Now it was time to start doing the quilting, starting with the satin stitch around the outside of the character pieces. First off, I pinned everything to within an inch of it's life...
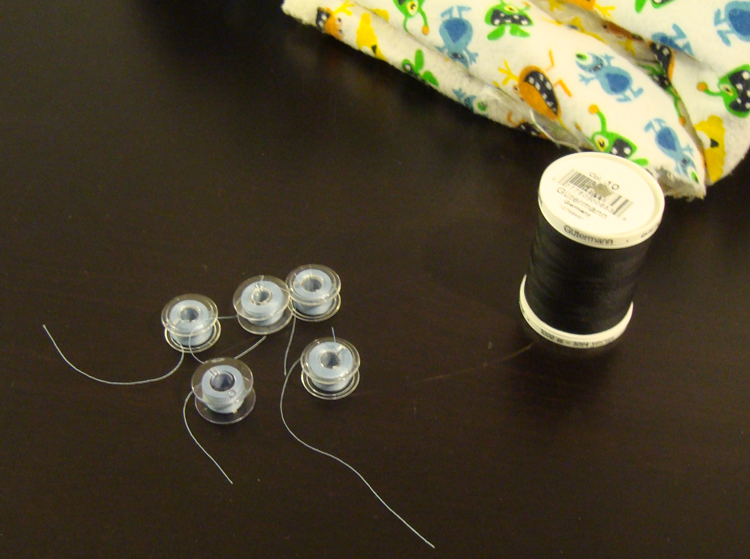
And I went through SO. MANY. BOBBINS. Bobbinssss.... I hates them, precious, I hates them. I resorted to winding a BAJILLION so I wouldn't have to stop every four seconds.
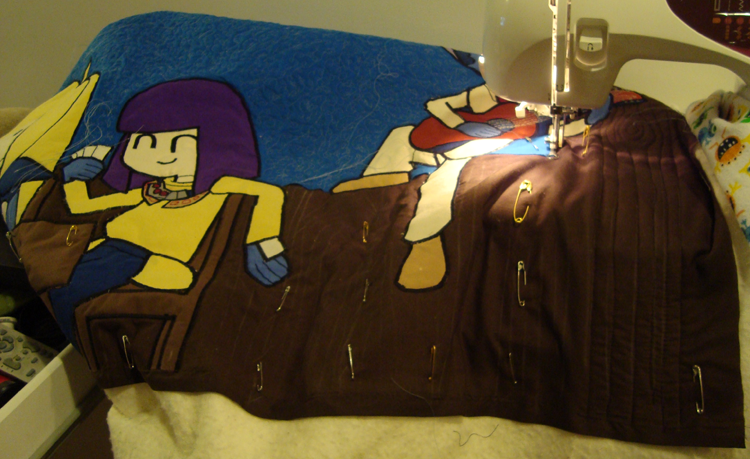
It was pretty difficult to actually manipulate the quilt the way I needed to with the characters being on such a large piece of fabric, so I think for the next quilt I'm going to try to put them on a piece of fabric that's a little larger than they are, and then hand applique that onto the backing fabric. EASIER. HOPEFULLY.
You can see my poor machine trying to accomadate all the ways I had to manipulate the quilt... Xellos was the WORST, he had all of those round baubles.
And this one because I thought it looked cool.
How they looked after ALL THAT STITCHING. For the most part, I was pleased with my lines.

Then I had to quilt the rest of the background. I decided I wouldn't go over the characters, since they had such close satin stitching anyway I didn't think I needed to. I was also unsure what kind of stitch I could use that wouldn't flatten them out, or interfere with the design I already had.
But for the background itself, I was a little stumped. In my head, they were in a wooden walled tavern, but I didn't really like any of the wood patterns I found online. So I decided I'd just DRAW the pattern myself, with a marking pencil, on the background.
I decided to do the background detailing in a brown close to the background colour, but I found that the boards weren't standing out enough. I did a very tight zigzag to define each board. THEN I realised tht I had forgotten to add the perspective on the window, so I did my best to take out the stitches there. It was HORRIBLE, but I managed... Sort of. Sort of managed.
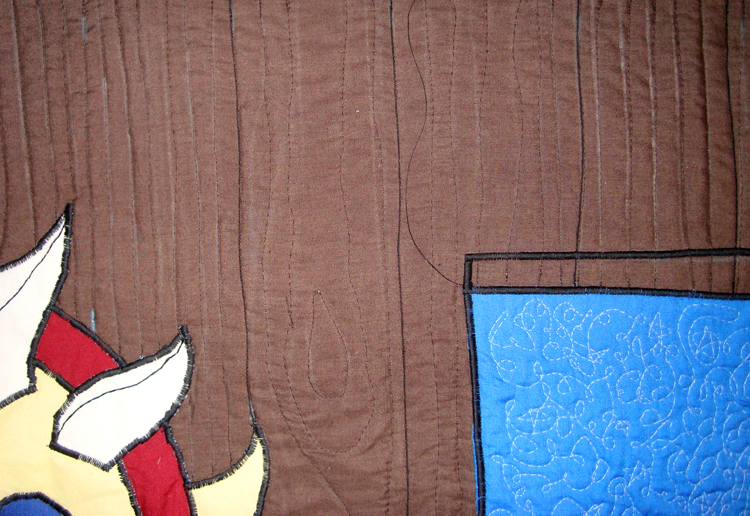
Here it is with all the wood grain done.
After that, it was my binding. I'd really like to get a nice crisp corner one of these days... Oh well. My mistake here was that I trimmed off the batting where it was sticking out past the quilt, and then realised that my binding was going to stick past the edge of my quilt too... And be super empty. ARGH. So I hand sewed it back on, so I could flip that binding around.
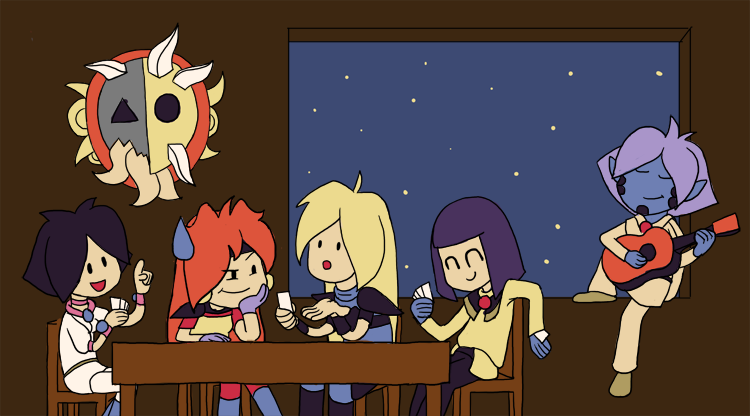
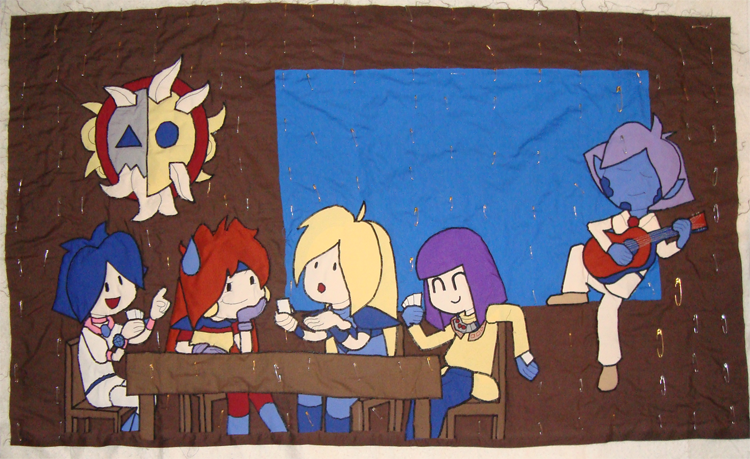
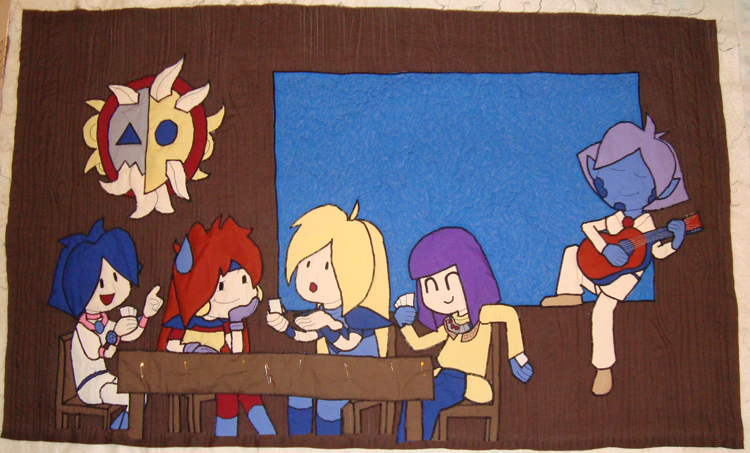
And now... IT. IS. DONE. (Doesn't feel like as much work, a year later. HA.)
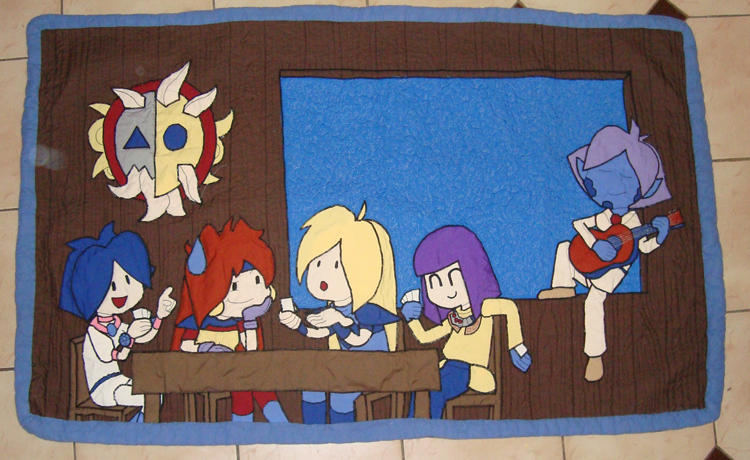
Full picture!
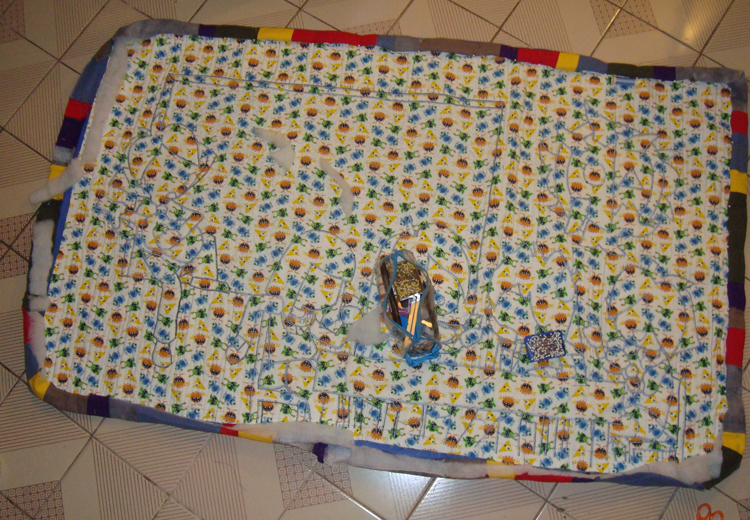
Back.
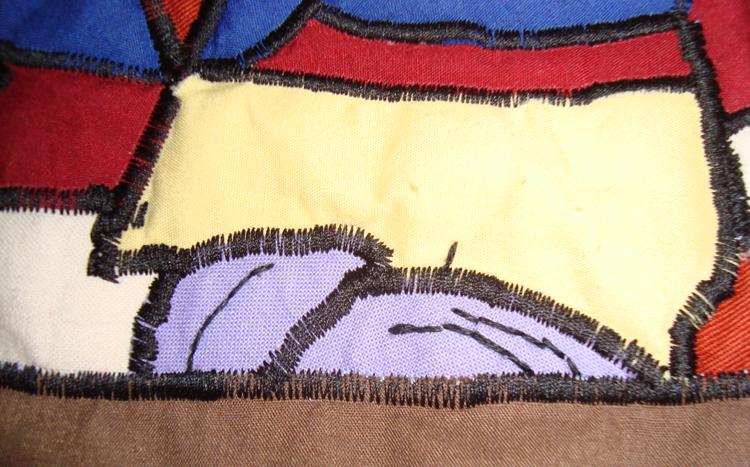
Detail shots! I took so many pictures...
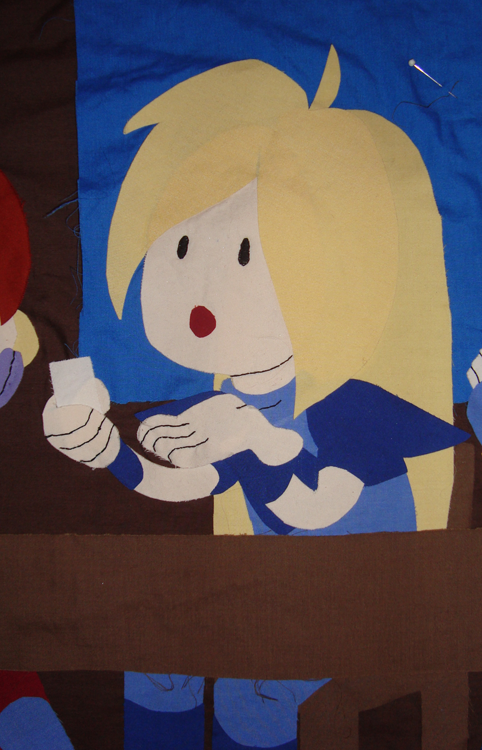
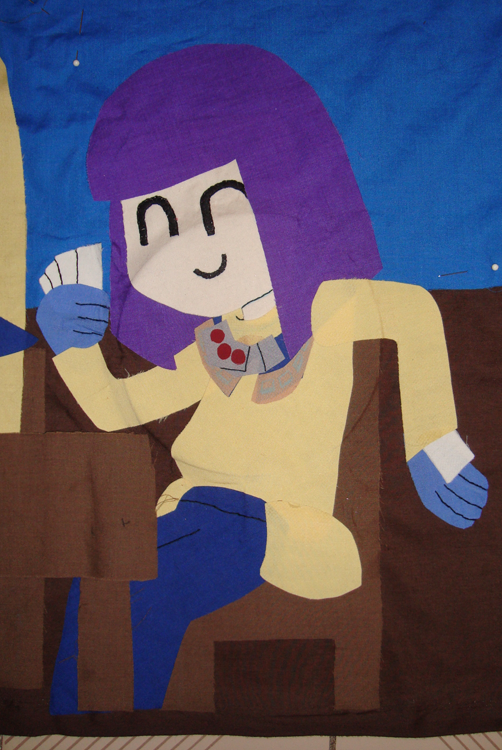
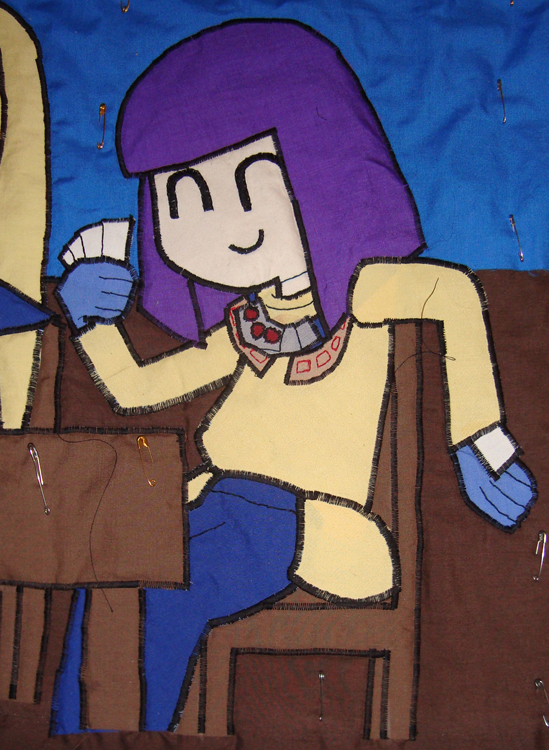
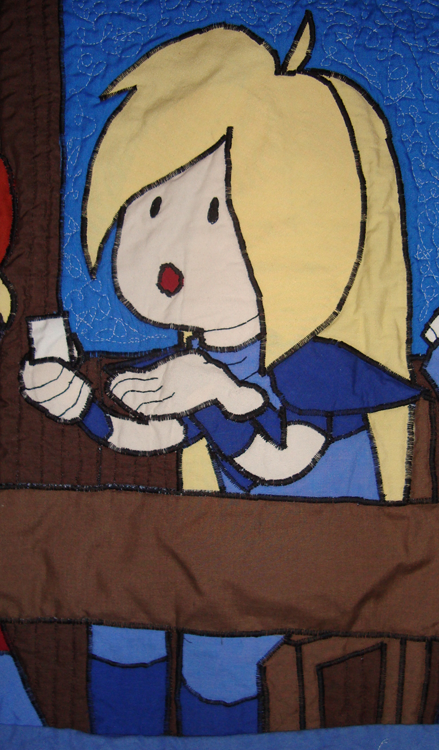
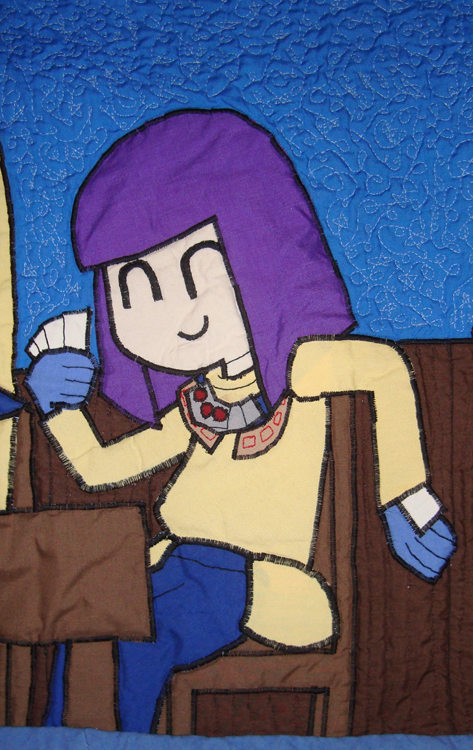
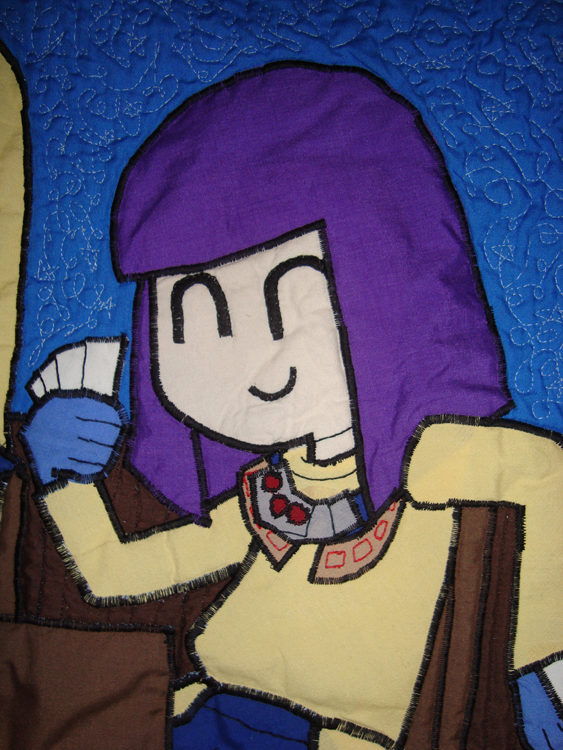
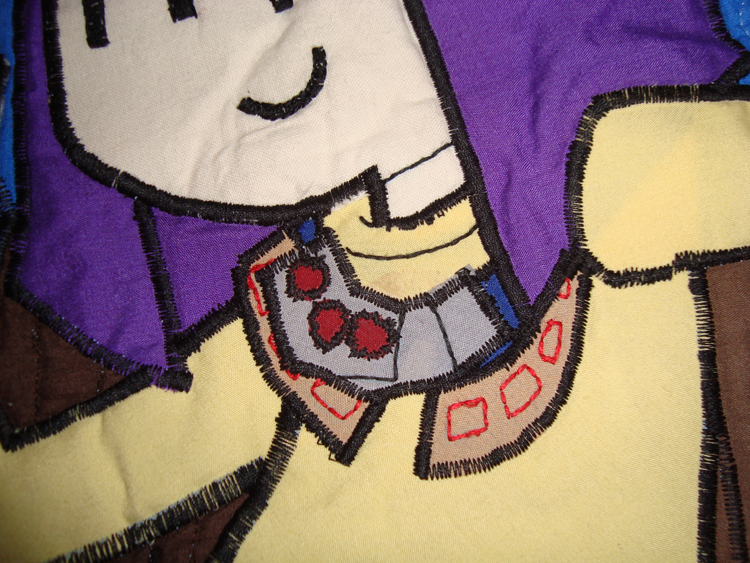
Amelia:

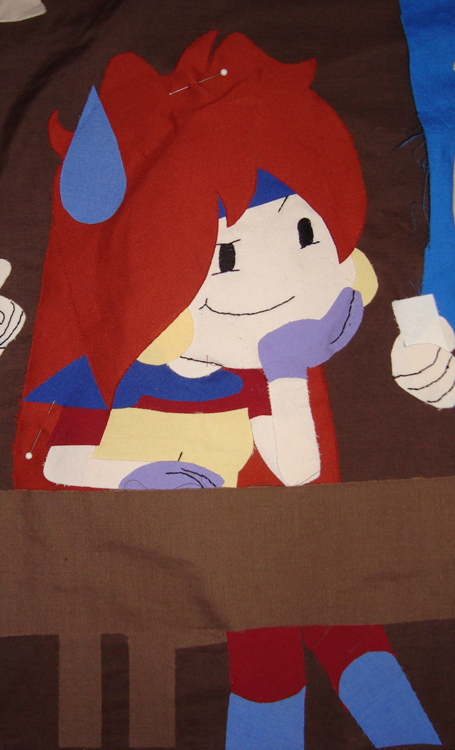
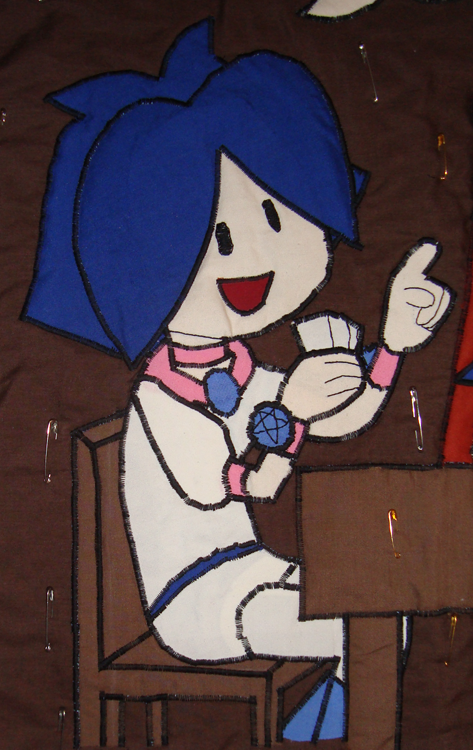
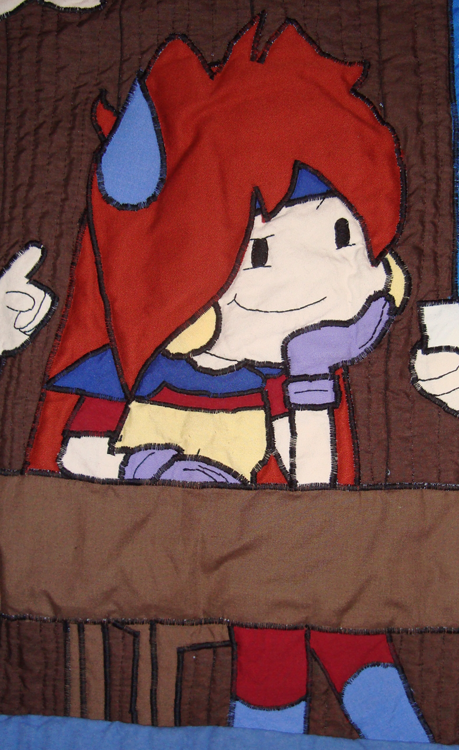
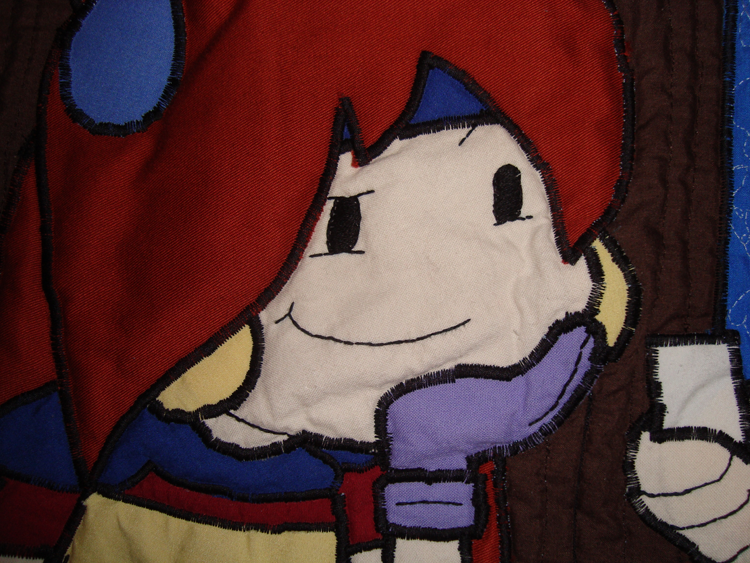
Lina:
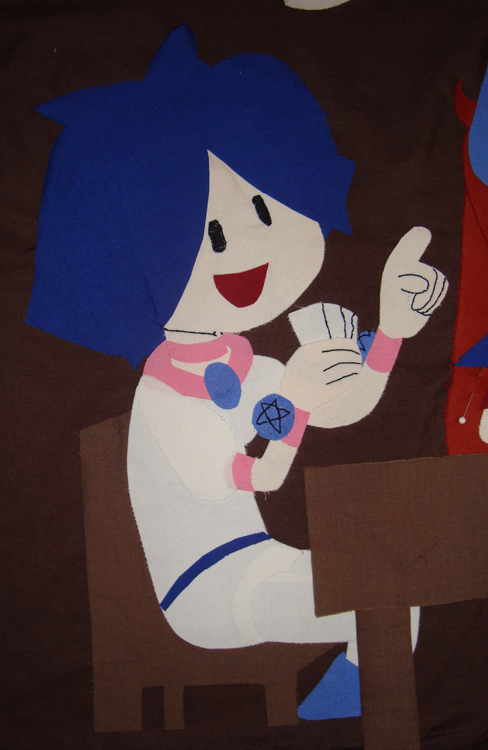
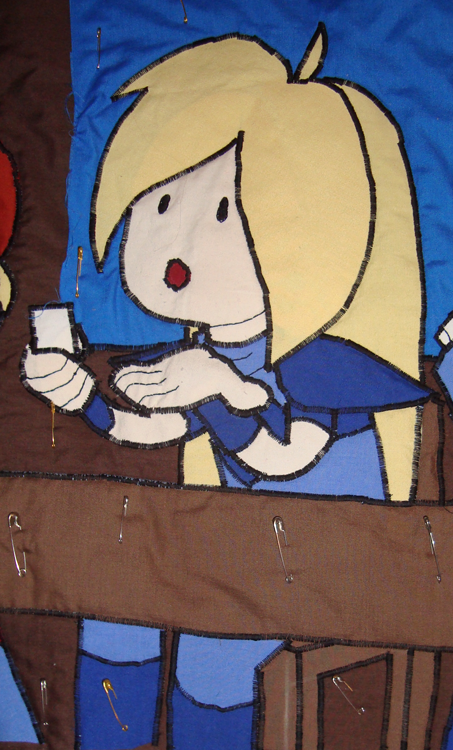
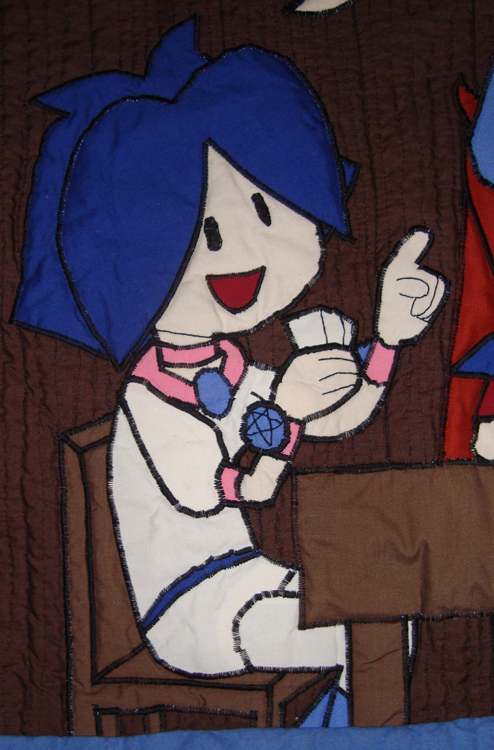
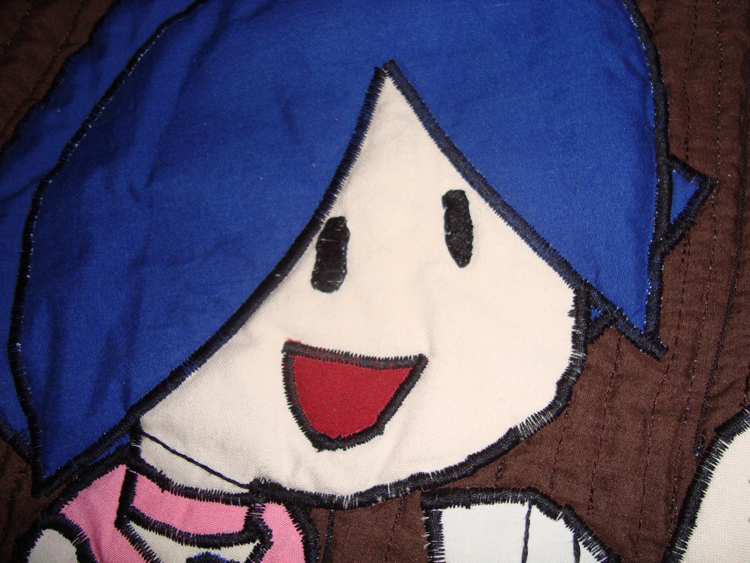
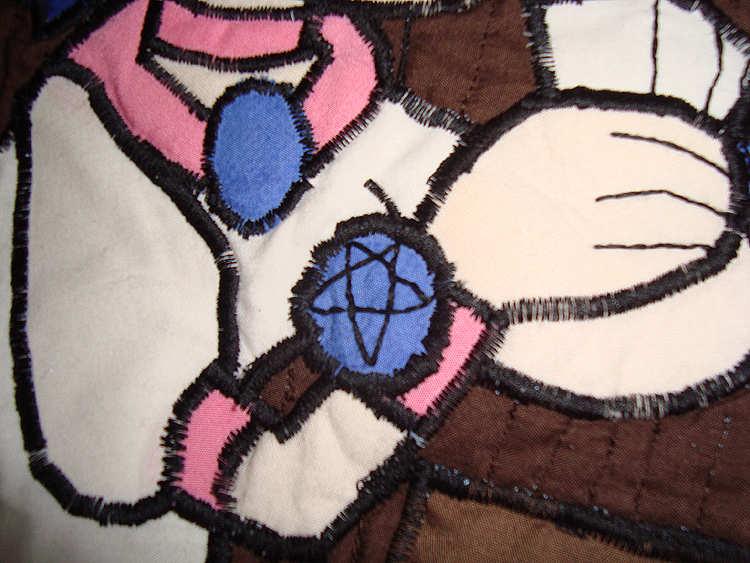
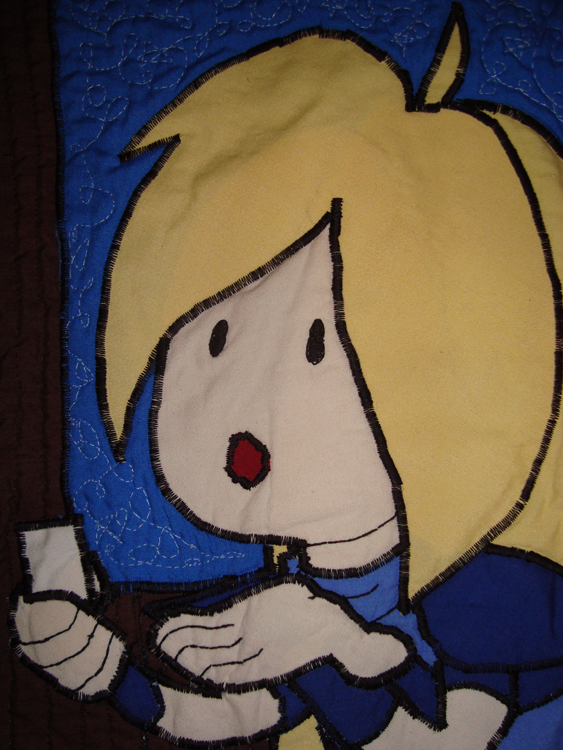
Gourry:
Xellos:
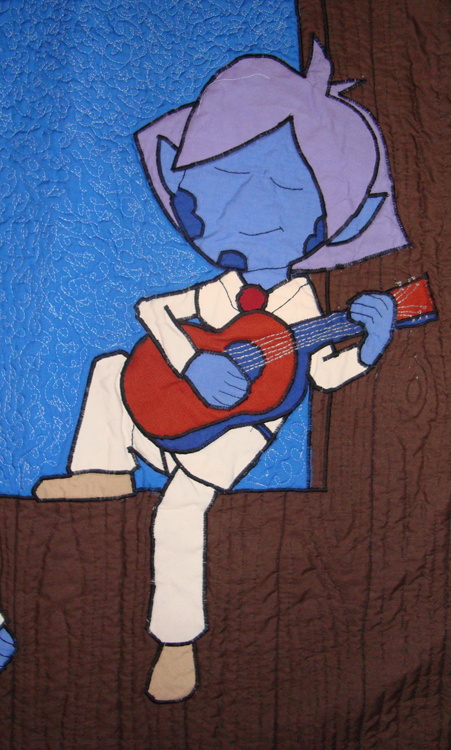
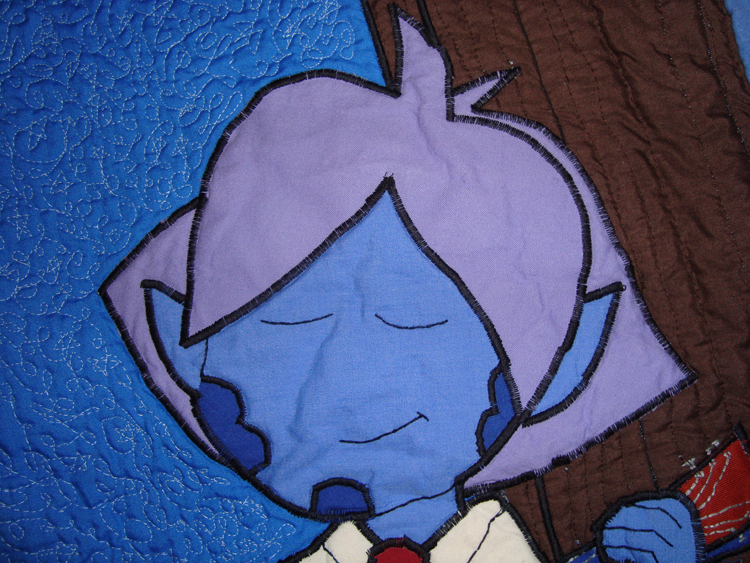
Zelgadis:
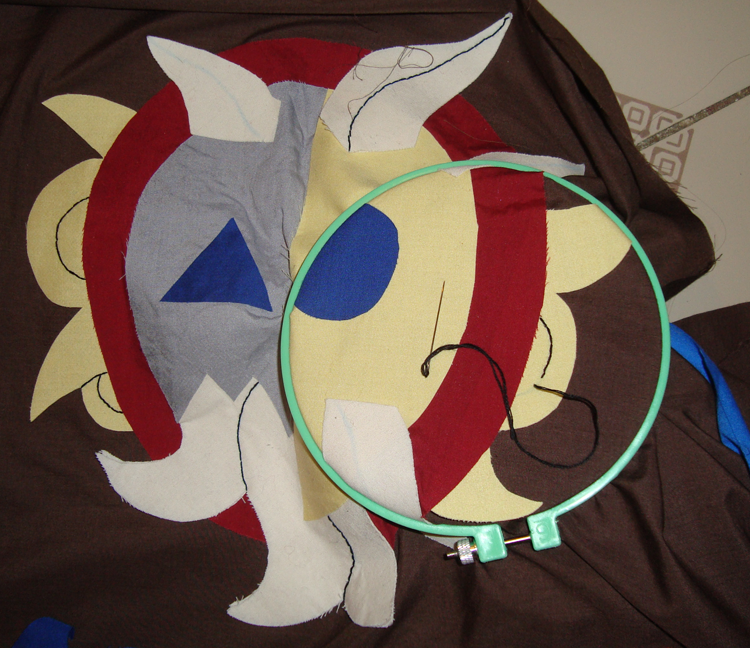
Zomelgustar:
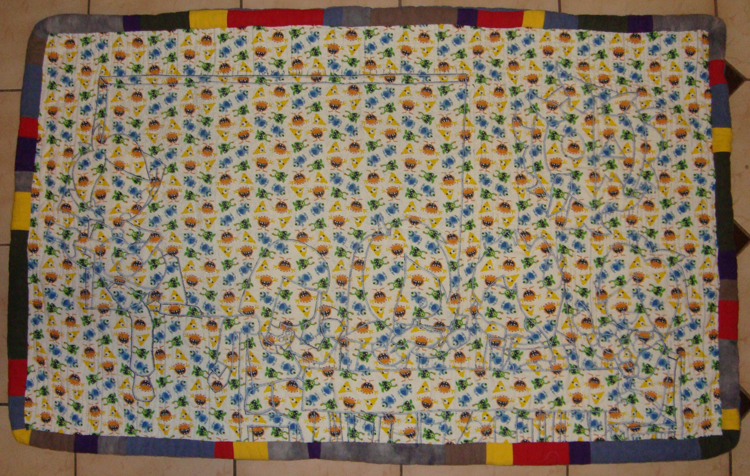
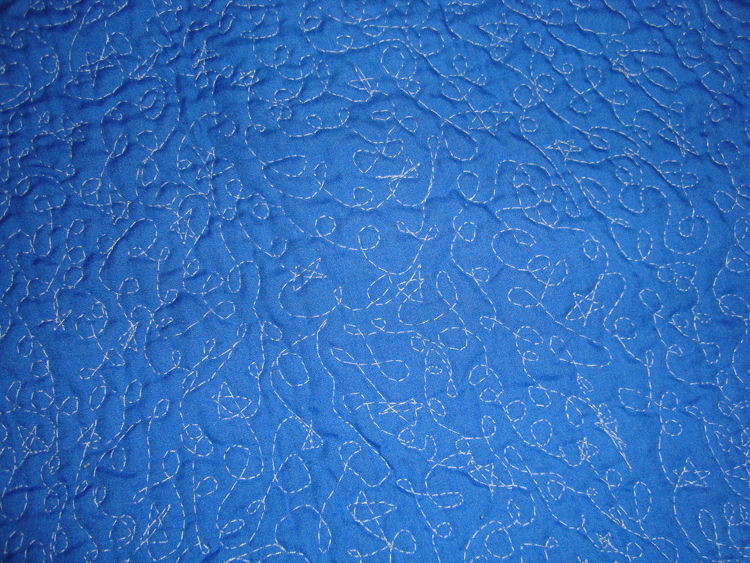
Also a picture of the back of the quilt, so you can see the stitches on the back.
And a picture of the free motion quilting I did in the window, to make it a starry night.
And the binding.
Hope you enjoyed that! It's my favourite quilt that I've made yet, I really loved the drawing.
The first quilt I thought I'd share is one I made for my adopted third sister's baby. I know that bunny_moon absolutely loves the anime show Slayers, so I was really excited to do a quilt based around that idea. I absolutely love the show, as ridiculous as it is. It's really great to have a super powerful female lead who's not above blowing stuff up! What is it with girls only ever using magic as shields?
I did a quick sketch at work in flash, trying to figure out the colours I'd need, as well as reducing the sheer amount. It's like they don't design these characters to be reproduced in fabric, or something. Jerks! The reason I used flash was because my cintiq (my beautiful beautiful cintiq) was being rented by my work at the time, so I was limited to the programs they had installed. Since it was a flash show I was working on at the time, I drew it in flash.
Here's after I've reduced the colours. You can't reeeeally tell, so that's encouraging.
Here are some of my sketches! I wanted to also incorporate the idea of card games (they are playing Munchkin, because the father *loves* that game), so I was trying to get the idea that Lina is explaining the rules of this game to Gourry for the hundreth time. Because that's what she does in the show.
It was really hard to get something I liked for that. I didn't want her to look angry, since this was going to be a baby quilt, but rather exasperated. She went through a lot of changes, let me tell you!
She started off exasperated *and* angry:
Moved to a face palm...
To completely unimpressed...
To... Bored I guess? Resigned?
To something actually close to the final design!
To what became the final sketch.
I then moved into photoshop, so I could work with the final size of the quilt, and would be able to print off the design without worrying about having to scale it up or down. I also tried to solid up the characters a bit...
And then, after playing with a couple of background design ideas that eliminated the amazing Zoamelgustar mask, I decided that even though it was going to be a baby quilt, Zoamelgustar was too amazing to leave off. So back on he went!
I wanted to have Gourry asking a question, Lina not about to explain it again, so Amelia takes over. Xellos is playing too, but he's cheating! Zelgadis has gone off to do his own thing, and as a renaissance man, would obviously be playing the guitar in the corner. I think he's my favourite part of this whole thing.
After finishing the drawing, I had to figure out the applique pieces. So I took my drawings, and started to cut them up. As an example, here's Zelgadis with all the layers that went into him.
One of the things I am going to do differently next time is not have so much overlap. For example,you can see that the back piece of his hair is a full piece, then his head, then his little scales, then his bangs. Since I was using fusible interfacing, the quilt got a lot stiffer than I would have liked.
After, I separated out the pieces into fabric colours, and put them in a file that would print on an 8,5 by 11 sheet of printer paper.
... And then I remembered to flip them, so I wouldn't accidentally make a reverse of my design. 9__9;
Now it's time to go and actually buy the fabric! To fabricland! (Fabricland.)
After I bought all the colours that I needed, I was ready to start using the Heat 'n Bond lightweight fusible interfacing that I had picked up from Wal-Mart. That meant I had to trace all the stuff I printed out onto the heat 'n bond, which was a bit of a pain. I also labelled all the pieces, since they were a little ambiguous.
After I had finished tracing it, ironing it down, and cutting it out, I had a huge pile of pieces.
Time to start ironing them onto the backing fabric!
Amelia...
More of them...
All of them!
They actually stuck on the backing fabric pretty well, I was pleasantly surprised.
Having learned from my last quilt that it's best to do the embroidery after you've cut everything out and assembled it so you know how it'll look in the final position, I was now ready to start embroidering.
And embroidering...
And... Well, you get the idea. Lots of details!
Look at all these strings. ALL THESE STRINGS. Also the little tuning thingers on the end of the guitar there!
Sorry for how blurry the photo is...
All of them together!
Now it was time to start doing the quilting, starting with the satin stitch around the outside of the character pieces. First off, I pinned everything to within an inch of it's life...
And I went through SO. MANY. BOBBINS. Bobbinssss.... I hates them, precious, I hates them. I resorted to winding a BAJILLION so I wouldn't have to stop every four seconds.
It was pretty difficult to actually manipulate the quilt the way I needed to with the characters being on such a large piece of fabric, so I think for the next quilt I'm going to try to put them on a piece of fabric that's a little larger than they are, and then hand applique that onto the backing fabric. EASIER. HOPEFULLY.
You can see my poor machine trying to accomadate all the ways I had to manipulate the quilt... Xellos was the WORST, he had all of those round baubles.
And this one because I thought it looked cool.
How they looked after ALL THAT STITCHING. For the most part, I was pleased with my lines.
Then I had to quilt the rest of the background. I decided I wouldn't go over the characters, since they had such close satin stitching anyway I didn't think I needed to. I was also unsure what kind of stitch I could use that wouldn't flatten them out, or interfere with the design I already had.
But for the background itself, I was a little stumped. In my head, they were in a wooden walled tavern, but I didn't really like any of the wood patterns I found online. So I decided I'd just DRAW the pattern myself, with a marking pencil, on the background.
I decided to do the background detailing in a brown close to the background colour, but I found that the boards weren't standing out enough. I did a very tight zigzag to define each board. THEN I realised tht I had forgotten to add the perspective on the window, so I did my best to take out the stitches there. It was HORRIBLE, but I managed... Sort of. Sort of managed.
Here it is with all the wood grain done.
After that, it was my binding. I'd really like to get a nice crisp corner one of these days... Oh well. My mistake here was that I trimmed off the batting where it was sticking out past the quilt, and then realised that my binding was going to stick past the edge of my quilt too... And be super empty. ARGH. So I hand sewed it back on, so I could flip that binding around.
And now... IT. IS. DONE. (Doesn't feel like as much work, a year later. HA.)
Full picture!
Back.
Detail shots! I took so many pictures...
Amelia:
Lina:
Gourry:
Xellos:
Zelgadis:
Zomelgustar:
Also a picture of the back of the quilt, so you can see the stitches on the back.
And a picture of the free motion quilting I did in the window, to make it a starry night.
And the binding.
Hope you enjoyed that! It's my favourite quilt that I've made yet, I really loved the drawing.