Leather bag - Finished Pictures.
Table of Contents.
1 - Table of Contents, and why in the first place.
2 - Research.
3 - Designing.
4 - Tooling.
5 - Other Leatherworking Steps.
6 - Dyeing.
7 - Assembling.
8 - Sewing a lining.
9 - Finished pictures!
Bag rotation:

And now we’re finished! I’m really pleased with how it came out, for the most part.


Arrrgh, shiny! I’m not sure how to take a nicer picture, without the glare. I think I just need to find something good to put over my light. You can see the snap I put on.


Side! I like how even the stitching looks, considering I just winged it for the strap. e__e

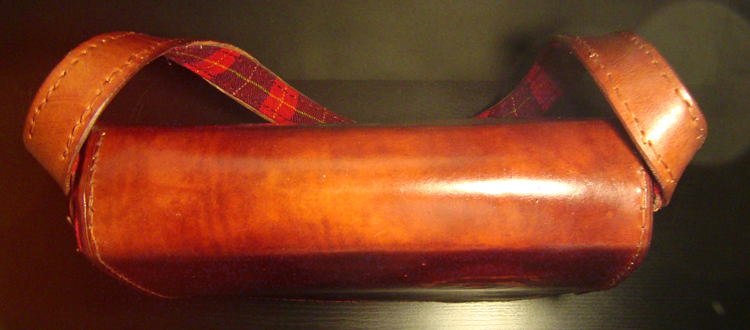
Back of my bag. You can see some marks already, and that’s just the downside to vegetable tanned leather apparently. Unfortunate.


Inside of my bag. This is how much of the stripe matching you can see! ARGH.

Bottom of my bag, and the flap.
Detail shots:

I went in and put in some shadows using some dye, and I think it really makes them stand out.

Seriously, I love the fez. This is his costume from series five.

Amy is showing Rory the wonders of the universe. He’s just enjoying being with her.

I like how it’s not solidly that bright undyed leather colour, I think that might have saved it a bit. It’s a neat effect.


As for how long it took... I bought the leather at Christmas time, and I only just finished it. The saddle stitching took LIKELY an *entire* season of Top Gear. An early season too, so about ten episodes. Plus I listened to some audio books. So all in all, I had it in an unfinished state for about eight months, and I likely put about a hundred hours into it.
1 - Table of Contents, and why in the first place.
2 - Research.
3 - Designing.
4 - Tooling.
5 - Other Leatherworking Steps.
6 - Dyeing.
7 - Assembling.
8 - Sewing a lining.
9 - Finished pictures!
Bag rotation:

And now we’re finished! I’m really pleased with how it came out, for the most part.


Arrrgh, shiny! I’m not sure how to take a nicer picture, without the glare. I think I just need to find something good to put over my light. You can see the snap I put on.


Side! I like how even the stitching looks, considering I just winged it for the strap. e__e

Back of my bag. You can see some marks already, and that’s just the downside to vegetable tanned leather apparently. Unfortunate.


Inside of my bag. This is how much of the stripe matching you can see! ARGH.

Bottom of my bag, and the flap.
Detail shots:

I went in and put in some shadows using some dye, and I think it really makes them stand out.

Seriously, I love the fez. This is his costume from series five.

Amy is showing Rory the wonders of the universe. He’s just enjoying being with her.

I like how it’s not solidly that bright undyed leather colour, I think that might have saved it a bit. It’s a neat effect.


As for how long it took... I bought the leather at Christmas time, and I only just finished it. The saddle stitching took LIKELY an *entire* season of Top Gear. An early season too, so about ten episodes. Plus I listened to some audio books. So all in all, I had it in an unfinished state for about eight months, and I likely put about a hundred hours into it.