Leather bag - Assembling.
Table of Contents.
1 - Table of Contents, and why in the first place.
2 - Research.
3 - Designing.
4 - Tooling.
5 - Other Leatherworking Steps.
6 - Dyeing.
7 - Assembling.
8 - Sewing a lining.
9 - Finished pictures!
Assembling.
I had also decided that I wanted to do the saddle stitch to put this thing together, because it was a super strong stitch.
One tutorial.
Youtube demonstration.
The book on hand stitching, by Al Stohlman.
This technique uses two hand needles, and since they recommended using waxed thread for some reason, I picked up some waxed thread. Not in this colour, they actually have many more colours at the store.
I bought a package of 10 hand needles, and it’s a good thing I did, I managed to bend a couple.
I found that the holes that I had drilled were large enough for one needle to go through, but the second one was super hard. I wound up using pliers to pull it through. In all the tutorials I read, they also talked about how you should pull one needle through, and then pull the other needle through without pulling the first thread tight. I’m not sure why, because I kept splitting the thread that I was using, and then you can’t tighten *either* side. TRUST ME it makes sense, as soon as you do it.
What I did instead was make sure that the first stitch that I did was in the middle, and then pulled one thread tight before putting the second needle through. Probably not the easiest way to go about it, but it worked better for me.
One thing I didn’t do was put the holes in the flap, or on the strap. I had decided that I would neaten up the ugly flesh side of the leather by making a lining, and then sewing it down so it wouldn’t come loose. Unfortunately I didn’t think this part through while I had access to the easy way, so I wound up having to do this with what basic tools I had.
Using a hammer and some nails, I carefully put nails in the corners of where the strap will attach to the bag. I left them there so everything would stay together.

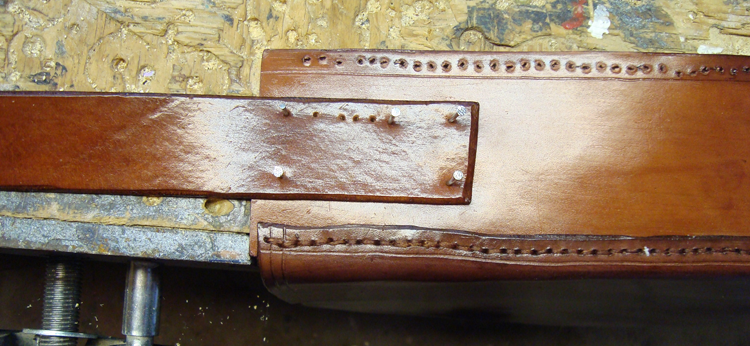
Then I did the X in the middle. And then, later, I did the same thing for the other side.
I also decided to glue the thing together,

thinking that would make it easier for me to work with. It sort of worked, but the glue that I used (leftover rubber cement) wasn’t great. Next time I’ll use barges.
To do the holes in the strap and the flap, I used a nail again and went along. After smashing my fingers a couple of times, I realised I wasn’t hitting the nail hard enough to make the hole *big* enough for me to get my needles through later. So I grabbed my pliers and held the nail with that. Because I am a WUSS and this was the easiest and quickest way to get through this! Don’t judge me!!
Obviously before I sewed together the handle or the flap, I needed to make the lining.
1 - Table of Contents, and why in the first place.
2 - Research.
3 - Designing.
4 - Tooling.
5 - Other Leatherworking Steps.
6 - Dyeing.
7 - Assembling.
8 - Sewing a lining.
9 - Finished pictures!
Assembling.
I had also decided that I wanted to do the saddle stitch to put this thing together, because it was a super strong stitch.
One tutorial.
Youtube demonstration.
The book on hand stitching, by Al Stohlman.
This technique uses two hand needles, and since they recommended using waxed thread for some reason, I picked up some waxed thread. Not in this colour, they actually have many more colours at the store.
I bought a package of 10 hand needles, and it’s a good thing I did, I managed to bend a couple.
I found that the holes that I had drilled were large enough for one needle to go through, but the second one was super hard. I wound up using pliers to pull it through. In all the tutorials I read, they also talked about how you should pull one needle through, and then pull the other needle through without pulling the first thread tight. I’m not sure why, because I kept splitting the thread that I was using, and then you can’t tighten *either* side. TRUST ME it makes sense, as soon as you do it.
What I did instead was make sure that the first stitch that I did was in the middle, and then pulled one thread tight before putting the second needle through. Probably not the easiest way to go about it, but it worked better for me.
One thing I didn’t do was put the holes in the flap, or on the strap. I had decided that I would neaten up the ugly flesh side of the leather by making a lining, and then sewing it down so it wouldn’t come loose. Unfortunately I didn’t think this part through while I had access to the easy way, so I wound up having to do this with what basic tools I had.
Using a hammer and some nails, I carefully put nails in the corners of where the strap will attach to the bag. I left them there so everything would stay together.
Then I did the X in the middle. And then, later, I did the same thing for the other side.
I also decided to glue the thing together,
thinking that would make it easier for me to work with. It sort of worked, but the glue that I used (leftover rubber cement) wasn’t great. Next time I’ll use barges.
To do the holes in the strap and the flap, I used a nail again and went along. After smashing my fingers a couple of times, I realised I wasn’t hitting the nail hard enough to make the hole *big* enough for me to get my needles through later. So I grabbed my pliers and held the nail with that. Because I am a WUSS and this was the easiest and quickest way to get through this! Don’t judge me!!
Obviously before I sewed together the handle or the flap, I needed to make the lining.