Guide to Reading Japanese Patterns
Just thought I'd make a guide on reading Japanese amigurumi patterns to complement this awesome guide, which I've seen linked a couple of times, since it isn't amigurumi-specific and hence didn't include some of the stitches commonly used to make amis. I am of the (very biased!) view that Japanese amis are some of the awesomest things ever, so I think it would be wonderful if others could learn how to read these patterns too. :)
Do keep in mind that while I've only been working from these patterns, I'm still kind of new to this, so for those who have experience with these patterns (and in Japanese), if I've missed out something or got something wrong somewhere, please feel free to correct me! :) Now that's out of the way, let's get started!
*This guide uses US stitch-terminology.
INTRODUCTION
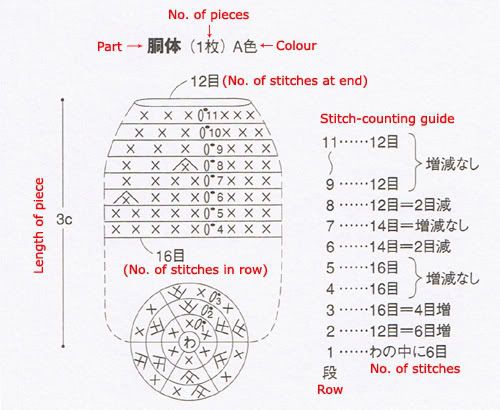
Japanese ami patterns usually look like this:

You may also see a stitch-counting guide at the side of the pattern, which shows how many stitches you should have in each row. It also tells you how many stitches to increase or decrease and when to keep the number of stitches constant, so you don't have to waste time counting the number of stitches in the pattern.
STITCH-GUIDE & TERMINOLOGY:


There's a whole list on a Japanese-English lexicon here which was posted up sometime back.
PATTERN-READING:
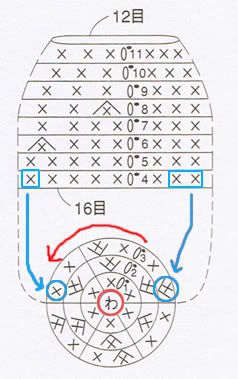
Patterns read anti-clockwise, so the stitch on the left of the row number is the starting stitch of the row, and the last stitch of each row is on the right of the row number. Do note that the circle highlighted in red refers to the magic ring that you start from, and the first row consists of the six stitches you started off with. Also, there may be patterns that require you to chain six stitches instead of creating a magic ring with six stitches, and when this happens, there is no Japanese character (pronounced "wa", meaning circle) in the middle of the circle.

After a couple of rows, probably to save space, the first few and the last few stitches of the pattern will be shown as a rough guide. The stitches marked out in blue correspond to each other, showing where the guide ends and the rest of the pattern is not shown. When you decrease, eg. in row 6, simply follow the pattern shown for the first 5 stitches (sc, sc, sc, dec) and apply it to the rest of the row.
*The method of starting a new row here is actually a slip stitch followed by a chain stitch, but I'm not sure why they would do this, because I've tried it and it forms a visible line of different stitches (and causes my teddy bears to look like brain-surgery patients!). There are certain patterns where they call for both this method and the usual way of starting a new row (ie., crocheting the first stitch of the new row instead of doing slst+ch first), but I haven't tried that so I don't know the difference. If anyone could shed light on this issue, that would be great as I'm personally quite curious about it.

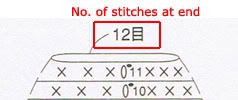
At the end of the pattern, you should have the number of stitches as stated. Sometimes the instructions will call for you to stuff the part and sew it up.
That's pretty much it, I think. There's stuff I can't really explain here, but which is also quite secondary (e.g. stitching the parts at certain positions - it's pretty commonsensical and you could probably easily figure it out yourself). Hopefully I haven't missed out anything. If there's anything you need clarification on or anything I missed out do tell me. Happy ami-making! :)
Credits: The pattern scan used in this guide was taken from: ちいさなかわいいあみぐるみと小物 (Small and cute amigurumi and komono), ISBN 978-4-8347-2761-6.
*Updated 06/07/2010
Do keep in mind that while I've only been working from these patterns, I'm still kind of new to this, so for those who have experience with these patterns (and in Japanese), if I've missed out something or got something wrong somewhere, please feel free to correct me! :) Now that's out of the way, let's get started!
*This guide uses US stitch-terminology.
INTRODUCTION
Japanese ami patterns usually look like this:

You may also see a stitch-counting guide at the side of the pattern, which shows how many stitches you should have in each row. It also tells you how many stitches to increase or decrease and when to keep the number of stitches constant, so you don't have to waste time counting the number of stitches in the pattern.
STITCH-GUIDE & TERMINOLOGY:


There's a whole list on a Japanese-English lexicon here which was posted up sometime back.
PATTERN-READING:
Patterns read anti-clockwise, so the stitch on the left of the row number is the starting stitch of the row, and the last stitch of each row is on the right of the row number. Do note that the circle highlighted in red refers to the magic ring that you start from, and the first row consists of the six stitches you started off with. Also, there may be patterns that require you to chain six stitches instead of creating a magic ring with six stitches, and when this happens, there is no Japanese character (pronounced "wa", meaning circle) in the middle of the circle.

After a couple of rows, probably to save space, the first few and the last few stitches of the pattern will be shown as a rough guide. The stitches marked out in blue correspond to each other, showing where the guide ends and the rest of the pattern is not shown. When you decrease, eg. in row 6, simply follow the pattern shown for the first 5 stitches (sc, sc, sc, dec) and apply it to the rest of the row.
*The method of starting a new row here is actually a slip stitch followed by a chain stitch, but I'm not sure why they would do this, because I've tried it and it forms a visible line of different stitches (and causes my teddy bears to look like brain-surgery patients!). There are certain patterns where they call for both this method and the usual way of starting a new row (ie., crocheting the first stitch of the new row instead of doing slst+ch first), but I haven't tried that so I don't know the difference. If anyone could shed light on this issue, that would be great as I'm personally quite curious about it.

At the end of the pattern, you should have the number of stitches as stated. Sometimes the instructions will call for you to stuff the part and sew it up.
That's pretty much it, I think. There's stuff I can't really explain here, but which is also quite secondary (e.g. stitching the parts at certain positions - it's pretty commonsensical and you could probably easily figure it out yourself). Hopefully I haven't missed out anything. If there's anything you need clarification on or anything I missed out do tell me. Happy ami-making! :)
Credits: The pattern scan used in this guide was taken from: ちいさなかわいいあみぐるみと小物 (Small and cute amigurumi and komono), ISBN 978-4-8347-2761-6.
*Updated 06/07/2010