Supernatural Tutorials.
Couple of days ago cakeinjection asked on icon_tutorial for some help to get a good colouring on a dark Supernatural screencapture. I come up with the first result but at that day I didn't have time to write a tutorial, so here it is. [Also requested by ssspiffy]
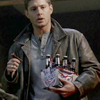
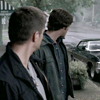
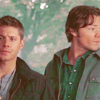
We're going from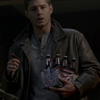
to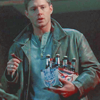
using Photoshop CS.
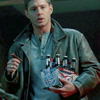
We're going from
to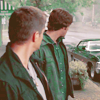
using Photoshop CS.
Dean : Yeah, that's called lying.'>
Tutorial 001
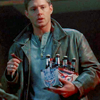
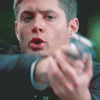
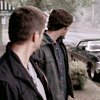
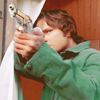
From
to
001. Open your Picture. Resize/Crop it. Sharpen if you want to. (I didnt sharpen mine)
002. Duplicate your base. Blend Mode: Screen. Opacity: 100%. *Layer 01*.
>>
003. Duplicate your base. Blend Mode: Screen. Opacity: 100%. *Layer 02*.
>>
004. Go to Layers >> New Adjustment layer >> Selective Colours. *Method Relative*
Reds: -100; +92; +100; 0.
Neutrals: +25; -12; -15; 0.
>>
005. Go to Layers >> New Adjustment Layer >> Color Balance. (Midtones/preserve luminosity)
+58; +25; +24
>>
006. Go to Layers >> New Adjustment Layers >> Hue/Saturation.
Masters: +12
Reds: +10
Cyans: +25
>>
007. Go to Layers >> New Adjustment layer >> Selective Colours. *Method Relative*
Yellows: 0; 0; -54; 0
Neutrals: +12; 0; 0; -15
Blacks: 0; 0; 0; -15.
>>
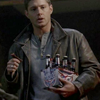
Final Result:
>>
Other Icons made with the same tecnique


Ps. My screencaptures were lighter, so I only used 1 screen layer for these icons.
********************
Tutorial 002
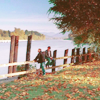
From
to
001. Open your pictures. Resize/crop it. Sharpen if you want to. (I didn't sharpen mine)
002. Duplicate your base. Blend Mode: Screen. Opacity: 100%. *Layer 01*.
>>
003. Duplicate your base. Blend Mode: Screen. Opacity: 100%. *Layer 02*.
>>
004. Go to Layers >>New Adjustment layer >> Color Balance. (Midtones/preserve luminosity)
+46; +16; +16.
>>
005. Go to Layers >>New Adjustment layer >> Selective Colours. (Method Relative)
Reds: -100; +68; +100; 0.
Yellows: -90, 0; +95; 0
Neutrals: +20; -5; -25; -8.
>>
006. Go to Layers >>New Adjustment layer >> Selective Colours. (Method Relative)
Reds: -41; 0; 0; +12.
Cyans: +100, -100; +100; +100
Neutrals: +12; -11; -17; 0.
Blacks: 0; 0; 0; -15.
>>
007. Go to Layers >>New Adjustment layer >> Color Balance. (Midtones/preserve luminosity)
+57; +11; -32.
>>
Final result:
>>
Other Icons made with the same tecnique
Ps. In the middle icon, the opacity of the second screen layer is 30%.
********************
:: It doesn't bother me if you use this tutorial step by step, but I recommend you to use it as a guide. The majority of the colouring I come up (sans this two tutorials) is a result of following some steps from different tutorials and add some tricks as more saturation, a color balance/selective colors/curves/levels/ layers.
:: If something is confusing, feel free to ask me anything.
:: This tutorial will not work on every Supernatural screencapture.
:: Supernatural fans, If any of want suggest a special episode or a special set of screencaptures to my newxt batch of icons, feel free.
:: Feel free to friend me. I don't bite peole. I swear!
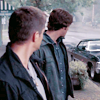
We're going from
to
using Photoshop CS.
We're going from
to
using Photoshop CS.
Dean : Yeah, that's called lying.'>
Tutorial 001
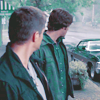
From
to
001. Open your Picture. Resize/Crop it. Sharpen if you want to. (I didnt sharpen mine)
002. Duplicate your base. Blend Mode: Screen. Opacity: 100%. *Layer 01*.
>>
003. Duplicate your base. Blend Mode: Screen. Opacity: 100%. *Layer 02*.
>>
004. Go to Layers >> New Adjustment layer >> Selective Colours. *Method Relative*
Reds: -100; +92; +100; 0.
Neutrals: +25; -12; -15; 0.
>>
005. Go to Layers >> New Adjustment Layer >> Color Balance. (Midtones/preserve luminosity)
+58; +25; +24
>>
006. Go to Layers >> New Adjustment Layers >> Hue/Saturation.
Masters: +12
Reds: +10
Cyans: +25
>>
007. Go to Layers >> New Adjustment layer >> Selective Colours. *Method Relative*
Yellows: 0; 0; -54; 0
Neutrals: +12; 0; 0; -15
Blacks: 0; 0; 0; -15.
>>
Final Result:
>>
Other Icons made with the same tecnique
Ps. My screencaptures were lighter, so I only used 1 screen layer for these icons.
********************
Tutorial 002
From
to
001. Open your pictures. Resize/crop it. Sharpen if you want to. (I didn't sharpen mine)
002. Duplicate your base. Blend Mode: Screen. Opacity: 100%. *Layer 01*.
>>
003. Duplicate your base. Blend Mode: Screen. Opacity: 100%. *Layer 02*.
>>
004. Go to Layers >>New Adjustment layer >> Color Balance. (Midtones/preserve luminosity)
+46; +16; +16.
>>
005. Go to Layers >>New Adjustment layer >> Selective Colours. (Method Relative)
Reds: -100; +68; +100; 0.
Yellows: -90, 0; +95; 0
Neutrals: +20; -5; -25; -8.
>>
006. Go to Layers >>New Adjustment layer >> Selective Colours. (Method Relative)
Reds: -41; 0; 0; +12.
Cyans: +100, -100; +100; +100
Neutrals: +12; -11; -17; 0.
Blacks: 0; 0; 0; -15.
>>
007. Go to Layers >>New Adjustment layer >> Color Balance. (Midtones/preserve luminosity)
+57; +11; -32.
>>
Final result:
>>
Other Icons made with the same tecnique
Ps. In the middle icon, the opacity of the second screen layer is 30%.
********************
:: It doesn't bother me if you use this tutorial step by step, but I recommend you to use it as a guide. The majority of the colouring I come up (sans this two tutorials) is a result of following some steps from different tutorials and add some tricks as more saturation, a color balance/selective colors/curves/levels/ layers.
:: If something is confusing, feel free to ask me anything.
:: This tutorial will not work on every Supernatural screencapture.
:: Supernatural fans, If any of want suggest a special episode or a special set of screencaptures to my newxt batch of icons, feel free.
:: Feel free to friend me. I don't bite peole. I swear!