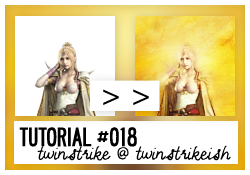
❝ 161 ❞ ▄ ( tutorial )

▄ Program: Adobe Photoshop CS4
▄ Type: Composition/Coloring
▄ Difficult: Medium
▄ PSD: No
TUTORIAL #018
STEP #001
FULL IMAGE
Before preparing your base, extract the background of the original image. Now crop, place and sharpen if necessary.

STEP #002

Duplicate your Base. Work with the bottom layer first. Use the Smudge Tool to spread and create a smoky effect with the image. Now work with the top layer. Use the Blur Tool on the edges to make it blend with the bottom layer. Merge both layers.

STEP #003

Now place this texture by twinstrikeish under the merged layer.

STEP #004

Now to work above the merged layer.
New Adjustment Layer - Brightness/Contrast
Brightness - 25
Contrast - 35
Set the Layer Opacity to 50%

STEP #005

Now add this texture by twinstrikeish and erase over the subject leaving only the area around it.

STEP #006

New Adjustment Layer - Photo Filter
Filter - Cyan
Density - 7%
Check "Preserve Luminosity".

STEP #007

Now add this texture by lookslikerain and repeat the erase effect as in Step #005.
Set the Layer to Multiply and Layer Opacity to 51%

STEP #008

New Adjustment Layer - Vibrance
Vibrance - +75

STEP #009

New Adjustment Layer - Gradient Map
Pick the Default Black-to-White Gradient.
Set the Layer to Soft Light and Layer Opacity to 45%

STEP #010

Add this texture by lookslikerain.
Set the Layer to Screen.

STEP #011

New Adjustment Layer - Color Balance
Midtones - +33, 0, -17

STEP #012

Repeat Step #010 - Add this texture by lookslikerain.
Set the Layer to Screen.

STEP #013

New Adjustment Layer - Hue/Saturation
Masters
Saturation +52
Set the Opacity of this Layer to 30%.

STEP #014

New Fill Layer - Gradient Fill
Pick a White-to-Black gradient.
Style - Radial
Angle - 90º
Set this Layer to Soft Light, Opacity 57%.

STEP #015

New Adjustment Layer - Channel Mixer
Red +100, 0, 0
Green 0, +100, 0
Blue -20, 0, +100

STEP #016

Copy Merged everything and past into a new layer. Erase according to your preference.
Set the Layer to Soft Light.¹
¹ - Things will be easier if you set to Soft Light before erasing some parts of it.

EXAMPLES


▄ COMMENTS ARE NICE → ♥
▄ CREDITS ARE LOVE → twinstrike or twinstrikeish;
▄ RESOURCES → ( here );
▄ AFFILIATES → ( here );
▄ UPDATES → ( watch );