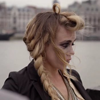
036: tutorial time!
on lellamd request!
//
01) duplicate your base and set it on multiply 100%; it gets a lot darker but don't worry, we'll work around it!
02) duplicate your base TWICE and set both levels on screen. see? now our caps is pretty light, be we need another step before starting with colours!
03) duplicate the last level (the screen one) and set it on soft light. that's our base! now let's colour it!
04) first step is to create some more lights and shadow so get ready! with a #f9f7f3 medium hardness rounded brush lets light the icon up a bit i'll put lights on her top hair like this
at this point i'll blurry up those brush strokes a bit (with gaussian blur my set is 3.8 but it depends on what you need), done that, i'll set this layer on overlay 48% fill.
05) okay, i really need some shadows too so, i'll repeat the previous step with a black brush, and i'll paint something like this

when blurring my shadows i will high the radius, mine is around 8,3. finished with the gaussian blur, i'll set the shadow on softlight.
06) lights are done, now i must continue with the colouring, the first step is to use a gradient, i always use a black/white one to give some light to my icons, that's exactly my first step.
repeat but set this layer on colour burn 31% fill (yes, i usually use two gradient layers).
07) vibrance! okay i have a thing for this tool but it's pretty. anyway, vibrance gives you some colour which are very welcome; i've set it up like this:
vibrance: 100 / saturation: 2
(in case you have no vibrance tool, you can use the hue/saturation, putting +15 in the saturation bar, and it will work anyway!)
08) first colour fill layer; i used a nice green, this one #7eb02e on softlight to give some colour! looks nice doesn't it?
09) curves! let's start with the rgb, keep in mind that i'll right the output number first so all my combo will be like:
OUT: ## / IN: ##
58 / 70
155 / 145
REDS
39 / 61
128 / 138
GREENS
64 / 56
128 /144
BLUES
56 / 67
156 / 124
done with the curves!
10) another black/white gradient set on softlight 66% fill (no, i don't love gradients, at all)
11) gradient map layer; it gives you some deepness, i use the black/white one set on softlight at 77% fill
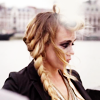
12) last layer!! selective color; here's how mine looks like!
REDS:
0 / 0 / -8 /+8
YELLOWS
11 / -17 / -8 / 19
WHITES
0 / 0 / 4 / 76
i hope everything is clear but if you have any questions please don't heistate! i know my english is terrible, but i will try to help!
//
01) duplicate your base and set it on multiply 100%; it gets a lot darker but don't worry, we'll work around it!
02) duplicate your base TWICE and set both levels on screen. see? now our caps is pretty light, be we need another step before starting with colours!
03) duplicate the last level (the screen one) and set it on soft light. that's our base! now let's colour it!
04) first step is to create some more lights and shadow so get ready! with a #f9f7f3 medium hardness rounded brush lets light the icon up a bit i'll put lights on her top hair like this
at this point i'll blurry up those brush strokes a bit (with gaussian blur my set is 3.8 but it depends on what you need), done that, i'll set this layer on overlay 48% fill.
05) okay, i really need some shadows too so, i'll repeat the previous step with a black brush, and i'll paint something like this
when blurring my shadows i will high the radius, mine is around 8,3. finished with the gaussian blur, i'll set the shadow on softlight.
06) lights are done, now i must continue with the colouring, the first step is to use a gradient, i always use a black/white one to give some light to my icons, that's exactly my first step.
repeat but set this layer on colour burn 31% fill (yes, i usually use two gradient layers).
07) vibrance! okay i have a thing for this tool but it's pretty. anyway, vibrance gives you some colour which are very welcome; i've set it up like this:
vibrance: 100 / saturation: 2
(in case you have no vibrance tool, you can use the hue/saturation, putting +15 in the saturation bar, and it will work anyway!)
08) first colour fill layer; i used a nice green, this one #7eb02e on softlight to give some colour! looks nice doesn't it?
09) curves! let's start with the rgb, keep in mind that i'll right the output number first so all my combo will be like:
OUT: ## / IN: ##
58 / 70
155 / 145
REDS
39 / 61
128 / 138
GREENS
64 / 56
128 /144
BLUES
56 / 67
156 / 124
done with the curves!
10) another black/white gradient set on softlight 66% fill (no, i don't love gradients, at all)
11) gradient map layer; it gives you some deepness, i use the black/white one set on softlight at 77% fill
12) last layer!! selective color; here's how mine looks like!
REDS:
0 / 0 / -8 /+8
YELLOWS
11 / -17 / -8 / 19
WHITES
0 / 0 / 4 / 76
i hope everything is clear but if you have any questions please don't heistate! i know my english is terrible, but i will try to help!