Fun with gray
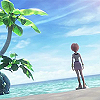
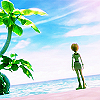
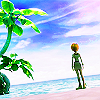
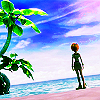
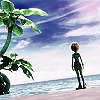
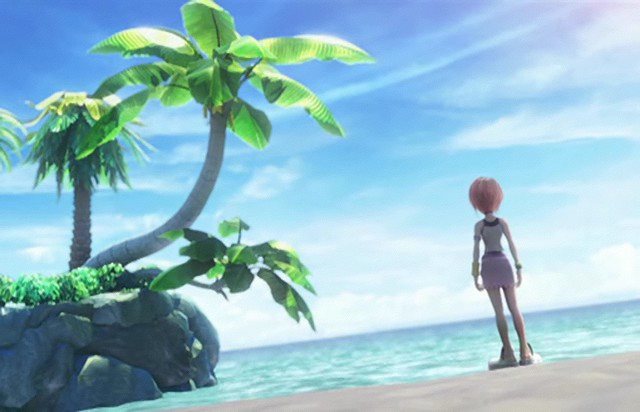
Go from THIS to this>> 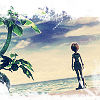
In PSPX
Step 1: Crop, Resize and Sharpen 1-2 times
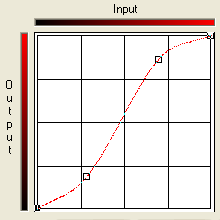
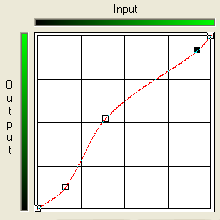
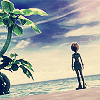
Step 2: x-x you know it was coming: Adjust>Brightness and Contrast>Curves. Dependning on your image you may want different settings. Since I like to make Kairi's pictures Red-ish, that's what im going for, with alittle green for the Palm Trees. Refrence pictures and in-/out- puts
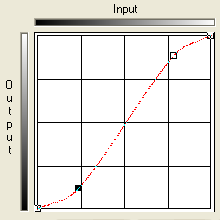
Input: 241
OUtput: 228
Input: 60
OUtput: 30
Input: 178
OUtput: 220
Input: 72
OUtput: 47
Input: 236
Output: 233
Input: 100
Output: 133
Input: 41
Output: 32
Input: 172
Output: 195
Input: 172
Output: 195
Step 3: Go the the 11th button on your tools bar (after the brush/airbrush tool) click on hte little pointer and select Saturation up/down.
RECOMMENDED BRUSH SETTINGS: Size-5 to 10, Hardness-Below 50, Opacity-30 or lower
Now draw over the trees a little till they have a nice brightness to them. I scribbled over rhe sky a little, also.
OPTIONAL: If you have a light image like mine, you may have to duplicate the base and set that to multiply (if its too dark then, just bring the opcity down)
Step 4: Duplicate the base. On the new layer, Adjust>Hue and Saturation>Colorize. Sturation is Zero, hue can be any number, make no difference. Set this new layer to Color (or Color Legacy, it varies between images, I know). I had to use Legacy.
Step 5: New Raster Layer. Fill with #000e38 or any dark blue for that matter. Set to Exclusion.

Step 6: From here do what you like with the image, but I'd recommend a border. If you want to, here's one. Just put it ontop of everything and set it to Screen.
and YAY! We're done!!!
Need any further explanations just ask and I'll do my best.
In PSPX
Step 1: Crop, Resize and Sharpen 1-2 times
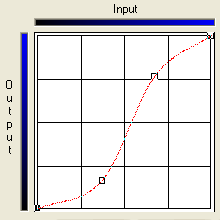
Step 2: x-x you know it was coming: Adjust>Brightness and Contrast>Curves. Dependning on your image you may want different settings. Since I like to make Kairi's pictures Red-ish, that's what im going for, with alittle green for the Palm Trees. Refrence pictures and in-/out- puts
Input: 241
OUtput: 228
Input: 60
OUtput: 30
Input: 178
OUtput: 220
Input: 72
OUtput: 47
Input: 236
Output: 233
Input: 100
Output: 133
Input: 41
Output: 32
Input: 172
Output: 195
Input: 172
Output: 195
Step 3: Go the the 11th button on your tools bar (after the brush/airbrush tool) click on hte little pointer and select Saturation up/down.
RECOMMENDED BRUSH SETTINGS: Size-5 to 10, Hardness-Below 50, Opacity-30 or lower
Now draw over the trees a little till they have a nice brightness to them. I scribbled over rhe sky a little, also.
OPTIONAL: If you have a light image like mine, you may have to duplicate the base and set that to multiply (if its too dark then, just bring the opcity down)
Step 4: Duplicate the base. On the new layer, Adjust>Hue and Saturation>Colorize. Sturation is Zero, hue can be any number, make no difference. Set this new layer to Color (or Color Legacy, it varies between images, I know). I had to use Legacy.
Step 5: New Raster Layer. Fill with #000e38 or any dark blue for that matter. Set to Exclusion.
Step 6: From here do what you like with the image, but I'd recommend a border. If you want to, here's one. Just put it ontop of everything and set it to Screen.
and YAY! We're done!!!
Need any further explanations just ask and I'll do my best.