#38
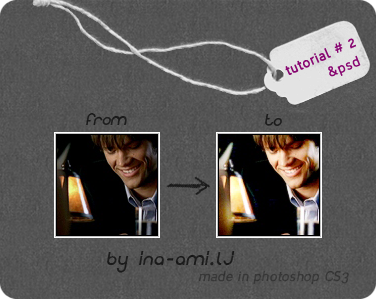
Tutorial #2
Made in: Photoshop CS3 extended
Level of Difficulty: Easy to Intermediate, a basic knowledge of the program is required; you have to know ho to use color balance, curves, levels and gradient map
Image Heavy: No
Translatable? Probably (no selective colors)
PSD: Yes

1. i usually start by cropping the picture before doing any coloring to it
i don't crop it 100x100, i drag the picture into a bigger canvas and i move it around until i find a position that i like
2. after that i sharpen the base and then go to edit - fade sharpen - and set it between 35%-45%
3. duplicate the base and go to filter - blur - Gaussian blur - radius between 0.8px and 1.5px (i think i used 1.2 for this one)
4. either fade the blur by going to edit - fade Gaussian blur - and set it between 45% to 65% or go to layers and lower the opacity of the layer to 65%
5. layer - new adjustment layer - gradient map - and pick the gradient called es vintage 25 (if you don't have the gradient you can dl the set from here) and set it to color dodge 15%
8. duplicate the background layer drag it on top and set it to soft light 60%
6. i wanted the icon to have more light so i went layer - new layer - go to brush tool and pick a hard brush and set it to 16-17 px and then apply some light bulbs like these
7. blur - Gaussian blur and set the radius to 3% (OK) and the ctrl+f until you get the desired effect and then go to layers and set it to soft light opacity 100%
8. duplicate the background layer drag it on top and set it to screen 100%
8. layer - new adjustment layer - levels - input levels - 6 / 1.29 / 255
9. layer - new adjustment layer - curves - custom
red - input:75 / output:85
green - input:76 / output:82
blue - input:129 / output:132
10. set the curves layer to screen opacity 17%
11. layer - new adjustment layer - color balance
(make sure you have preserve luminosity checked)
shadows: 0 / 0 / 0
midtones: -11 / -18 / -44
highlights: 0 / 0 / 0
12. set the color balance layer to screen 13%
13. i wanted more light so i duplicated the light bulbs layer twice and set the first layer to soft light opacity 100% and the second one to soft light opacity 60%
14. layer - new adjustment layer - gradient map - Black, White gradient
15. set the Black, White gradient to soft light opacity 20%
16. right click on the background layer - flatten image
» PSD (password thespringishere)
» comments are ♥ » don't alter » don't claim as your own » don't hotlink » don't re-post outside lj
» ADD the community for updates
Made in: Photoshop CS3 extended
Level of Difficulty: Easy to Intermediate, a basic knowledge of the program is required; you have to know ho to use color balance, curves, levels and gradient map
Image Heavy: No
Translatable? Probably (no selective colors)
PSD: Yes

1. i usually start by cropping the picture before doing any coloring to it
i don't crop it 100x100, i drag the picture into a bigger canvas and i move it around until i find a position that i like
2. after that i sharpen the base and then go to edit - fade sharpen - and set it between 35%-45%
3. duplicate the base and go to filter - blur - Gaussian blur - radius between 0.8px and 1.5px (i think i used 1.2 for this one)
4. either fade the blur by going to edit - fade Gaussian blur - and set it between 45% to 65% or go to layers and lower the opacity of the layer to 65%
5. layer - new adjustment layer - gradient map - and pick the gradient called es vintage 25 (if you don't have the gradient you can dl the set from here) and set it to color dodge 15%
8. duplicate the background layer drag it on top and set it to soft light 60%
6. i wanted the icon to have more light so i went layer - new layer - go to brush tool and pick a hard brush and set it to 16-17 px and then apply some light bulbs like these
7. blur - Gaussian blur and set the radius to 3% (OK) and the ctrl+f until you get the desired effect and then go to layers and set it to soft light opacity 100%
8. duplicate the background layer drag it on top and set it to screen 100%
8. layer - new adjustment layer - levels - input levels - 6 / 1.29 / 255
9. layer - new adjustment layer - curves - custom
red - input:75 / output:85
green - input:76 / output:82
blue - input:129 / output:132
10. set the curves layer to screen opacity 17%
11. layer - new adjustment layer - color balance
(make sure you have preserve luminosity checked)
shadows: 0 / 0 / 0
midtones: -11 / -18 / -44
highlights: 0 / 0 / 0
12. set the color balance layer to screen 13%
13. i wanted more light so i duplicated the light bulbs layer twice and set the first layer to soft light opacity 100% and the second one to soft light opacity 60%
14. layer - new adjustment layer - gradient map - Black, White gradient
15. set the Black, White gradient to soft light opacity 20%
16. right click on the background layer - flatten image
» PSD (password thespringishere)
» comments are ♥ » don't alter » don't claim as your own » don't hotlink » don't re-post outside lj
» ADD the community for updates