TUTORIAL
Alright, I've had a couple requests for this in the past, so I figured I would go ahead and do this. Please do tell me if this gets put to good use.
I want to see icons, people! :)
-------------
TUTORIAL #01:
From this to this.
(using layers and done on PSP9, but should be easily translated to other programs)
First, crop your picture and resize it until it's 100x100.
You should get something like this:

Next, create a raster layer.
Flood fill it with #082A50 and set it to Exclusion, 100% opacity.
This is what you'll get:

Then create another raster layer.
Flood fill it with #DBDBDB and set it to Burn, 100% opacity.
And you'll get this:

Create a third raster layer.
Flood fill it with #59B9D9 and set it to Burn, 100% opacity.
It'll look like this:

Now, duplicate the background layer.
Set it to Screen, 100% opacity.
You'll get this:

NOTE: You may need to do more than one screen layer if your image is still too dark.
One last layer.
Once again, duplicate the background layer.
Set it to Hard Light, 100% opacity.
You'll end up with this:

THIS LAYER IS OPTIONAL!!! You may want it if the image isn't contrasted enough for your taste. Or you may think it looks just dandy as is. It's up to you.
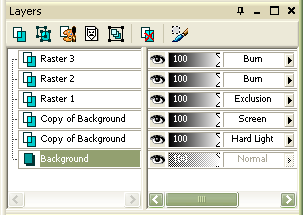
Now, a quick rundown of the order.

It's important that the layers stay in this order if you want to get these specific results. However, feel free to play around with it. Experiment with different colors.
Also, I'll leave the sharpening up to you. I didn't sharpen the image for this icon, because it didn't need it. Oversharpening can be a bad thing.
I used this particular technique on just about every icon in this, this and this post.
Please tell me if this made any sense!
And if you use it, I'd love to see what you make!
I want to see icons, people! :)
-------------
TUTORIAL #01:
From this to this.
(using layers and done on PSP9, but should be easily translated to other programs)
First, crop your picture and resize it until it's 100x100.
You should get something like this:

Next, create a raster layer.
Flood fill it with #082A50 and set it to Exclusion, 100% opacity.
This is what you'll get:

Then create another raster layer.
Flood fill it with #DBDBDB and set it to Burn, 100% opacity.
And you'll get this:

Create a third raster layer.
Flood fill it with #59B9D9 and set it to Burn, 100% opacity.
It'll look like this:

Now, duplicate the background layer.
Set it to Screen, 100% opacity.
You'll get this:

NOTE: You may need to do more than one screen layer if your image is still too dark.
One last layer.
Once again, duplicate the background layer.
Set it to Hard Light, 100% opacity.
You'll end up with this:

THIS LAYER IS OPTIONAL!!! You may want it if the image isn't contrasted enough for your taste. Or you may think it looks just dandy as is. It's up to you.
Now, a quick rundown of the order.

It's important that the layers stay in this order if you want to get these specific results. However, feel free to play around with it. Experiment with different colors.
Also, I'll leave the sharpening up to you. I didn't sharpen the image for this icon, because it didn't need it. Oversharpening can be a bad thing.
I used this particular technique on just about every icon in this, this and this post.
Please tell me if this made any sense!
And if you use it, I'd love to see what you make!