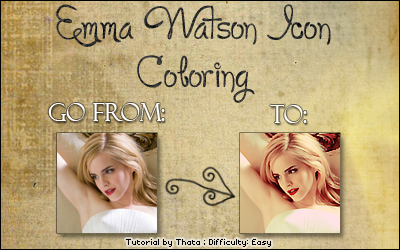
Emma Watson Icon Coloring Tutorial
Helloooo :DD
OMG how much I missed here *---* I'm so sorry I've been absent by the last 8 months, it's just that I figured out college + livejournal do not match ;_; I was sooo busy that I didn't have ANY time to make stuff at photoshop (only when it was for college purposes). I'm still having classes until December 22nd, but for now things are a little bit calmer and I made a coloring tutorial for you guys \o/ Also, I'll try to make a batch of icons/wallpapers and post here soon enough (:
So, here it goes, hope yall like it :D

Program used: Photoshop CS3
Level: Easy
Steps: 7
Uses: Selective Coloring, Curves, Color Balance, Hue/Saturation & Channel Mixer
Translatable? No, includes Selective Coloring, sorry ;x
PSD? Yes! :D
Emma Watson Icon Coloring
1. First of all, crop your image and sharpen it according to its needs. If your image is kinda dark, you can duplicate the base and set it to screen, opacity 50% (or you can see which opacity works best with your pic);
2. Go to Layer > New Adjustment Layer > Color Balance:
• Midtones: -48, +11, +28
• Shadows: +21, -16, -5
• Highlights: -25, -6, -35
* Make sure ‘Preserve Luminosity’ is checked.
This layer will give a greenish look to your picture;
3. Go to Layer > New Adjustment Layer > Selective Color:
> Method: Relative
• Reds:
Cyan: +43
Magenta: 0
Yellow: +100
Black: 0
• Yellows:
Cyan: -100
Magenta: +20
Yellow: -52
Black: 0
• Magentas:
Cyan: -56
Magenta: 0
Yellow: +67
Black: 0
• Whites:
Cyan: +19
Magenta: 0
Yellow: +51
Black: 0
• Neutrals:
Cyan: -10
Magenta: 0
Yellow: +10
Black: 0
• Blacks:
Cyan: 0
Magenta: +30
Yellow: 0
Black: +5
This layer should bring up the reds and yellows a bit;
3. Go to Layer > Adjustment Layers > Selective Color:
> Method: Relative
• Reds:
Cyan: -15
Magenta: +22
Yellow: -11
Black: 0
• Yellows:
Cyan: 0
Magenta: +18
Yellow: -50
Black: 0
• Neutrals:
Cyan: 0
Magenta: -12
Yellow: +8
Black: 0
This will decrease the yellows on your picture a bit;
4. Go to Layer > Fill Layer > Solid Color:
Fill it with #9E2323 and set it to Screen, opacity 20%.
I like this effect because the shadows get a beautiful red tone :)
5. Go to Layer > New Adjustment Layer > Curves:
> RGB:
• First Point:
Output: 34 ; Input: 32
• Second Point:
Output: 166 ; Input: 157
> Red:
• First point:
Output: 112 ; Input: 112
• Second point:
Output: 185 ; Input: 173
> Green:
• First point:
Output: 40 ; Input: 52
• Second point:
Output: 158 ; Input: 150
> Blue:
• First point:
Output: 114 ; Input: 104
• Second point:
Output: 198 ; Input: 206
This layer will increase the magentas on your picture and also turn it a little bit lighter;
6. Go to Layer > New Adjustment Layer > Hue/Saturation:
> Master:
Saturation: +8
7. Go to Layer > New Adjustment Layer > Channel Mixer:
• Red: +93, +7, 0
• Green: +13, +89, -13
• Blue: -4, +5, +91
It should bring up the yellows :D
That's that! :D Hope you guys liked it... please tell me if there's something wrong with the tutorial o/ And I LOVE when people comment and show me their results or tell me what they think about what I did, so pleeease: comment! :D It makes me happy^^
Other results using this coloring:


Oh, almost forgot, if you want the .PSD, click here.
xoxo
Thata :*
Mood:
{ calm }
OMG how much I missed here *---* I'm so sorry I've been absent by the last 8 months, it's just that I figured out college + livejournal do not match ;_; I was sooo busy that I didn't have ANY time to make stuff at photoshop (only when it was for college purposes). I'm still having classes until December 22nd, but for now things are a little bit calmer and I made a coloring tutorial for you guys \o/ Also, I'll try to make a batch of icons/wallpapers and post here soon enough (:
So, here it goes, hope yall like it :D

Program used: Photoshop CS3
Level: Easy
Steps: 7
Uses: Selective Coloring, Curves, Color Balance, Hue/Saturation & Channel Mixer
Translatable? No, includes Selective Coloring, sorry ;x
PSD? Yes! :D
Emma Watson Icon Coloring
1. First of all, crop your image and sharpen it according to its needs. If your image is kinda dark, you can duplicate the base and set it to screen, opacity 50% (or you can see which opacity works best with your pic);
2. Go to Layer > New Adjustment Layer > Color Balance:
• Midtones: -48, +11, +28
• Shadows: +21, -16, -5
• Highlights: -25, -6, -35
* Make sure ‘Preserve Luminosity’ is checked.
This layer will give a greenish look to your picture;
3. Go to Layer > New Adjustment Layer > Selective Color:
> Method: Relative
• Reds:
Cyan: +43
Magenta: 0
Yellow: +100
Black: 0
• Yellows:
Cyan: -100
Magenta: +20
Yellow: -52
Black: 0
• Magentas:
Cyan: -56
Magenta: 0
Yellow: +67
Black: 0
• Whites:
Cyan: +19
Magenta: 0
Yellow: +51
Black: 0
• Neutrals:
Cyan: -10
Magenta: 0
Yellow: +10
Black: 0
• Blacks:
Cyan: 0
Magenta: +30
Yellow: 0
Black: +5
This layer should bring up the reds and yellows a bit;
3. Go to Layer > Adjustment Layers > Selective Color:
> Method: Relative
• Reds:
Cyan: -15
Magenta: +22
Yellow: -11
Black: 0
• Yellows:
Cyan: 0
Magenta: +18
Yellow: -50
Black: 0
• Neutrals:
Cyan: 0
Magenta: -12
Yellow: +8
Black: 0
This will decrease the yellows on your picture a bit;
4. Go to Layer > Fill Layer > Solid Color:
Fill it with #9E2323 and set it to Screen, opacity 20%.
I like this effect because the shadows get a beautiful red tone :)
5. Go to Layer > New Adjustment Layer > Curves:
> RGB:
• First Point:
Output: 34 ; Input: 32
• Second Point:
Output: 166 ; Input: 157
> Red:
• First point:
Output: 112 ; Input: 112
• Second point:
Output: 185 ; Input: 173
> Green:
• First point:
Output: 40 ; Input: 52
• Second point:
Output: 158 ; Input: 150
> Blue:
• First point:
Output: 114 ; Input: 104
• Second point:
Output: 198 ; Input: 206
This layer will increase the magentas on your picture and also turn it a little bit lighter;
6. Go to Layer > New Adjustment Layer > Hue/Saturation:
> Master:
Saturation: +8
7. Go to Layer > New Adjustment Layer > Channel Mixer:
• Red: +93, +7, 0
• Green: +13, +89, -13
• Blue: -4, +5, +91
It should bring up the yellows :D
That's that! :D Hope you guys liked it... please tell me if there's something wrong with the tutorial o/ And I LOVE when people comment and show me their results or tell me what they think about what I did, so pleeease: comment! :D It makes me happy^^
Other results using this coloring:


Oh, almost forgot, if you want the .PSD, click here.
xoxo
Thata :*
Mood:

{ calm }