(no subject)
Day 18 was last Wednesday or Thursday, when I cut and placed cross-braces between the rafters. I tried to engineer my roof sections to fit the "modular" concept (that hasn't really worked out - you'll see in a bit) and built them each 4 feet wide - the standard width of a sheet of plywood (or OSB, in this case). Trying to save a little cash, I only put rafters on the outer sides of the OSB - should have really used one in the middle too, but I was low on bank and boards, and tried to cheat it. 1/2" OSB is not structurally sound enough to serve as roofing with rafters 48" apart. Just in case you had been wondering.
But with cross-braces put in halfway up the length of the panels, it works okay. It's strong enough to support it's own weight and then some, as we tested quite a lot of on Day 19 - Roofing Day.
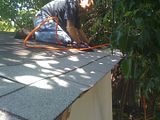
Saturday was Roofing Day. My dad came down with a couple more ladders so we could actually get on the roof easily and also put up a small scaffold with my ladder. We got straight on to work, rolling out the asphalt-soaked felt that goes under shingles.
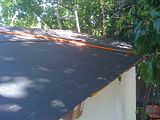
We rolled it out to length and cut it on the ground, since it's easier to lift a 12' roll up to the roof than it is to lift the whole bloody thing.
Once the tar paper is all laid down, it's time for shingles. We ran a starter course inverted, covered it with another right-ways 'round, and moved on up to the peak. We left some overhang since we didn't do any drip-capping.
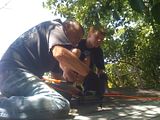
Steven climbed up onto the roof and helped a bit too. Interesting note: my paternal great-grandfather and grandfather were both professional roofers. Today gives us 5 generations of Daugherty men with a least a marginal experience of roofing. :)
The job went much faster than I thought it would. We were only slowed down by running out of shingles. Trying to estimate how many your need is hard because the shingle packages don't give helpful data on coverage provided. Turns out you lose a lot of the square footage implied by their packaging to the overlap needed. So we had to run out and buy 3 more packages of shingles to add to the 2 I had thought sufficient. Shingles are expensive - fortunately I have a credit card, so I was not deterred in my shed-completion.
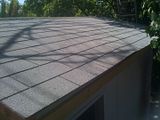
We also got the fascia nailed on in front. Screws would have been better, but all my drill batteries were dead, so nails it was. I also should have used screws on the gables, but I nailed those too.
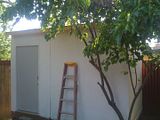
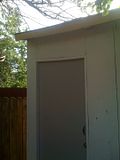
And here's the workshop with major construction operations completed. I have to get the back fascia installed and then do the soffits, but that's fairly light work. Then there's still some painting to do. Some bench and shelf building will complete the inside.
It didn't come out 100% perfect, but it's close. My dad has a lot of experience in building and that came in handy. Attempting it on my own would certainly have yielded much worse results, so I'm really glad he was around to help me. The modular concept is mostly intact, except for the roof, really. You really can't shingle the roof in a modular fashion if you want to provide the best protection possible. Plus, that would have been a real bitch to attempt anyway since it had all been built already. If we had built the roof panels on the ground and shingled them individually, then raised them into place and run shingles down the seams, the modular-roof would have been workable. It might not have been as leak-proof as this roof certainly is.
I'm a little miffed that I didn't consider the roof problem a little more carefully before we built it, given how expensive it turned out to be. There's $145 worth of tar paper and shingles up there that will have to be mostly sacrificed when we move (which will hopefully be before the end of the year, but that's another post all together). But overall I'm pleased with this little building. Even though I ran over-budget by $100 or $200, it still came in under $1000, which means it cost me less than half what I would have paid for a commercial unit. And I had a good time building it. As Norm Abrams always says, "This was a fun project to build." Time to start planning the shop furniture!
But with cross-braces put in halfway up the length of the panels, it works okay. It's strong enough to support it's own weight and then some, as we tested quite a lot of on Day 19 - Roofing Day.
Saturday was Roofing Day. My dad came down with a couple more ladders so we could actually get on the roof easily and also put up a small scaffold with my ladder. We got straight on to work, rolling out the asphalt-soaked felt that goes under shingles.

We rolled it out to length and cut it on the ground, since it's easier to lift a 12' roll up to the roof than it is to lift the whole bloody thing.

Once the tar paper is all laid down, it's time for shingles. We ran a starter course inverted, covered it with another right-ways 'round, and moved on up to the peak. We left some overhang since we didn't do any drip-capping.

Steven climbed up onto the roof and helped a bit too. Interesting note: my paternal great-grandfather and grandfather were both professional roofers. Today gives us 5 generations of Daugherty men with a least a marginal experience of roofing. :)

The job went much faster than I thought it would. We were only slowed down by running out of shingles. Trying to estimate how many your need is hard because the shingle packages don't give helpful data on coverage provided. Turns out you lose a lot of the square footage implied by their packaging to the overlap needed. So we had to run out and buy 3 more packages of shingles to add to the 2 I had thought sufficient. Shingles are expensive - fortunately I have a credit card, so I was not deterred in my shed-completion.

We also got the fascia nailed on in front. Screws would have been better, but all my drill batteries were dead, so nails it was. I also should have used screws on the gables, but I nailed those too.

And here's the workshop with major construction operations completed. I have to get the back fascia installed and then do the soffits, but that's fairly light work. Then there's still some painting to do. Some bench and shelf building will complete the inside.
It didn't come out 100% perfect, but it's close. My dad has a lot of experience in building and that came in handy. Attempting it on my own would certainly have yielded much worse results, so I'm really glad he was around to help me. The modular concept is mostly intact, except for the roof, really. You really can't shingle the roof in a modular fashion if you want to provide the best protection possible. Plus, that would have been a real bitch to attempt anyway since it had all been built already. If we had built the roof panels on the ground and shingled them individually, then raised them into place and run shingles down the seams, the modular-roof would have been workable. It might not have been as leak-proof as this roof certainly is.
I'm a little miffed that I didn't consider the roof problem a little more carefully before we built it, given how expensive it turned out to be. There's $145 worth of tar paper and shingles up there that will have to be mostly sacrificed when we move (which will hopefully be before the end of the year, but that's another post all together). But overall I'm pleased with this little building. Even though I ran over-budget by $100 or $200, it still came in under $1000, which means it cost me less than half what I would have paid for a commercial unit. And I had a good time building it. As Norm Abrams always says, "This was a fun project to build." Time to start planning the shop furniture!