A Wonder Woman Cape
(Okay, so it’s the Too Fabulous Drag Queen Version, so what?)
The Recipient: My girlfriend Amber, who has lost 150 pounds low carbing, and has achieved her Doctor’s goal of 198 pounds. Her personal goal is to lose even more, and I have no doubt that she will, but this particular goal is so poignant and impressive, I just couldn’t let it slide by without making her something fabulous to commemorate. She is a Wonder Woman fanatic, and last Halloween she wore a cheesy commercial WW costume. (OH! I KNOW! THE HORROR!) The cape she had was just this sad little too small rectangle, and it was just so…so… SAD. I couldn’t take it. It wounded me to even look at it. I knew right then I had to make her at least the cape. She is really an amazing person-sparkly and bubbly and busy and over the top fabulous. Even at 350 pounds, she never let anything hold back her divaliciousness:

Amber, 350+ pounds, with her cousin; Size 12 on Christmas Eve 2011; and The Saddest Wonder Woman Cape in all the World.
The Challenge: My main aim with this project was to spend no new money at all, and just use up what was in my stash. You may remember me lamenting the giant uselessness of my stash, so I thought this would be a great challenge to use some of it up. I already owned red, white and blue cheapie polyester satin, plus gobs of fake acrylic rhinestones, what more did I need? Nothing. So, I dove right in, armed with images of the original cape:

How hard can it be, right? I thought for sure it would just be a piece of cake. It’s a dumb ¾ circle cape, divvied up mathematically in different colors. Big deal, right? It was a big deal. The pieces are huge. The bias was a killer. No matter how carefully I drafted the pattern, no matter how precisely I cut the fabric, no matter how meticulously I matched up seams, no matter how finely I matched bias to grain, no matter how perfectly I pressed, pinned and sewed gingerly with a walking foot… it still had a mind of its own and did its own unexpected things. I was so sure I could come in here and crow, “I am the master of cheap ass satin!” but, alas, this was not to be.
So, to any of you reading this and thinking, as I once did with much hubris, “I can make a Wonder Woman cape, no problem!” well, good luck with that. Be sure your significant other has a straitjacket handy.
My Pattern Pieces: I made them with a compass, divided up the pie mathematically to match Lynda’s. I extended them using a yardstick on the fabric, making the cape as long as the fabric would allow.

I pinned and sewed each wedge to the next wedge, further reinforcing them with the serger for nice finished edges. Then I pressed the seam toward the opposite color of the matching thread, so the seams wouldn’t be so obvious. At first I had the notion to do lovely French seams… well, this damn fabric had other plans and would not allow it. My sample French seams on scraps looked like ass. So, I abandoned that and just went with the overlocking. It worked perfectly fine, after wrestling it to the ground, putting it in a half nelson and beating it with a folding chair.


The hem was serged, then folded twice, pressed, pinned, and finally topstitched down using a walking foot and the slowest speed humanly possible… any speed at all and the fabric would buckle and warp. 288 slooooooow inches. That’s a damn lotta hem, my friends!

The neckline was stay stitched, then strengthened with Pellon fusible interfacing. I made a long ½ inch double folded bias tape out of matching red satin and top stitched it down. Nothing fancy.

The stars: Holy Cow The Stars! I lost count after 120. I loaded this mother with stars. The original stars are those embroidered iron on kind, and those are easily available everywhere, but I was determined not to spend any money, even if it meant using up several hours of my time making stars. So, I got to work, thinking I would just trace a template onto some Wonder Under and call it good. Well, no. Just no. I traced about three of them before I knew that was just never going to work. It looked like a 3 year old did it. I am not a good tracer. There had to be a better way, and then it came to me: Print the stars on the Wonder Under. I wasn’t even sure if that would work, but I risked my billion year old printer and gave it a go. It worked brilliantly. HURRAY! I did not have to trace 120+ stars! Side note: yeah, brilliant, but not so easy, I ruined several sheets jamming them inside the printer, lol!)

I tried to make them the same proportion as Lynda’s, but I miscalculated and made them a little too big. Oh well. It took a mighty long time to cut all those out, but I just kicked back and enjoyed several episodes of Star Trek Voyager (eps with Seven of Nine, natch, she’s my favorite) while I cut and cut and cut some more. Note to self: Invest in some serious cushy comfort scissors. Do they make any with handles made of clouds and cotton candy and goose down?

Can you believe this was only half the stars that actually went on the cape?
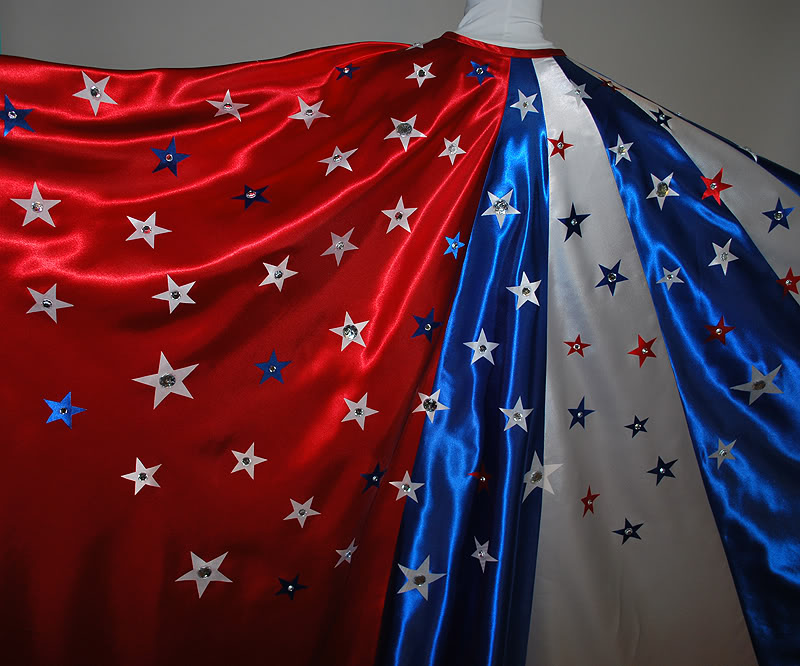
Then I just started pinning, then ironing them on. I tried desperately to follow the random pattern of stars on her cape, but I gave that up fairly quickly and just did my own thing. Please to note the perfection of my star cutting skills. I may not be able to draw, but dammit I can handle a pair of scissors.


Oooooo it was looking so amazing! I was totally loving it and decided to keep it for myself instead. Just kidding! Next was to add a little cheesy acrylic rhinestone to each star. Even though the original cape had a large sequin sewn on with a little bead to the star, I wanted to really bling this up for my blingy girlfriend. So, I pulled out my trusty Gem-Tac glue and got to work. This was so exciting, I was almost finished, the stones look so good, I am so loving it, just a few more stones, hey, waittaminute, what the hell! WHAT THE HELL! The white satin was sucking the moisture out of the glue and it had seeped into a big rosy areola around each rhinestone. I. Thought. I. Would. Die.


OMG I made a cape full of stars with rhinestone nipples.
Allow me to take a moment to defend myself in this most heinous gluing crime. It was a super slow seep. I didn’t even notice the problem until I was all done. Then, to my horror, the areolas just kept getting bigger. I was desperately hoping that they were just moisture and would go away once the glue was dry… but no. Gem-Tac is the very best glue for stones like this. I have used it for years and years, usually gluing cab pearls into settings for the Renaissance girdles I make, but I have used it a few times on fabric. The Gem-Tac always worked brilliantly and held the stone firmly, lasting years. It takes supreme effort to pick a stone off fabric once the glue has cured. I DON’T KNOW WHAT HAPPENED. I was devastated, and brought my woes to my LiveJournal friends. Many thanks to , , , and for all their great suggestions and heartfelt sympathies.
At this point I just wanted to chuck it all and make a new one… but I came to my senses and decided this one just needed to be fixed. I went to Michaels with the aim of getting white fabric paint to cover up the areolas, but then I realized I could just buy bigger stones to cover them instead. My friend loves bling, and having bigger bling would suit her just fine. Such immense relief! The cape was saved!
But, there was still the problem of the glue. I had to abandon my favorite Gem-Tac and go with what I supposed was second best: E-6000. Man, I HATE THAT GLUE. It is so hard to handle. Goopy, oozy, thick, stringy, stinky, sticky, wasteful, impossible to keep the tube tidy. Anyway, I picked off all the stones from the offending stars, which was no easy task because Gem-Tac really works. I then replaced them with bigger ones, effectively camouflaging the areolas. Whew! It worked!

Still not perfect, but 1000 times better than before! Hmmm, I actually like it better with the bigger stones!
At this point I was really squirrelly and a little psycho because the glue was such a mess and my gluing skills were really lacking and the stones weren’t all pretty pretty princess anymore. They were just big gobs of messy stinking glue. My son felt sorry for me after I explained what I was doing, and he taped this sweet little note to my cutting table so I would see it when I came around to that side:

Aaawwww I’m keeping it forever and pinning it to my wall next to my computer.
Anyway, I let those stupid stones set, but when I came to check on them: WTF!!! Apparently the stones were so cheapy ass that the glue was insulted to spend eternity with them and was having none of it. Each one of them had their foils crinkled by some nefarious chemical reaction going on with that damn glue. Shit. I just couldn’t catch a break, could I?? Note to self: next time, no cheapy ass stones. Get the good stuff no matter the cost or how long I have to wait for them to be delivered.

Well, It’s done. I cannot fix the crinkled stones. Other glues won’t hold, Gem-Tac hated the white satin (I determined it was indeed the fabric’s fault, not the glue-tests showed it didn’t seep on anything but that damn satin.) so I am just stuck with crinkled stones. I think the cape still looks as fabulous as I could make it under the circumstances, and it is really fun to wear and spin around in! I know Amber will LOVE it.
What will I do differently next time? IF THERE IS A NEXT TIME
*use higher quality satin with all colors being the same brand. Do they make a satin that magically doesn't have any bias stretch? That's what I want.
*Make a full sized pattern piece for each sized wedge, no matter how much paper I have to use to do it.
*Buy the proper embroidered stars
*Buy really awesome sparkly crystal stones, Swarovski or Precosia or something.
*TEST ALL GLUES, 24 hours, and if they are lacking, buy sew on jewels and SEW THE DAMN THINGS ON.
*Maybe invest in hot fix tools and stones instead, since my gluing skills are so poor I should have my Etsy membership revoked.
So, there you have it: A blinged out Wonder Woman Cape. I actually really love it, despite all the trouble it gave me. I’ve always wanted to make one, and now I have. I’m feeling pretty pleased with myself!
Now I just have to cross my fingers and hope that damn E-6000 holds the stones as well as I know Gem-Tac does… Wonder Woman can’t be losing any stones while partying it up in Vegas!