Purple/Blue Icon Tutorial
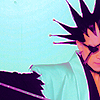
Go from 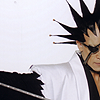
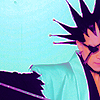
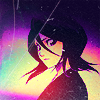
to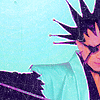
in PS7
STEP 1 -->
Resize your pic to 100x100, sharpen, so on and so forth. For dramatic effects with the selective coloring, I did not duplicate my base and set it to screen, however if your base is dark, of course I would recommend it.
STEP 2 -->
Layer -> New Adjustment Layer -> Hue/Saturation -> Master Saturation +41
STEP 3 -->
Layer -> New Adjustment Layer -> Selective Coloring
Reds : -100, +28, -65, 0
Whites : +100, -58, +44, 0
Neutrals : -49, -3, -67, +41
STEP 4 -->
Layer -> New Adjustment Layer -> Selective Coloring
Reds : -100, -100, +82, +15
Cyans : +100, -100, 0, +100
Blues : -49, +100, -1, +6
Whites : +100, -14, +43, +24
Neutrals : -57, -20, -32, +42
Blacks : +21, +100, -35, +40
STEP 5 -->
This step isn't necessary, but I think it gives the icon a nice finished look.
Layer -> New Adjustment Layer -> Selective Coloring
Neutrals : +40, 0, -11, 0
TA-DA! That's all with the selective coloring, so now feel free to add brushes, textures, masks, or anything you please! Comment and lemme know if you liked it!
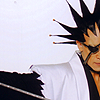
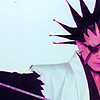
Other icons made with the above selective coloring:
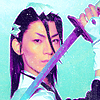
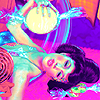

to
in PS7
STEP 1 -->
Resize your pic to 100x100, sharpen, so on and so forth. For dramatic effects with the selective coloring, I did not duplicate my base and set it to screen, however if your base is dark, of course I would recommend it.
STEP 2 -->
Layer -> New Adjustment Layer -> Hue/Saturation -> Master Saturation +41
STEP 3 -->
Layer -> New Adjustment Layer -> Selective Coloring
Reds : -100, +28, -65, 0
Whites : +100, -58, +44, 0
Neutrals : -49, -3, -67, +41
STEP 4 -->
Layer -> New Adjustment Layer -> Selective Coloring
Reds : -100, -100, +82, +15
Cyans : +100, -100, 0, +100
Blues : -49, +100, -1, +6
Whites : +100, -14, +43, +24
Neutrals : -57, -20, -32, +42
Blacks : +21, +100, -35, +40
STEP 5 -->
This step isn't necessary, but I think it gives the icon a nice finished look.
Layer -> New Adjustment Layer -> Selective Coloring
Neutrals : +40, 0, -11, 0
TA-DA! That's all with the selective coloring, so now feel free to add brushes, textures, masks, or anything you please! Comment and lemme know if you liked it!
Other icons made with the above selective coloring: