effigy bodies recap with pics
{x-posted to dressdiaries, and to elizabethangarb.}
I thought I would write this entry here to show and explain what I've done so far. It might help make sense of what I've done, since now there are pics included.
This is my inspiration image for the entire project:

I am starting with the pair of bodies, and using the information Janet Arnold gave in her article in the Costume Journal for 2007 on the extant effigy pair of bodies worn by the effigy of Queen Elizabeth I.
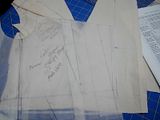
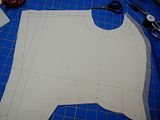
The pattern is drafted from my own body, as draped onto my Uniquely You dress dummy which is pretty close at this point to the real me. On my pattern I've come up with my own way to deal with the modern darts by folding the lower dart out, which came out pretty close to the slash & pivot method margorose suggested to me. My method kept the lower straight edge I needed, so, I decided to stay with the original pattern I came up with. I then adjusted the side and back seams to make it fit snugger on me.
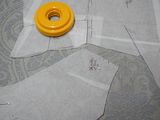
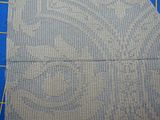
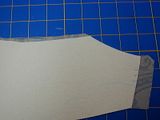
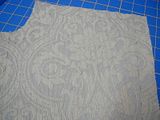
I marked and cut out the pattern pieces on the fashion fabric, a drill interlining, and the coutil fabric. The fashion fabric is a couple of large sample fabrics of silk/cotton blend in a nice steel blue damask. I had to place the pattern around a grommet near the middle for one front piece, and then place the back and other front piece best I could on the larger fabric piece. I am only able to center a design on the back piece, but the fronts will not be matched. You can see the placement for the back piece, where you can see how little room I had to work with.
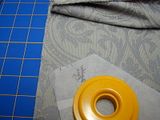
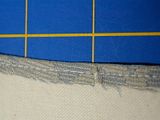
One of the front pieces had to be pieced together, because the fabric with the grommet was too short upon washing. I hand sewed the nearly matched pieces together, as seen here.
While tired, I cut out the back piece of the fashion fabric, before I realized that I had forgotten to add in seam allowance on the side of the back piece! I can't recut another back piece as I had no more fabric large enough, and I didn't want a frankenstein-pieced back. After a good night's sleep, I realized I could salvage the piece by trimming the drill a little more than 1/4", folding under 1/4" on the edges of the fashion fabric, then sewing close to the folded edge. I did similarly to the coutil.
The two layers (damask & drill are now one layer, the coutil the other layer) were matched wrong sides together. I then hand basted with fine black silk thread all of the layers together. If I had not made the mistake I did, I more likely would have machine sewn the side back edges, then turned them to finish.
To explain, the original photos from Arnold shows the whip stitched back seams, and unlike most of the rest of the garment edges, the whipped edges are not bound at all. In fact, it is hard to see what finish was done there. So, I think that the unbound edges were actually finished first by turning under, before being whip stitched all together. Her notes kinda suggest this, but doesn't clearly say it.
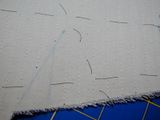
I've spent the past few days machine sewing the many 3/8" channels, with two 3/4" channels for the larger bones (I am using reeds for boning). I started sewing the channels from the main 3/4" channel, sewing the smaller channels parallel from there, which keeps most of the channels on grain or close to it. There are four lines of sewing that are at an angle to that in the center front, which is off grain.
And that's where I am at right now, with the channels completed on all three pieces. The whole set of images can be found here. More progress updates and pics as this gets completed.
I thought I would write this entry here to show and explain what I've done so far. It might help make sense of what I've done, since now there are pics included.
This is my inspiration image for the entire project:

I am starting with the pair of bodies, and using the information Janet Arnold gave in her article in the Costume Journal for 2007 on the extant effigy pair of bodies worn by the effigy of Queen Elizabeth I.
The pattern is drafted from my own body, as draped onto my Uniquely You dress dummy which is pretty close at this point to the real me. On my pattern I've come up with my own way to deal with the modern darts by folding the lower dart out, which came out pretty close to the slash & pivot method margorose suggested to me. My method kept the lower straight edge I needed, so, I decided to stay with the original pattern I came up with. I then adjusted the side and back seams to make it fit snugger on me.

I marked and cut out the pattern pieces on the fashion fabric, a drill interlining, and the coutil fabric. The fashion fabric is a couple of large sample fabrics of silk/cotton blend in a nice steel blue damask. I had to place the pattern around a grommet near the middle for one front piece, and then place the back and other front piece best I could on the larger fabric piece. I am only able to center a design on the back piece, but the fronts will not be matched. You can see the placement for the back piece, where you can see how little room I had to work with.


One of the front pieces had to be pieced together, because the fabric with the grommet was too short upon washing. I hand sewed the nearly matched pieces together, as seen here.

While tired, I cut out the back piece of the fashion fabric, before I realized that I had forgotten to add in seam allowance on the side of the back piece! I can't recut another back piece as I had no more fabric large enough, and I didn't want a frankenstein-pieced back. After a good night's sleep, I realized I could salvage the piece by trimming the drill a little more than 1/4", folding under 1/4" on the edges of the fashion fabric, then sewing close to the folded edge. I did similarly to the coutil.


The two layers (damask & drill are now one layer, the coutil the other layer) were matched wrong sides together. I then hand basted with fine black silk thread all of the layers together. If I had not made the mistake I did, I more likely would have machine sewn the side back edges, then turned them to finish.
To explain, the original photos from Arnold shows the whip stitched back seams, and unlike most of the rest of the garment edges, the whipped edges are not bound at all. In fact, it is hard to see what finish was done there. So, I think that the unbound edges were actually finished first by turning under, before being whip stitched all together. Her notes kinda suggest this, but doesn't clearly say it.
I've spent the past few days machine sewing the many 3/8" channels, with two 3/4" channels for the larger bones (I am using reeds for boning). I started sewing the channels from the main 3/4" channel, sewing the smaller channels parallel from there, which keeps most of the channels on grain or close to it. There are four lines of sewing that are at an angle to that in the center front, which is off grain.


And that's where I am at right now, with the channels completed on all three pieces. The whole set of images can be found here. More progress updates and pics as this gets completed.