MOTION BLUR TUTORIAL.
My first tut so be easy :-D
Here is a tutorial for making the motion Blur kinda look.. we will be going from
to
.
1- Open up your image in Photoshop and crop it however you like.. in my case... this is my image
( after cropped-resized ).
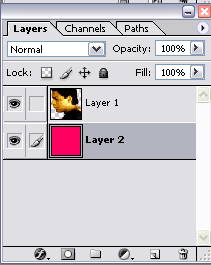
2-Make sure your actual pic and the background are 2 different layers. layers palette should look something like this :
3-Save the image as 1. Save all the files as default PS files ( PSD,PDD ).
4-After you have saved the image, take that same image in photoshop, and select the layer with the image on it ( not the bg ).
5- Go up to Filters-Blur-Motion Blur. Angle=0. I started out with the Distance of 5. Your image should now look somethign like this :
Save that image as 2.
6- Now keeping the picture layer selected, go back up to Filters-Blur-Motion Blur. Change the distance to 1 higher then the one you put in #5. In my case, it would be 6. Now your image should look like this :
7-Keep repeating step #6 until you think that it is blurred enough. I stopped at 8.
8- Open up Imageready. Open the file named '1'. If your animations Palette isn't already opened, open it up by going up to Window-Animation.
9- In the animations palette your pic should be there. Duplicate it.
10- Now you have the 2nd image in the aniamtions palette selected. go up to File-Place. Click Choose.. and find the file named 2. Hit ok.
11- Now click on the first frame and go over to the layers palette. There should be an eye on the left of each layer. On the layer that says 2.psd, click the eye. It should go away. Now go back to the 2nd frame on the Animations Palette. Look across the bottom of the screen and you should see this so far (while the 2nd frame in the aniamtions palette is highlited.) :


12- Now as the above example says, click on the eye next to 2.psd...But remember, this is on the 2nd frame!
13- Now while you are on the last frame, click the Duplicate button once again. Go up to file-Place again, and choose the file named 3.
14- Now as step 11 says, go back to frame 1 ... click the eye next to the layer that says 3.psd. Now go to the last frame, and click on the empty box next to the layer that says 3.psd( or whatever the top layer is ).The eye will appear. Now all 3 of your frames ( or how many ever there are )in the animation palette are different.
15- Repeat step 13 and 14 except with the right files names and frame names. After you have done this with all of your files that you saved.. I saved 5 files in all. You should have 5 frames in your animation palette. Here is my animations palette so far.. yours should be similar.

16- Now you have to go backwards.Duplicate Frame 5 and do the same thing in step 13 except choose the file one underneath the last file. My last file was 5. So i choose file 4.
17- Keep repeating all the steps after STEP 13 until you have gotten back to file 1. If you made the exact same number of files as i did, you should have 9 frames in all. I put my speed for the first 8 frames as NO DELAY. And The 9th frame is .5 seconds.
18- If you want, you can add some stars of w/e on the background. In in imageready, or Photoshop, make a new layer on top of everything. put whatever you want .. and then take the eraser tool and delete whaever is covering your main pic.
19- If you want to add any text, move back to photoshop, and add whatever text you would like, and switch back to imageready, save optimized as, and save it as a GIF file.
Here is my final result...

Hope you enjoyed my tutorial and if you have any questions please ask. Please show me what you made :).
Here is a tutorial for making the motion Blur kinda look.. we will be going from

to
.
1- Open up your image in Photoshop and crop it however you like.. in my case... this is my image

( after cropped-resized ).
2-Make sure your actual pic and the background are 2 different layers. layers palette should look something like this :

3-Save the image as 1. Save all the files as default PS files ( PSD,PDD ).
4-After you have saved the image, take that same image in photoshop, and select the layer with the image on it ( not the bg ).
5- Go up to Filters-Blur-Motion Blur. Angle=0. I started out with the Distance of 5. Your image should now look somethign like this :

Save that image as 2.
6- Now keeping the picture layer selected, go back up to Filters-Blur-Motion Blur. Change the distance to 1 higher then the one you put in #5. In my case, it would be 6. Now your image should look like this :

7-Keep repeating step #6 until you think that it is blurred enough. I stopped at 8.
8- Open up Imageready. Open the file named '1'. If your animations Palette isn't already opened, open it up by going up to Window-Animation.
9- In the animations palette your pic should be there. Duplicate it.
10- Now you have the 2nd image in the aniamtions palette selected. go up to File-Place. Click Choose.. and find the file named 2. Hit ok.
11- Now click on the first frame and go over to the layers palette. There should be an eye on the left of each layer. On the layer that says 2.psd, click the eye. It should go away. Now go back to the 2nd frame on the Animations Palette. Look across the bottom of the screen and you should see this so far (while the 2nd frame in the aniamtions palette is highlited.) :


12- Now as the above example says, click on the eye next to 2.psd...But remember, this is on the 2nd frame!
13- Now while you are on the last frame, click the Duplicate button once again. Go up to file-Place again, and choose the file named 3.
14- Now as step 11 says, go back to frame 1 ... click the eye next to the layer that says 3.psd. Now go to the last frame, and click on the empty box next to the layer that says 3.psd( or whatever the top layer is ).The eye will appear. Now all 3 of your frames ( or how many ever there are )in the animation palette are different.
15- Repeat step 13 and 14 except with the right files names and frame names. After you have done this with all of your files that you saved.. I saved 5 files in all. You should have 5 frames in your animation palette. Here is my animations palette so far.. yours should be similar.

16- Now you have to go backwards.Duplicate Frame 5 and do the same thing in step 13 except choose the file one underneath the last file. My last file was 5. So i choose file 4.
17- Keep repeating all the steps after STEP 13 until you have gotten back to file 1. If you made the exact same number of files as i did, you should have 9 frames in all. I put my speed for the first 8 frames as NO DELAY. And The 9th frame is .5 seconds.
18- If you want, you can add some stars of w/e on the background. In in imageready, or Photoshop, make a new layer on top of everything. put whatever you want .. and then take the eraser tool and delete whaever is covering your main pic.
19- If you want to add any text, move back to photoshop, and add whatever text you would like, and switch back to imageready, save optimized as, and save it as a GIF file.
Here is my final result...
Hope you enjoyed my tutorial and if you have any questions please ask. Please show me what you made :).