Hacking the video stream for BlueJeans on Linux
Like most of the rest of the world, I'm working from home and stuck inside. I saw some folks who had virtual backgrounds setup on Zoom, and I wondered if something like that was possible for the videoconferencing service that my employer (Red Hat) uses, BlueJeans. The short answer is: No. Bluejeans has no native support for anything other than a regular video cam stream.
But this is Linux. We don't stop at the short answer.
I started thinking, surely, it has to be possible to "man in the middle" the video stream. And indeed, it is. I did all of this on Fedora 32 (x86_64), but it should work anywhere else.
Step 1: v4l2loopback
v4l2loopback is a kernel module which creates virtual V4L2 loopback video devices. V4L2 devices are what most (all?) webcams supported by Linux are.
This module is not in the upstream kernel, so you need to pull the sources from git and build it locally. The github home is: https://github.com/umlaeute/v4l2loopback.
Don't forget to install kernel-devel and kernel-headers that correspond to the running kernel on your system:
dnf install kernel-devel kernel-headers
Now, we need to clone the v4l2loopback source code, build it as a module for our kernel, and then install it:
[spot@localhost ~]$ git clone https://github.com/umlaeute/v4l2loopback.git
Cloning into 'v4l2loopback'...
remote: Enumerating objects: 65, done.
remote: Counting objects: 100% (65/65), done.
remote: Compressing objects: 100% (40/40), done.
remote: Total 1771 (delta 28), reused 43 (delta 19), pack-reused 1706
Receiving objects: 100% (1771/1771), 811.39 KiB | 8.11 MiB/s, done.
Resolving deltas: 100% (991/991), done.
[spot@localhost ~]$ cd v4l2loopback
[spot@localhost v4l2loopback]$ make
Building v4l2-loopback driver...
make -C /lib/modules/`uname -r`/build M=/home/spot/v4l2loopback modules
make[1]: Entering directory '/usr/src/kernels/5.5.0-0.rc7.git1.2.fc31.x86_64'
CC [M] /home/spot/v4l2loopback/v4l2loopback.o
Building modules, stage 2.
MODPOST 1 modules
CC [M] /home/spot/v4l2loopback/v4l2loopback.mod.o
LD [M] /home/spot/v4l2loopback/v4l2loopback.ko
make[1]: Leaving directory '/usr/src/kernels/5.5.0-0.rc7.git1.2.fc31.x86_64'
[spot@localhost v4l2loopback]$ sudo make install
make -C /lib/modules/`uname -r`/build M=/home/spot/v4l2loopback modules_install
make[1]: Entering directory '/usr/src/kernels/5.5.0-0.rc7.git1.2.fc31.x86_64'
INSTALL /home/spot/v4l2loopback/v4l2loopback.ko
At main.c:160:
- SSL error:02001002:system library:fopen:No such file or directory: crypto/bio/bss_file.c:69
- SSL error:2006D080:BIO routines:BIO_new_file:no such file: crypto/bio/bss_file.c:76
sign-file: certs/signing_key.pem: No such file or directory
DEPMOD 5.5.0-0.rc7.git1.2.fc31.x86_64
make[1]: Leaving directory '/usr/src/kernels/5.5.0-0.rc7.git1.2.fc31.x86_64'
SUCCESS (if you got 'SSL errors' above, you can safely ignore them)
[spot@localhost v4l2loopback]$ sudo depmod -a
Now, we can load the v4l2loopback module to create a virtual V4L2 video device:
[spot@localhost v4l2loopback]$ sudo modprobe v4l2loopback devices=1 video_nr=10 card_label="OBS Cam" exclusive_caps=1
You can change the card label string to whatever you want. This creates /dev/video10 and labels it as OBS Cam.
At this point, I played with pushing content to it via ffmpeg and seeing the result via ffplay, but while fun, this was not what I was going for.
Step 2: obs-v4l2sink
obs-v4l2sink is a plugin for OBS (Open Broadcaster Software) Studio that allows it to write video output to a V4L2 device. In order to build this, you need some more dependencies (and you need to have rpmfusion enabled):
sudo dnf install qt5-qtbase-devel obs-studio obs-studio-devel
Now, pull the source down from github (https://github.com/CatxFish/obs-v4l2sink):
[spot@localhost ~]$ git clone https://github.com/CatxFish/obs-v4l2sink.git
Cloning into 'obs-v4l2sink'...
remote: Enumerating objects: 94, done.
remote: Total 94 (delta 0), reused 0 (delta 0), pack-reused 94
Unpacking objects: 100% (94/94), 40.07 KiB | 683.00 KiB/s, done.
[spot@localhost ~]$ cd obs-v4l2sink/
Next, I had to hack one of the .cmake files so it would find the OBS cmake files from the rpmfusion package:
diff --git a/external/FindLibObs.cmake b/external/FindLibObs.cmake
index ab0a3de..7758ee3 100644
--- a/external/FindLibObs.cmake
+++ b/external/FindLibObs.cmake
@@ -95,7 +95,7 @@ if(LIBOBS_FOUND)
set(LIBOBS_INCLUDE_DIRS ${LIBOBS_INCLUDE_DIR} ${W32_PTHREADS_INCLUDE_DIR})
set(LIBOBS_LIBRARIES ${LIBOBS_LIB} ${W32_PTHREADS_LIB})
- include(${LIBOBS_INCLUDE_DIR}/../cmake/external/ObsPluginHelpers.cmake)
+ include(/usr/lib64/cmake/LibObs/ObsPluginHelpers.cmake)
# allows external plugins to easily use/share common dependencies that are often included with libobs (such as FFmpeg)
if(NOT DEFINED INCLUDED_LIBOBS_CMAKE_MODULES)
With that change, now, I could build this from source:
[spot@localhost obs-v4l2sink]$ mkdir build && cd build
[spot@localhost build]$ cmake -DLIBOBS_INCLUDE_DIR="/usr/include/obs" -DCMAKE_INSTALL_PREFIX=/usr ..
-- The C compiler identification is GNU 10.0.1
-- The CXX compiler identification is GNU 10.0.1
-- Check for working C compiler: /usr/lib64/ccache/cc
-- Check for working C compiler: /usr/lib64/ccache/cc -- works
-- Detecting C compiler ABI info
-- Detecting C compiler ABI info - done
-- Detecting C compile features
-- Detecting C compile features - done
-- Check for working CXX compiler: /usr/lib64/ccache/c++
-- Check for working CXX compiler: /usr/lib64/ccache/c++ -- works
-- Detecting CXX compiler ABI info
-- Detecting CXX compiler ABI info - done
-- Detecting CXX compile features
-- Detecting CXX compile features - done
-- Found Libobs: /usr/bin/../lib64/libobs.so
-- Configuring done
-- Generating done
-- Build files have been written to: /home/spot/obs-v4l2sink/build
[spot@localhost build]$ make -j4
Scanning dependencies of target v4l2sink_autogen
[ 20%] Automatic MOC and UIC for target v4l2sink
[ 20%] Built target v4l2sink_autogen
Scanning dependencies of target v4l2sink
[ 40%] Building CXX object CMakeFiles/v4l2sink.dir/src/v4l2sink.cpp.o
[ 60%] Building CXX object CMakeFiles/v4l2sink.dir/v4l2sink_autogen/mocs_compilation.cpp.o
[ 80%] Building CXX object CMakeFiles/v4l2sink.dir/src/v4l2sinkproperties.cpp.o
/home/spot/obs-v4l2sink/src/v4l2sink.cpp: In function ‘bool v4l2device_close(void*)’:
/home/spot/obs-v4l2sink/src/v4l2sink.cpp:217:1: warning: no return statement in function returning non-void [-Wreturn-type]
217 | }
| ^
[100%] Linking CXX shared module v4l2sink.so
[100%] Built target v4l2sink
[spot@localhost build]$ sudo make install
[ 20%] Automatic MOC and UIC for target v4l2sink
[ 20%] Built target v4l2sink_autogen
[100%] Built target v4l2sink
Install the project...
-- Install configuration: ""
-- Installing: /usr/lib/obs-plugins/v4l2sink.so
-- Up-to-date: /usr/share/obs/obs-plugins/v4l2sink/locale
-- Installing: /usr/share/obs/obs-plugins/v4l2sink/locale/zh-TW.ini
-- Installing: /usr/share/obs/obs-plugins/v4l2sink/locale/en-US.ini
-- Installing: /usr/share/obs/obs-plugins/v4l2sink/locale/de-DE.ini
If you're paying close attention, you'll notice that it installed the plugin into /usr/lib, and we need it to be in /usr/lib64. Move that file on over.
[spot@localhost build]$ sudo mv /usr/lib/obs-plugins/v4l2sink.so /usr/lib64/obs-plugins/v4l2sink.so
Step 3: OBS
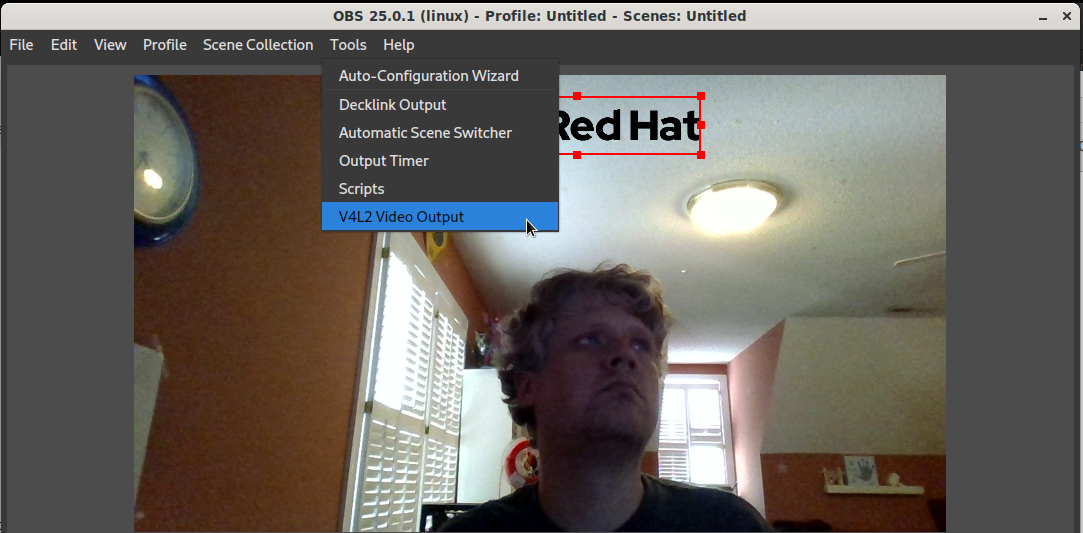
Now, open OBS. You should see a selection under the "Tools" menu for V4L2 Video Output, this means the plugin is loaded:
Set the path to the virtual device we created in Step 1 (/dev/video10):
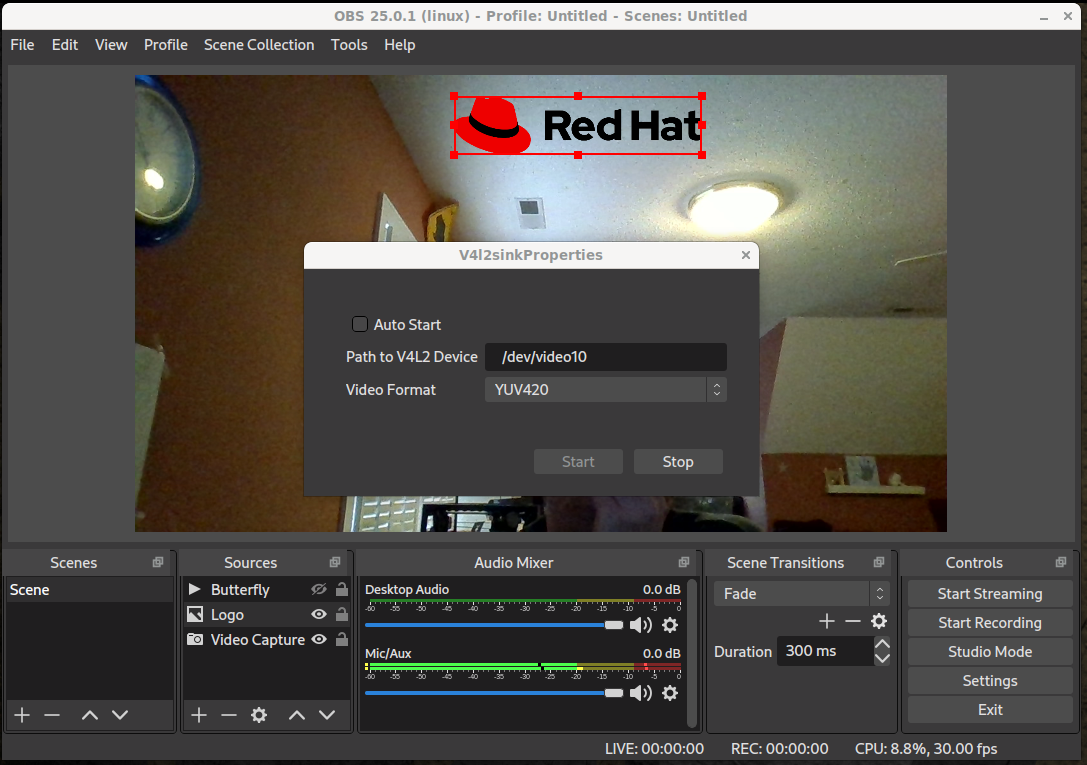
Click Start. The dialog doesn't go away, but it is running. You can close the dialog.
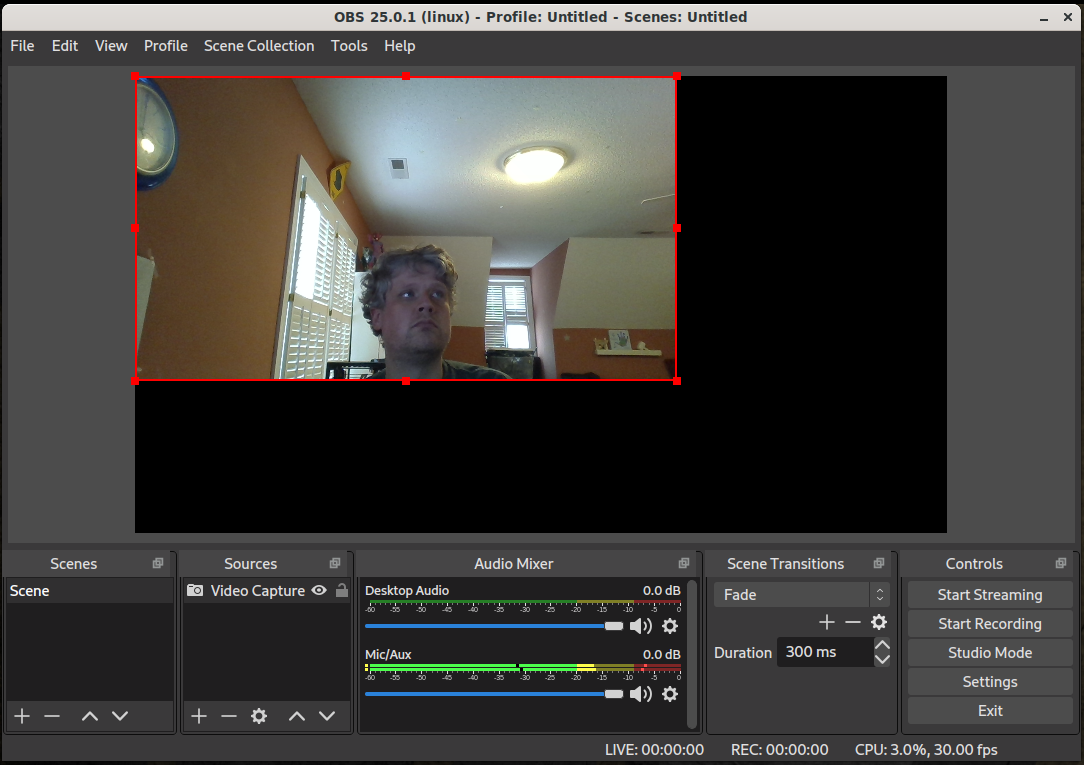
At this point, you need to add some sources. The first source you should add is a Video Capture Source. Click the "+" under Sources, and select Video Capture Device (V4L2). Create new, name it whatever you want. Hit OK. In the Properties dialog that follows, change the Device to your built in camera. NOT YOUR VIRTUAL DEVICE. Change any of the tunables you need here and hit OK.
Now, you should see the live feed from your webcam in the main OBS window. On my system it didn't take up the full space, so I dragged that box (from the bottom right corner) to fill the space:
You might also want to lock this source (click the lock next to the Video Capture Source), so that you don't accidentally move it around.
Step 4: Effects
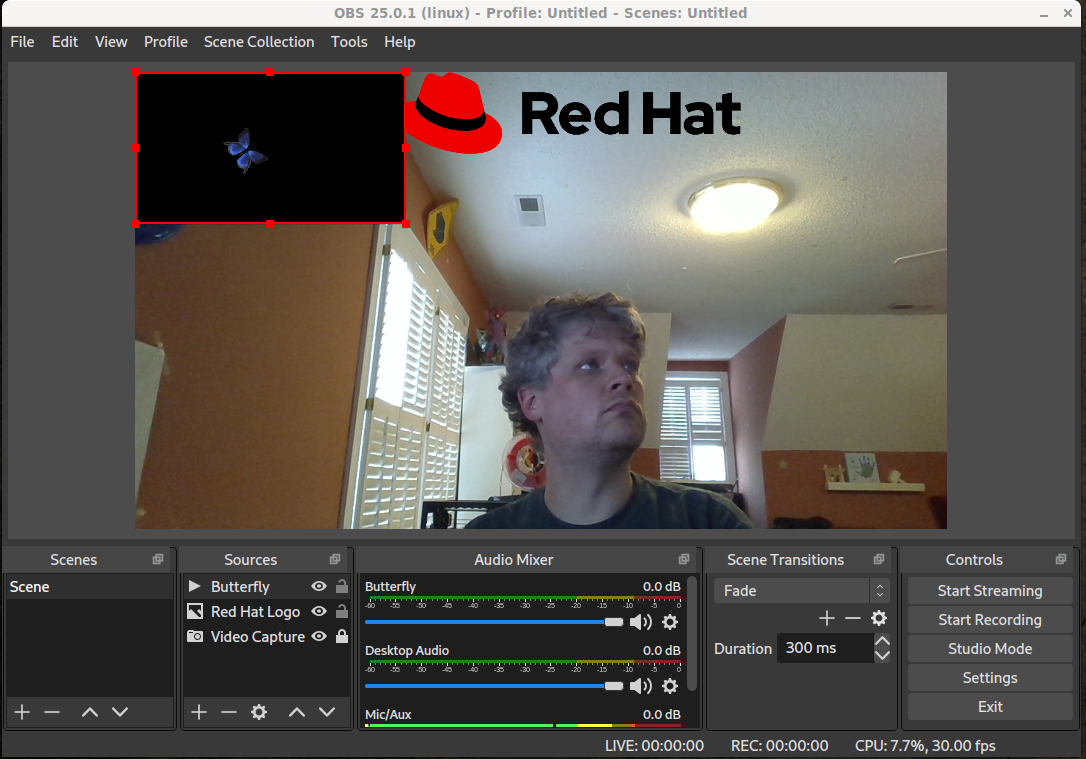
If you skip this step entirely, you should be able to get BlueJeans working EXACTLY like it would normally, just with OBS in the middle. But that's not why we're here, so lets add two effects. First, I want to add a Red Hat watermark. I downloaded a PNG of the logo with transparency, then I add an additional Source, this time it is an Image type. I renamed it to Red Hat Logo and hit OK. The Properties dialog prompts me to select the file, I do, then hit OK. You should see it over top of your webcam video feed now (if not, reorder the Sources list so that it is above the Video Capture device in the list). You can lock the logo's position or make it invisble by clicking the lock or eye next to it in the Sources list. BlueJeans adds a small grey overlay to the bottom of all video windows, so I put the logo on the top of mine, but you can move it around until you have it where you like it.
Now, I wanted to add a fun effect, so I downloaded a short video of a butterfly flying across a black background: Video used under license from Freestock.com Once downloaded, I added a third source, this time a Media source. I renamed it to Butterfly and hit OK. In the Properties dialog, I selected the file. I also told it to loop and use hardware decoding when available, then hit OK. You should see the butterfly flying happily in the top left of your feed.
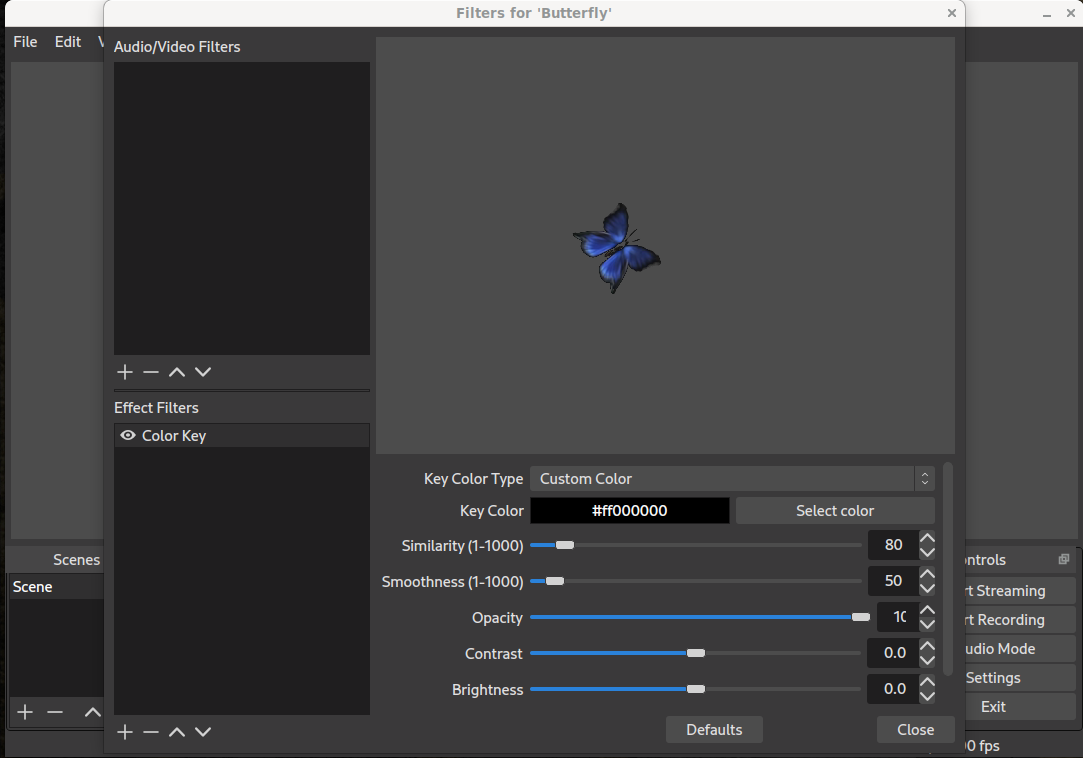
We need to do one more thing, we need to set the black background in the video to be invisible. We do this by adding a Color Key Effect Filter. First, stretch and move the butterfly source so that it is where you want it. Then, right click on the Butterfly source and select Effects. Hit the plus under Effect Filters and select Color Key. Now, change the Key Color Type to "Custom Color" and select black (#ff000000). You should now just see the butterfly in the preview window. Make sure you have the Opacity at 100%, we want to see our Video Capture source behind the butterfly! Hit Close and you should see the butterfly flying by!
I set it to loop because I want to be able to turn the butterfly on (and off) as needed, and I can do that by toggling the visibility (clicking the eye next to the Butterfly source). If it was not looping, it would play once and stop, whether or not it is visible.
Step 5: BlueJeans
NOTE: I could not get this to work with Google Chrome/Chromium. There are lots of people who have posted to the internet trying to get help to reliably change webcam from the default (first found device) in Chrome/Chromium without much success. So, I used Firefox. You need to be sure you haven't given BlueJeans blanket permission to use the webcam, or it will keep trying to use your built-in device. Click on the little "toggle" next to to the URL and make sure there is no permissions for the camera under "Permissions".
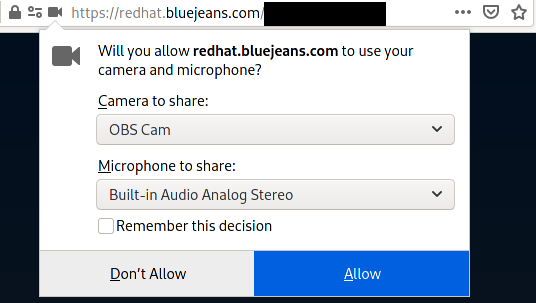
Now, when you open BlueJeans, it will prompt you to give it permission to use the camera and microphone. Be sure to select OBS Cam (or whatever you named your virtual device). You can check the remember box now. I did not, because there are some meetings where the other participants may not appreciate a water mark (or they're all Mac users and none of this works for them). Hit Allow, and you're off! Everything else is BlueJeans as normal.
Step 6: Notes
When BlueJeans shows you your webcam video, it flips it. This is not how anyone else sees it, don't panic or flip it in OBS. On my system, this works in near realtime, and it only uses about 9% of the CPU. I keep the OBS window open on a separate monitor, so that I can trigger effects during the call if I want to.
The butterfly video isn't perfect, the Color Key eats out a bit of the body. A better video (with transparency/color key in mind) would solve this issue.
You don't need to hit "Start Streaming" or "Start Recording" in OBS. The plugin we built, installed, configured, and enabled is piping the video from OBS to /dev/video10. If you want to stop, you just go back to Tools->V4L2 Video Output and hit Stop (or close OBS).
Oh, remember when I mentioned a virtual background? Well, you can totally do that with this technique, but you really need a solid background, ideally in a color that never shows up on you or your clothes. In the film business, they use "green screen" (aka chroma key or color key) to accomplish this. I don't have a green screen or even a single color wall in my office, so I couldn't do anything else here, but if you do, you can add a Color Key Effect filter to the Video Capture source (right click it) to remove the "background". Then it will become transparent and you can add an image or video source and layer it appropriately.
If anyone comes up with a clever way to create a virtual background without the need for a "green screen", please share it!
But this is Linux. We don't stop at the short answer.
I started thinking, surely, it has to be possible to "man in the middle" the video stream. And indeed, it is. I did all of this on Fedora 32 (x86_64), but it should work anywhere else.
Step 1: v4l2loopback
v4l2loopback is a kernel module which creates virtual V4L2 loopback video devices. V4L2 devices are what most (all?) webcams supported by Linux are.
This module is not in the upstream kernel, so you need to pull the sources from git and build it locally. The github home is: https://github.com/umlaeute/v4l2loopback.
Don't forget to install kernel-devel and kernel-headers that correspond to the running kernel on your system:
dnf install kernel-devel kernel-headers
Now, we need to clone the v4l2loopback source code, build it as a module for our kernel, and then install it:
[spot@localhost ~]$ git clone https://github.com/umlaeute/v4l2loopback.git
Cloning into 'v4l2loopback'...
remote: Enumerating objects: 65, done.
remote: Counting objects: 100% (65/65), done.
remote: Compressing objects: 100% (40/40), done.
remote: Total 1771 (delta 28), reused 43 (delta 19), pack-reused 1706
Receiving objects: 100% (1771/1771), 811.39 KiB | 8.11 MiB/s, done.
Resolving deltas: 100% (991/991), done.
[spot@localhost ~]$ cd v4l2loopback
[spot@localhost v4l2loopback]$ make
Building v4l2-loopback driver...
make -C /lib/modules/`uname -r`/build M=/home/spot/v4l2loopback modules
make[1]: Entering directory '/usr/src/kernels/5.5.0-0.rc7.git1.2.fc31.x86_64'
CC [M] /home/spot/v4l2loopback/v4l2loopback.o
Building modules, stage 2.
MODPOST 1 modules
CC [M] /home/spot/v4l2loopback/v4l2loopback.mod.o
LD [M] /home/spot/v4l2loopback/v4l2loopback.ko
make[1]: Leaving directory '/usr/src/kernels/5.5.0-0.rc7.git1.2.fc31.x86_64'
[spot@localhost v4l2loopback]$ sudo make install
make -C /lib/modules/`uname -r`/build M=/home/spot/v4l2loopback modules_install
make[1]: Entering directory '/usr/src/kernels/5.5.0-0.rc7.git1.2.fc31.x86_64'
INSTALL /home/spot/v4l2loopback/v4l2loopback.ko
At main.c:160:
- SSL error:02001002:system library:fopen:No such file or directory: crypto/bio/bss_file.c:69
- SSL error:2006D080:BIO routines:BIO_new_file:no such file: crypto/bio/bss_file.c:76
sign-file: certs/signing_key.pem: No such file or directory
DEPMOD 5.5.0-0.rc7.git1.2.fc31.x86_64
make[1]: Leaving directory '/usr/src/kernels/5.5.0-0.rc7.git1.2.fc31.x86_64'
SUCCESS (if you got 'SSL errors' above, you can safely ignore them)
[spot@localhost v4l2loopback]$ sudo depmod -a
Now, we can load the v4l2loopback module to create a virtual V4L2 video device:
[spot@localhost v4l2loopback]$ sudo modprobe v4l2loopback devices=1 video_nr=10 card_label="OBS Cam" exclusive_caps=1
You can change the card label string to whatever you want. This creates /dev/video10 and labels it as OBS Cam.
At this point, I played with pushing content to it via ffmpeg and seeing the result via ffplay, but while fun, this was not what I was going for.
Step 2: obs-v4l2sink
obs-v4l2sink is a plugin for OBS (Open Broadcaster Software) Studio that allows it to write video output to a V4L2 device. In order to build this, you need some more dependencies (and you need to have rpmfusion enabled):
sudo dnf install qt5-qtbase-devel obs-studio obs-studio-devel
Now, pull the source down from github (https://github.com/CatxFish/obs-v4l2sink):
[spot@localhost ~]$ git clone https://github.com/CatxFish/obs-v4l2sink.git
Cloning into 'obs-v4l2sink'...
remote: Enumerating objects: 94, done.
remote: Total 94 (delta 0), reused 0 (delta 0), pack-reused 94
Unpacking objects: 100% (94/94), 40.07 KiB | 683.00 KiB/s, done.
[spot@localhost ~]$ cd obs-v4l2sink/
Next, I had to hack one of the .cmake files so it would find the OBS cmake files from the rpmfusion package:
diff --git a/external/FindLibObs.cmake b/external/FindLibObs.cmake
index ab0a3de..7758ee3 100644
--- a/external/FindLibObs.cmake
+++ b/external/FindLibObs.cmake
@@ -95,7 +95,7 @@ if(LIBOBS_FOUND)
set(LIBOBS_INCLUDE_DIRS ${LIBOBS_INCLUDE_DIR} ${W32_PTHREADS_INCLUDE_DIR})
set(LIBOBS_LIBRARIES ${LIBOBS_LIB} ${W32_PTHREADS_LIB})
- include(${LIBOBS_INCLUDE_DIR}/../cmake/external/ObsPluginHelpers.cmake)
+ include(/usr/lib64/cmake/LibObs/ObsPluginHelpers.cmake)
# allows external plugins to easily use/share common dependencies that are often included with libobs (such as FFmpeg)
if(NOT DEFINED INCLUDED_LIBOBS_CMAKE_MODULES)
With that change, now, I could build this from source:
[spot@localhost obs-v4l2sink]$ mkdir build && cd build
[spot@localhost build]$ cmake -DLIBOBS_INCLUDE_DIR="/usr/include/obs" -DCMAKE_INSTALL_PREFIX=/usr ..
-- The C compiler identification is GNU 10.0.1
-- The CXX compiler identification is GNU 10.0.1
-- Check for working C compiler: /usr/lib64/ccache/cc
-- Check for working C compiler: /usr/lib64/ccache/cc -- works
-- Detecting C compiler ABI info
-- Detecting C compiler ABI info - done
-- Detecting C compile features
-- Detecting C compile features - done
-- Check for working CXX compiler: /usr/lib64/ccache/c++
-- Check for working CXX compiler: /usr/lib64/ccache/c++ -- works
-- Detecting CXX compiler ABI info
-- Detecting CXX compiler ABI info - done
-- Detecting CXX compile features
-- Detecting CXX compile features - done
-- Found Libobs: /usr/bin/../lib64/libobs.so
-- Configuring done
-- Generating done
-- Build files have been written to: /home/spot/obs-v4l2sink/build
[spot@localhost build]$ make -j4
Scanning dependencies of target v4l2sink_autogen
[ 20%] Automatic MOC and UIC for target v4l2sink
[ 20%] Built target v4l2sink_autogen
Scanning dependencies of target v4l2sink
[ 40%] Building CXX object CMakeFiles/v4l2sink.dir/src/v4l2sink.cpp.o
[ 60%] Building CXX object CMakeFiles/v4l2sink.dir/v4l2sink_autogen/mocs_compilation.cpp.o
[ 80%] Building CXX object CMakeFiles/v4l2sink.dir/src/v4l2sinkproperties.cpp.o
/home/spot/obs-v4l2sink/src/v4l2sink.cpp: In function ‘bool v4l2device_close(void*)’:
/home/spot/obs-v4l2sink/src/v4l2sink.cpp:217:1: warning: no return statement in function returning non-void [-Wreturn-type]
217 | }
| ^
[100%] Linking CXX shared module v4l2sink.so
[100%] Built target v4l2sink
[spot@localhost build]$ sudo make install
[ 20%] Automatic MOC and UIC for target v4l2sink
[ 20%] Built target v4l2sink_autogen
[100%] Built target v4l2sink
Install the project...
-- Install configuration: ""
-- Installing: /usr/lib/obs-plugins/v4l2sink.so
-- Up-to-date: /usr/share/obs/obs-plugins/v4l2sink/locale
-- Installing: /usr/share/obs/obs-plugins/v4l2sink/locale/zh-TW.ini
-- Installing: /usr/share/obs/obs-plugins/v4l2sink/locale/en-US.ini
-- Installing: /usr/share/obs/obs-plugins/v4l2sink/locale/de-DE.ini
If you're paying close attention, you'll notice that it installed the plugin into /usr/lib, and we need it to be in /usr/lib64. Move that file on over.
[spot@localhost build]$ sudo mv /usr/lib/obs-plugins/v4l2sink.so /usr/lib64/obs-plugins/v4l2sink.so
Step 3: OBS
Now, open OBS. You should see a selection under the "Tools" menu for V4L2 Video Output, this means the plugin is loaded:
Set the path to the virtual device we created in Step 1 (/dev/video10):
Click Start. The dialog doesn't go away, but it is running. You can close the dialog.
At this point, you need to add some sources. The first source you should add is a Video Capture Source. Click the "+" under Sources, and select Video Capture Device (V4L2). Create new, name it whatever you want. Hit OK. In the Properties dialog that follows, change the Device to your built in camera. NOT YOUR VIRTUAL DEVICE. Change any of the tunables you need here and hit OK.
Now, you should see the live feed from your webcam in the main OBS window. On my system it didn't take up the full space, so I dragged that box (from the bottom right corner) to fill the space:
You might also want to lock this source (click the lock next to the Video Capture Source), so that you don't accidentally move it around.
Step 4: Effects
If you skip this step entirely, you should be able to get BlueJeans working EXACTLY like it would normally, just with OBS in the middle. But that's not why we're here, so lets add two effects. First, I want to add a Red Hat watermark. I downloaded a PNG of the logo with transparency, then I add an additional Source, this time it is an Image type. I renamed it to Red Hat Logo and hit OK. The Properties dialog prompts me to select the file, I do, then hit OK. You should see it over top of your webcam video feed now (if not, reorder the Sources list so that it is above the Video Capture device in the list). You can lock the logo's position or make it invisble by clicking the lock or eye next to it in the Sources list. BlueJeans adds a small grey overlay to the bottom of all video windows, so I put the logo on the top of mine, but you can move it around until you have it where you like it.
Now, I wanted to add a fun effect, so I downloaded a short video of a butterfly flying across a black background: Video used under license from Freestock.com Once downloaded, I added a third source, this time a Media source. I renamed it to Butterfly and hit OK. In the Properties dialog, I selected the file. I also told it to loop and use hardware decoding when available, then hit OK. You should see the butterfly flying happily in the top left of your feed.
We need to do one more thing, we need to set the black background in the video to be invisible. We do this by adding a Color Key Effect Filter. First, stretch and move the butterfly source so that it is where you want it. Then, right click on the Butterfly source and select Effects. Hit the plus under Effect Filters and select Color Key. Now, change the Key Color Type to "Custom Color" and select black (#ff000000). You should now just see the butterfly in the preview window. Make sure you have the Opacity at 100%, we want to see our Video Capture source behind the butterfly! Hit Close and you should see the butterfly flying by!
I set it to loop because I want to be able to turn the butterfly on (and off) as needed, and I can do that by toggling the visibility (clicking the eye next to the Butterfly source). If it was not looping, it would play once and stop, whether or not it is visible.
Step 5: BlueJeans
NOTE: I could not get this to work with Google Chrome/Chromium. There are lots of people who have posted to the internet trying to get help to reliably change webcam from the default (first found device) in Chrome/Chromium without much success. So, I used Firefox. You need to be sure you haven't given BlueJeans blanket permission to use the webcam, or it will keep trying to use your built-in device. Click on the little "toggle" next to to the URL and make sure there is no permissions for the camera under "Permissions".
Now, when you open BlueJeans, it will prompt you to give it permission to use the camera and microphone. Be sure to select OBS Cam (or whatever you named your virtual device). You can check the remember box now. I did not, because there are some meetings where the other participants may not appreciate a water mark (or they're all Mac users and none of this works for them). Hit Allow, and you're off! Everything else is BlueJeans as normal.
Step 6: Notes
When BlueJeans shows you your webcam video, it flips it. This is not how anyone else sees it, don't panic or flip it in OBS. On my system, this works in near realtime, and it only uses about 9% of the CPU. I keep the OBS window open on a separate monitor, so that I can trigger effects during the call if I want to.
The butterfly video isn't perfect, the Color Key eats out a bit of the body. A better video (with transparency/color key in mind) would solve this issue.
You don't need to hit "Start Streaming" or "Start Recording" in OBS. The plugin we built, installed, configured, and enabled is piping the video from OBS to /dev/video10. If you want to stop, you just go back to Tools->V4L2 Video Output and hit Stop (or close OBS).
Oh, remember when I mentioned a virtual background? Well, you can totally do that with this technique, but you really need a solid background, ideally in a color that never shows up on you or your clothes. In the film business, they use "green screen" (aka chroma key or color key) to accomplish this. I don't have a green screen or even a single color wall in my office, so I couldn't do anything else here, but if you do, you can add a Color Key Effect filter to the Video Capture source (right click it) to remove the "background". Then it will become transparent and you can add an image or video source and layer it appropriately.
If anyone comes up with a clever way to create a virtual background without the need for a "green screen", please share it!