Little Miss Sunshine Tutorial
Requested by: graven_rose
going from:

to:

Step 1: Crop your base, I took a screencap from LMS, credit to some LJ user I cannot remember xD, check the resource post ;)

Step 2: Duplicate your base twice, set the first duplicate to screen (trama en castellano), and the second one to soft light (luz suave).
Layer order: Base, Screen, Soft Light ; opacity 100%, [you might have to change the opacity, depending on how bright your image is, if it's too bright you should lower the opacity of both layers.]

Step 3: Now create a Hue/Saturation Adjustment Layer (Go to the menu above: Layer > New Adjustment Layer > Hue/Saturation) and Increase the saturation in Master to +20 [play with these settings too, I often use +30]

Step 4: Add a Selective Colour Adjustment Layer (Go to the menu above: Layer > New Adjustment Layer > Selective Colour) , put the following settings:
Reds: -52, 0 , +100, +100
Yellows: -100, 0 , +100, 0
Neutrals: +100, 0 , -100, 0

Step 5: New Color Balance Layer (Go to the menu above: Layer > New Adjustment Layer > Color Balance)
Midtones: -100, +25, -30
Shadows: -5, -2, -13

Step 6:
Decorating:
- Add this texture [NOT MADE BY ME] on Linear Burn, Opacity 86%.
- This part can be tricky, Create a new layer (CTRL + SHIFT + N), and with the Rectangular Tool draw a black rectangle. Make sure it's as wider than your image, because you'll have to 'transform' it.
- Now that you have your rectangle, press: CTRL + T (Free Transform) and rotate it a bit, so that it looks like this:
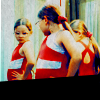
- Finally add some text, I wrote SUPERMODEL on TrashHand [found here at dafont.com ]. And we're done!

other examples:


* Enjoy!
* no hotlinking PLEASE
* credit if use
* comments are ♥
and I'd lovee to see what you came out with!
this is a guide, if you copy exactly you might not get the same result I got, every image is different.