A double dose of Tutorials!
This tutorial will show you how to go from:
»
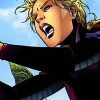
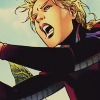
Step 1: We start with the base image:
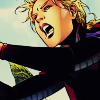
Step 2: Duplicate the layer, and set the layer properties to Screen at 100% opacity:
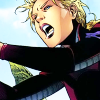
Step 3: Create a new layer, with the layer properties set to Exclusion at 20% opacity. Select a medium-to-light blue color (For this icon, I used #7b87f7), and use the fill/flood tool:
Step 4: Create another new layer, with the properties set to Soft Light at 100% opacity. Select a dark brown (For this icon, I used #673f21), and use the fill/flood tool.
Step 5:Now, create a color adjustment layer. This is where it gets tricky, because you need to adjust it to the hues already in the image. You want to try and negate the way the image is heavily relying on browns and reds. For this image, I set the color levels to:
-54 (Cyan)
-35 (Magenta)
31 (Blue)
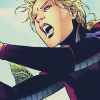
Once you've selected your colors, set the layer to Soft Light at 100% opacity! Your result should look like this:
This is usually where I finish. But if you want to do other things, now is when you add and textures/text or whatever you'd like. For darker images, setting the Color Adjustment layer to Screen (at a lower opacity - somewhere between 40 and 60%!) also will give a similar effect.
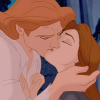
The next tutorial is fairly similar, though working with animation is a bit different. This tutorial will show you how to go from:

»
Step 1: We start with the base image:
Step 2: Duplicate the layer, and set the layer properties to Screen at 100% opacity:

Step 3: Create a new layer, with the properties set to Exclusion at 20% opacity. Select a very dark blue color (for this icon, I used #1b2147). and use the fill/flood tool:
Step 4:Now, create a color adjustment layer. This is where it gets tricky, because you need to adjust it to the hues already in the image. You want to try and negate the way the image is heavily relying on browns and reds. For this image, I set the color levels to:
8 (Red)
36 (Green)
-15 (Yellow)
Once you've selected your colors, set the layer to Screen at 100% opacity! Your result should look like this:
And you're done! Like I said with the other one, this is where you can experiment with text and textures. Of course, these colors - as well as everything else is a guide! Feel free to experiment with other colors and techniques.
My main purpose for this way to find a way to enhance the colors like many icon makers do without the use of Selective Color. Hopefully this gives the desired result! And was... helpful. Feel free to ask questions if you have them!
Credit; shunkanidou or vegetas!
Other goodies:
Affiliates
Resources
Watch!
»
Step 1: We start with the base image:
Step 2: Duplicate the layer, and set the layer properties to Screen at 100% opacity:
Step 3: Create a new layer, with the layer properties set to Exclusion at 20% opacity. Select a medium-to-light blue color (For this icon, I used #7b87f7), and use the fill/flood tool:
Step 4: Create another new layer, with the properties set to Soft Light at 100% opacity. Select a dark brown (For this icon, I used #673f21), and use the fill/flood tool.
Step 5:Now, create a color adjustment layer. This is where it gets tricky, because you need to adjust it to the hues already in the image. You want to try and negate the way the image is heavily relying on browns and reds. For this image, I set the color levels to:
-54 (Cyan)
-35 (Magenta)
31 (Blue)
Once you've selected your colors, set the layer to Soft Light at 100% opacity! Your result should look like this:
This is usually where I finish. But if you want to do other things, now is when you add and textures/text or whatever you'd like. For darker images, setting the Color Adjustment layer to Screen (at a lower opacity - somewhere between 40 and 60%!) also will give a similar effect.
The next tutorial is fairly similar, though working with animation is a bit different. This tutorial will show you how to go from:
»
Step 1: We start with the base image:
Step 2: Duplicate the layer, and set the layer properties to Screen at 100% opacity:
Step 3: Create a new layer, with the properties set to Exclusion at 20% opacity. Select a very dark blue color (for this icon, I used #1b2147). and use the fill/flood tool:
Step 4:Now, create a color adjustment layer. This is where it gets tricky, because you need to adjust it to the hues already in the image. You want to try and negate the way the image is heavily relying on browns and reds. For this image, I set the color levels to:
8 (Red)
36 (Green)
-15 (Yellow)
Once you've selected your colors, set the layer to Screen at 100% opacity! Your result should look like this:
And you're done! Like I said with the other one, this is where you can experiment with text and textures. Of course, these colors - as well as everything else is a guide! Feel free to experiment with other colors and techniques.
My main purpose for this way to find a way to enhance the colors like many icon makers do without the use of Selective Color. Hopefully this gives the desired result! And was... helpful. Feel free to ask questions if you have them!
Credit; shunkanidou or vegetas!
Other goodies:
Affiliates
Resources
Watch!