Home Project: Tiling My Office Window Sill
Over the past few years, we have been replacing our older, less efficient windows with newer, double paned, triple EEE rated, energy efficient ones. It took time because, well, window replacement is not cheap. (BTW-quick plug: if you are in the Phoenix area, Affordable Windows offers a great product and has the best installers on the planet. And, no, I don’t get anything for referring them, but we used another company for the first batch of windows and I can verify that I know great window installers from not-so-great.)
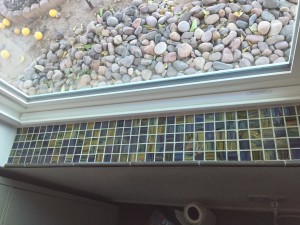
As you can see, my office has a great window with a view of the back yard and our amazing, prolific lemon tree. (Please, ignore the rest of the back yard, which is a still work in progress.)
This window was also one of the last needing replacement as it was part of a newer add-on section of the house than those that were part of the original build. We had all the 1950-era ones replaced first, since they were the least efficient. And for those who are wondering, yes, we have seen noticeable savings on our utility bills.
The office window is a little over 4 feet wide, with a sill that is just under 4 inches deep. Because the existing window leaked dust, and the cats like to sit on the sill, what was originally a white ledge had turned gray in places, so needed some TLC. But I decided not to simply repaint. I say it’s because the cats were just going to dirty it up again, even with a fancy new non-leaky window. My husband simply nodded and said, “I can tell you need a craft fix, so carry on.”
At any rate, I decided I wanted something more creative in my writing space. Thus, began my first foray into tiling.
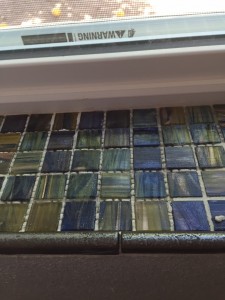
The room has dark green floor tile that is so dark it looks black, and the fixtures are brushed nickel. I chose a blue mosaic glass tile with hints of green because I like the way it catches the light. Also, the 4mm tile size seemed like it would be best for the size of the project. Also, they can be cut with hand-held tile cutters and I wouldn’t need a tile saw. I also opted for premixed grout that could be used as the tile set, which also simplified the task.

One issue I ran into was that the tile size I chose did not perfectly fit the sill depth. I considered cutting tiles to fit, but having to cut over four feet worth of 4mm tiles into less than 2mm slices and then filing the edges was daunting. (I wanted a pretty window sill-and possibly a craft-fix-not a month-long tedious project.) So, I found some spacer tile* I liked and decided to place a row of that at the front of the sill. It makes a nice lip, as they are a bit taller than the glass tile, and the dark color actually ties the sill in better with the floor.

I have to admit, once I finished, I could see that the mosaic tile is not perfectly level. I figured out that I didn’t scrape off enough of the set grout before placing the tile. However, it’s only noticeable if you are really looking for it, and I am happy with the final results.

Of course, I will do better on the window sill in my sewing room, which is the next project and will give me some additional tiling practice before I do the bathroom backsplash. Once those are done, I should stop “jonesing” for a hands-on home project for a bit.
*I have since discovered there is such a thing as tile edging and will be checking to see if that will work nicely for future projects.
