Tutorial @01
First tutorial!!>3<
Requested by 2baki .
Want to request one? Come here!
>>
Level: Easy
Involved Seletive Color, Hue/Saturation, Levels, Curves, Brightness/Contrast.
I use Photoshop CS2.
* Lots of different layers and steps and image heavy><"
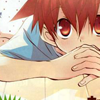
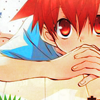
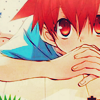
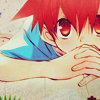
1- Crop your base.
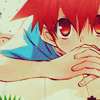
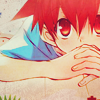
2- Duplicate the base and set it to Soft Light 100% to make it brighter.
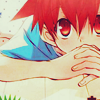
3- Add a Hue/Saturation Layer with Saturation +20 (Layer>New Adjustment Layer>Hue/Saturation..)
4- I add some Green because actually, at the left bottom corner there's a bit green. I always love to add a seletive color layer to adjust the color:)
Add a Selective Color Layer with the following settings. (Layer>New Adjustment Layer>Selective Color)
Yellow: -100, 33, -21, 0
Green: 100, 32, -42,0
Cyan: 100, 28, -100, 12
White: 0, 0, 0, -16
Neutral: 20, 0, 0, 15
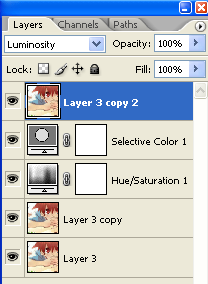
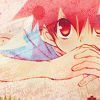
5- Now go back to the base and duplicate it. Put this duplicated layer at the top and set it to Luminosity 100%
Layers should be like this(Don't worry about the layer name because I deleted something before)
6- A bit dull with the skin, right? So I add a Curve Layer to make it brighter and have some ombre(?) like.
first spot-
Input:126
Output:128
second spot-
Input:89
Output:78

7- I'm really sorry if you think there're so much steps because I love to adjust color till I get a perfect color.
So here comes another layer againXD Add a Levels Layer!
RGB: 20, 1.49, 255
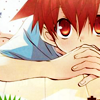
Much brighter, right?
Honestly, I think if you're already satisfied with this one(or any other steps), you may stop here and add textures or brushes or texts if you like.
8- Another Selective Color Layer, sorry guys:(
Neutrals:29, 35, 18, 25
9- Add a Brightness/Contrast layer.
Contrast: -8

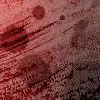
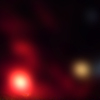
10- Add a new layer and fill with #051243 (any dark blue is okay). Then set it to Exclusion 50%.
11- Add a new layer fill with #760707(any dark red is okay). Then set it to Exclusion 20%. Duplicate this filled layer and set it to Soft Light 20%.
12- Another Curve Layer.
Input: 150
Output: 172
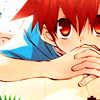
Finally, the coloring is finish! *exhausted*
In fact, if you just want to learn the coloring, you may stop at any steps above.
Ready to start adding other stuffs? GO!
13- Add the following texture by pinkloveforum and set it to Multiply 20%. I erase some that cover the character.
>>
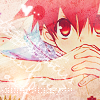
14- Add the following gradient texture by erniemay and set it to Screen 100%.

>>
15- Add this texture again but set it to Screen 100%. Eraase some too beacause it covers the character.
>>
It is now similar to the final result!:P
16- Add this light texture by? and set it to Screen 100%.
17- Add a new blank layer to add these brushes on it.
( I forget where I get them sorry. But for the heart, I cut it from another brush)
Get this after adding the light texture and brushes!
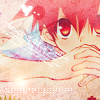
18- Use the Type Tool to type words, type anything you want, and change the texts color to black. I use the font Violation. (Download here) Text size is 15pt. Set this text layer to Overlay 50%. Then press Ctrl+T(transform) to slant it.
19- Duplicate the above text layer and change the texts color to white. Set this duplicated layer to Normal 80%.
Now, you are finish! CongratulationsXD!
I'm sorry if my grammers are wrong cause I'm not so good at English, I'm a Chinese.:)
If you want a Chinese version, you are more than welcome to request:D
As I remember, I had used someone's tutorial in some steps I think, but I can't remember I used who's. So if that's you, please tell me.
Download the .PSD file here.
If you have some questions, comment here and I'll reply you soon!
Requested by 2baki .
Want to request one? Come here!
>>
Level: Easy
Involved Seletive Color, Hue/Saturation, Levels, Curves, Brightness/Contrast.
I use Photoshop CS2.
* Lots of different layers and steps and image heavy><"
1- Crop your base.
2- Duplicate the base and set it to Soft Light 100% to make it brighter.
3- Add a Hue/Saturation Layer with Saturation +20 (Layer>New Adjustment Layer>Hue/Saturation..)
4- I add some Green because actually, at the left bottom corner there's a bit green. I always love to add a seletive color layer to adjust the color:)
Add a Selective Color Layer with the following settings. (Layer>New Adjustment Layer>Selective Color)
Yellow: -100, 33, -21, 0
Green: 100, 32, -42,0
Cyan: 100, 28, -100, 12
White: 0, 0, 0, -16
Neutral: 20, 0, 0, 15
5- Now go back to the base and duplicate it. Put this duplicated layer at the top and set it to Luminosity 100%
Layers should be like this(Don't worry about the layer name because I deleted something before)
6- A bit dull with the skin, right? So I add a Curve Layer to make it brighter and have some ombre(?) like.
first spot-
Input:126
Output:128
second spot-
Input:89
Output:78
7- I'm really sorry if you think there're so much steps because I love to adjust color till I get a perfect color.
So here comes another layer againXD Add a Levels Layer!
RGB: 20, 1.49, 255
Much brighter, right?
Honestly, I think if you're already satisfied with this one(or any other steps), you may stop here and add textures or brushes or texts if you like.
8- Another Selective Color Layer, sorry guys:(
Neutrals:29, 35, 18, 25
9- Add a Brightness/Contrast layer.
Contrast: -8
10- Add a new layer and fill with #051243 (any dark blue is okay). Then set it to Exclusion 50%.
11- Add a new layer fill with #760707(any dark red is okay). Then set it to Exclusion 20%. Duplicate this filled layer and set it to Soft Light 20%.
12- Another Curve Layer.
Input: 150
Output: 172
Finally, the coloring is finish! *exhausted*
In fact, if you just want to learn the coloring, you may stop at any steps above.
Ready to start adding other stuffs? GO!
13- Add the following texture by pinkloveforum and set it to Multiply 20%. I erase some that cover the character.
>>
14- Add the following gradient texture by erniemay and set it to Screen 100%.
>>
15- Add this texture again but set it to Screen 100%. Eraase some too beacause it covers the character.
>>
It is now similar to the final result!:P
16- Add this light texture by? and set it to Screen 100%.
17- Add a new blank layer to add these brushes on it.
( I forget where I get them sorry. But for the heart, I cut it from another brush)
Get this after adding the light texture and brushes!
18- Use the Type Tool to type words, type anything you want, and change the texts color to black. I use the font Violation. (Download here) Text size is 15pt. Set this text layer to Overlay 50%. Then press Ctrl+T(transform) to slant it.
19- Duplicate the above text layer and change the texts color to white. Set this duplicated layer to Normal 80%.
Now, you are finish! CongratulationsXD!
I'm sorry if my grammers are wrong cause I'm not so good at English, I'm a Chinese.:)
If you want a Chinese version, you are more than welcome to request:D
As I remember, I had used someone's tutorial in some steps I think, but I can't remember I used who's. So if that's you, please tell me.
Download the .PSD file here.
If you have some questions, comment here and I'll reply you soon!