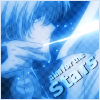
Here's another tutorial
How to make this icon: 
I remember to save the images of the steps this time ^_^
Cardcaptors Sakura icon
again I used PSP 7 for this one.
steps:
1: I took this image and croped it so it would be 98 x 98. ( I made this image myself with power DVD)


2: I then made a duplicate of the image and went to colors > colorize > Hue (149) and saturation (197). After that I used the gassious blur filter on it. (effects > blur > gassious blur > radius (3.00)
it should look like this now:
3: I then set the blend mode of that layer to hard light with the opacity at 80
you should have this:
4: I then added another layer and used this brush
with this light blur color (#D3E4F8). I stamped it once and set the blend mode to soft light, opacity 30
now you should have this:
5: now it's time for the text. I created a new layer for the text and used the verdana font at 14px for the word "stars" and the color #AACDF1. While the text is still selected, I went to effects > 3d effects > setting (drop shadow > vertical 1, horizontal 1, opacity 49, blur 1.2)
6: I then used the deformation tool to rotate the text
7: I repeated steps 5 and six for the other text (only have the font at 5px
8: set the blend mode to hard light
it should now look like this:
9: Now flatten the image and use this color (#D6E3F5) for the background color.
10: go to image > add border > 1 px on each side.
and there you go
I remember to save the images of the steps this time ^_^
Cardcaptors Sakura icon
again I used PSP 7 for this one.
steps:
1: I took this image and croped it so it would be 98 x 98. ( I made this image myself with power DVD)
2: I then made a duplicate of the image and went to colors > colorize > Hue (149) and saturation (197). After that I used the gassious blur filter on it. (effects > blur > gassious blur > radius (3.00)
it should look like this now:
3: I then set the blend mode of that layer to hard light with the opacity at 80
you should have this:
4: I then added another layer and used this brush
with this light blur color (#D3E4F8). I stamped it once and set the blend mode to soft light, opacity 30
now you should have this:
5: now it's time for the text. I created a new layer for the text and used the verdana font at 14px for the word "stars" and the color #AACDF1. While the text is still selected, I went to effects > 3d effects > setting (drop shadow > vertical 1, horizontal 1, opacity 49, blur 1.2)
6: I then used the deformation tool to rotate the text
7: I repeated steps 5 and six for the other text (only have the font at 5px
8: set the blend mode to hard light
it should now look like this:
9: Now flatten the image and use this color (#D6E3F5) for the background color.
10: go to image > add border > 1 px on each side.
and there you go