icon tutorial.
xfalseapologyx asked a tutorial of this icon, so there it is. ;D
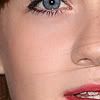
>>
Made in: Photoshop CS2
Steps: 14
Difficulty: medium
.Psd: yes
Not translatable
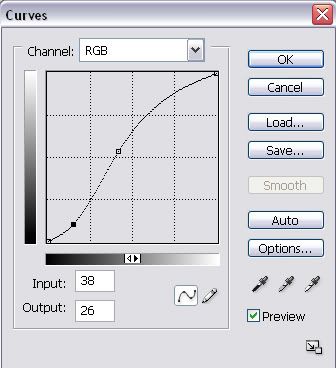
1. Curves: RGB
First point:
I: 106
O: 136
Second point:
I:38
O:26
it must look like this:
2. Color Fill: #6f5126, Soft Light, Opacity 52%, Fill: 100%.
3. Color Fill: #f4e9dd, Multiply, Opacity 100%, Fill: 100%.
4. Color Balance:
Midtones: 0/-13/+23
Highlights: 0/0/-8
Shadows: 0/0/0
5. Selective Color:
Reds: 0/+8/-11/0
Yellows: 0/-30/+60/0
Magentas: +100/-100/-100/0
Whites: 0/0/+18/0
6. Selective Color:
Cyans: 100/-100/+100/0
Blues: 100/-100/-100/0
7. Color Fill: #100101, Exclusion, Opacity 46%, Fill: 100%.
8. Channel Mixer:
Green: 0/+96/0
Blue: 0/0/+94
9. Brightness/Contrast:
+13/-20
10. Color Fill: #f3e9e2, Soft Light, Opacity 66%, Fill: 100%
11. Select the image, press Ctrl+Shift+C, create a new layer and past (Ctrl+V) the image. Set the same layer on Soft Light, Opacity 45%, Fill: 100%. Duplicate the layer and set it on multiply, Opacity 45%, Fill: 100%.
12. Brightness/Contrast:
-5/0
13. Color Fill: #ab927f, Soft Light, Opacity 72%, Fill: 100%.
14. Color Balance:
Midtones: 0/0/+8
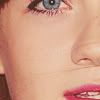
.psd
Other results:

Show me yours! ;D
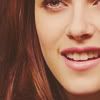
>>
Made in: Photoshop CS2
Steps: 14
Difficulty: medium
.Psd: yes
Not translatable
1. Curves: RGB
First point:
I: 106
O: 136
Second point:
I:38
O:26
it must look like this:
2. Color Fill: #6f5126, Soft Light, Opacity 52%, Fill: 100%.
3. Color Fill: #f4e9dd, Multiply, Opacity 100%, Fill: 100%.
4. Color Balance:
Midtones: 0/-13/+23
Highlights: 0/0/-8
Shadows: 0/0/0
5. Selective Color:
Reds: 0/+8/-11/0
Yellows: 0/-30/+60/0
Magentas: +100/-100/-100/0
Whites: 0/0/+18/0
6. Selective Color:
Cyans: 100/-100/+100/0
Blues: 100/-100/-100/0
7. Color Fill: #100101, Exclusion, Opacity 46%, Fill: 100%.
8. Channel Mixer:
Green: 0/+96/0
Blue: 0/0/+94
9. Brightness/Contrast:
+13/-20
10. Color Fill: #f3e9e2, Soft Light, Opacity 66%, Fill: 100%
11. Select the image, press Ctrl+Shift+C, create a new layer and past (Ctrl+V) the image. Set the same layer on Soft Light, Opacity 45%, Fill: 100%. Duplicate the layer and set it on multiply, Opacity 45%, Fill: 100%.
12. Brightness/Contrast:
-5/0
13. Color Fill: #ab927f, Soft Light, Opacity 72%, Fill: 100%.
14. Color Balance:
Midtones: 0/0/+8
.psd
Other results:
Show me yours! ;D