"And we head out to the highway, the hurt will find us anyway..."
Me again...
I know, I know...I am not here, you haven't seen me xD
Just a quick update with tutorial requested by Ana {
spg_spn_girls}. I hope you will understand everything, let me know if you don't, I'll try to help ;)
We're going from this to
- made in Photoshop CS2 9.0 -
1. Crop your picture to 100x100 px as usual (I've used the size 200x200 px for the tutorial). This lovely Alona's picture 's been taken by elsiecat - thanks a lot, your photos are like a dream xD

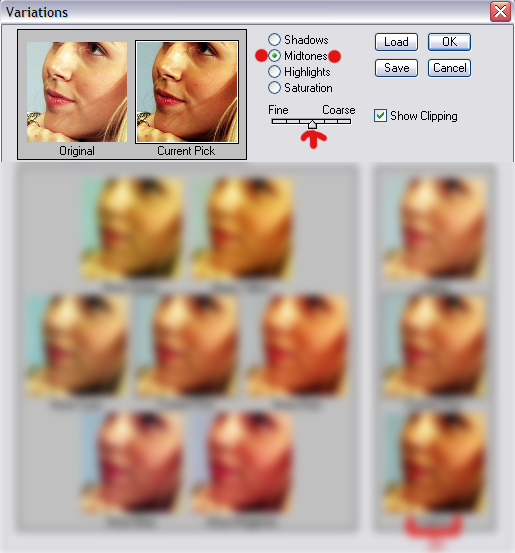
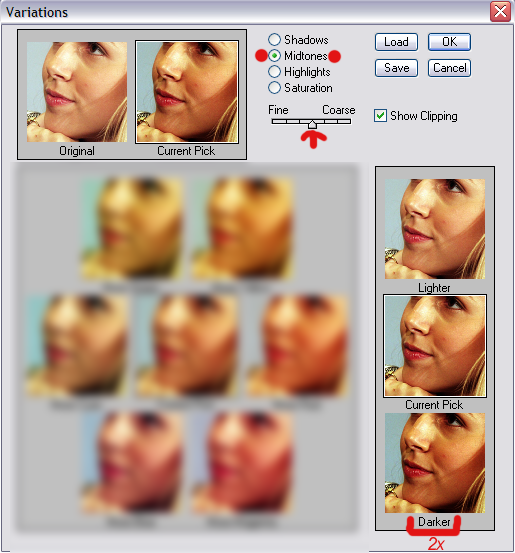
2. Go to Image > Adjustments > Variations. Be sure you've selected Midtones and it should looks like this. Then click two times on the option DARKER - it should looks like this, then hit OK.

3. Go to Layer > New Adjustment layer > Brightness -30/Contrast 0

4. Go to Layer > New Adjustment layer > Hue/Saturation: Saturation -30

5. Go to Layer > New Adjustment layer > New Fill Layer > Solid Color: be8e70

6. Select all layers {CTRL + A} then EDIT > Copy Merged and paste it {CTRL + V} on top the of all layers, set it to the SCREEN opacity 100%

7. Select all layers again {CTRL + A} then EDIT > Copy Merged and paste it {CTRL + V} on top the of all layers again.
Then Filter > Sharpen > Sharpen. Set it to the NORMAL opacity 100% (or less if the pic becomes too grainy/sharpened).

8. Make a new layer, then pick the white color: ffffff, select soft rounded brush (100px in my case) and make a spot on your almost finished icon (depends on the pic, play around till you'll be satisfied with position of this white spot). Then set this layer to the SCREEN opacity 50%. And you're done :)

- it really depends on the base you have, of course it isn't working on every picture, just play around :)))
As I said - if you have questions, go ahead and ask.
I know, I know...I am not here, you haven't seen me xD
Just a quick update with tutorial requested by Ana {
spg_spn_girls}. I hope you will understand everything, let me know if you don't, I'll try to help ;)
We're going from this to
- made in Photoshop CS2 9.0 -
1. Crop your picture to 100x100 px as usual (I've used the size 200x200 px for the tutorial). This lovely Alona's picture 's been taken by elsiecat - thanks a lot, your photos are like a dream xD
2. Go to Image > Adjustments > Variations. Be sure you've selected Midtones and it should looks like this. Then click two times on the option DARKER - it should looks like this, then hit OK.
3. Go to Layer > New Adjustment layer > Brightness -30/Contrast 0
4. Go to Layer > New Adjustment layer > Hue/Saturation: Saturation -30
5. Go to Layer > New Adjustment layer > New Fill Layer > Solid Color: be8e70
6. Select all layers {CTRL + A} then EDIT > Copy Merged and paste it {CTRL + V} on top the of all layers, set it to the SCREEN opacity 100%
7. Select all layers again {CTRL + A} then EDIT > Copy Merged and paste it {CTRL + V} on top the of all layers again.
Then Filter > Sharpen > Sharpen. Set it to the NORMAL opacity 100% (or less if the pic becomes too grainy/sharpened).
8. Make a new layer, then pick the white color: ffffff, select soft rounded brush (100px in my case) and make a spot on your almost finished icon (depends on the pic, play around till you'll be satisfied with position of this white spot). Then set this layer to the SCREEN opacity 50%. And you're done :)
- it really depends on the base you have, of course it isn't working on every picture, just play around :)))
As I said - if you have questions, go ahead and ask.