granola not included
I'll just say it right now: I can be picky about food. Not in a taste sense (well, that too sometimes), but about the ingredients. I don't buy only organic, but I do pay a certain amount of attention to how many unpronouceable things are on any product list.
Flavored yogurt is often one of the worst offenders, so I buy plain yogurt and mix in a bit of sweetener (usually a spoonful of maple syrup) and jam. Since I also try to avoid dairy products that have been made with herds fed growth hormones (to stimulate more milk production), I've ended up paying a lot more for yogurt than I used to--not just in the actual price, but by going out of my way to the specialty grocery store to find the yogurt I like best.
So I decided to make my own. I've done so before, but it's been several years. Last weekend I tried it and forgot one of the cardinal rules in yogurt-making. This weekend I succeeded again, yay!
For a quart of yogurt you need:
2-3 tablespoons plain yogurt for 'starter' (must contain active yogurt cultures--just look on the package)
one quart milk
a clean quart-size jar and lid
a kettle or large saucepan
food thermometer (preferably with a clip)
low-temperature heat source--heating pad, oven with light on, crockpot, etc. (more on this later)
optional: up to 1/2 cup powdered milk (also more later)
Take your starter yogurt and let it sit at room temperature while you perform the other steps. Adding cold starter to warmed milk can drop the temperature.
Heat the milk up to 185 degrees. This is to kill some of the bad bacteria. A lot of places recommend using a double-boiler to do this. I don't have the patience, though I will admit, there are tiny flecks of slightly scalded milk from the bottom of the pan in my final product. (It doesn't bother me. Much. Hm.)
Cool the milk to 110-120 degrees. You can cool it faster by putting the whole pan of milk in a sink full of cool water, but pay close attention so the milk doesn't get too cold. If you're going to do so, add the powdered milk to the liquid milk now. The only reason for doing this is to create a less-runny final product. I don't mind runny yogurt, though, and I've also discovered that the yogurt brand I like best sets up quite well without adding in more milk solids. So I don't bother.
Add the starter yogurt. Gently stir. With the one-jar technique, you don't have to worry about distributing the starter evenly, so do less stirring. Warning: do NOT shake the warmed milk at any time. You can end up creating curds instead of yogurt. Blech.
If you're planning to make the yogurt in several smaller containers, try using a whisk to make sure the starter is mixed in well with the warm milk.
Pour the milk into your clean jar and close the jar. (Some people recommend sterilizing everything. I'm pretty blasé about it. If it's clean, it's good enough for me.) Now place the jar where it will stay above 100 degrees (but below 120) for the next several hours.
Suggestions! Use a heating pad wrapped around the jar, and a towel wrapped around that. I used to use this method and just leave it all night long. Last weekend I discovered that my current heating pad has an automatic off switch, so that didn't work. Also, even the lowest setting on this heating pad is rather high. So yesterday I did the first steps early in the day and then switched the heating pad on and off every so often. (I kept the thermometer rolled up inside the heating pad.)
I've also seen the idea of using a crock pot filled with warm water and turned on and off, putting jars in an ice chest filled with hot water, and so forth. You can find all kinds of useful suggestions simply by googling "make yogurt." (If you're wanting to make a larger batch, I found a half-gallon recipe using a crockpot without water.)
Oh, and some people have oven lights that generate enough heat to keep the yogurt at the right temperature. Mine doesn't, so I wasn't able to go that route.
Leave the 'brewing' yogurt for four to eight hours. It's pretty easy to tell if you've made yogurt by the end of that time--there's a more solid white product rather than milk, and a clear liquid left over with a slight yellow-green tinge. That's whey, I believe. You can mix it in the yogurt or pour it off--but if you want to do that, wait until your yogurt is cooled down. The yogurt will be more solid, making it easier to remove the whey. (I just leave it alone and dump whatever whey is left over when the yogurt is gone.)
Oh, almost forgot! The longer the yogurt stays in the heat, the more tangy it gets. If you like a milder product, four hours should be plenty. But it will be more liquidy than if you wait longer.
Here's my yogurt yesterday, just after removing it from the towel-heating pad roll.
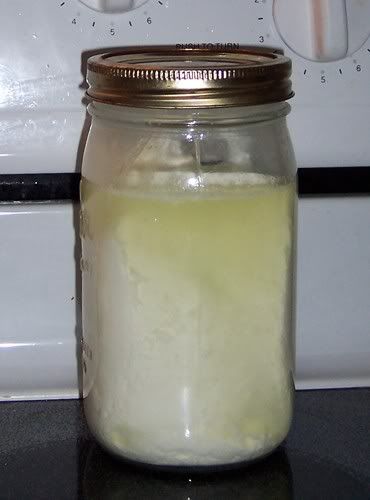
And that's the last step! Put it in the fridge, cool it down, then eat! Save a bit at the end for your next starter.
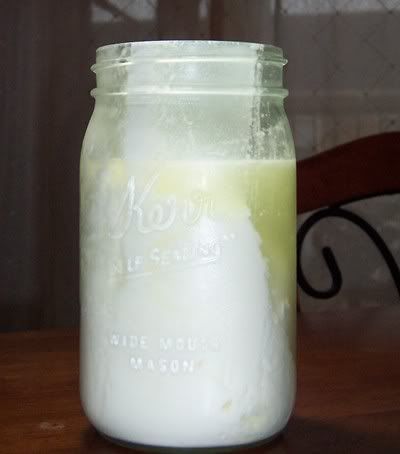
Even though the jar of yogurt has been in the refrigerator overnight, you can still see that it was 'set' while on its side. Easy to see the difference now between the yogurt and the whey. Look how nicely solid the yogurt is! Go Brown Cow brand yogurt! It's got the champion solid-set bacteria!
You do need 'fresh' starter every so often. So what I do is I freeze the store-bought yogurt in an ice-cube tray, then put the cubes in a baggy in the freezer. Pull out three cubes to thaw when you want to make another batch. (Doing this will also help you avoid the temptation of not making yogurt since you already have some on hand. Heh.)
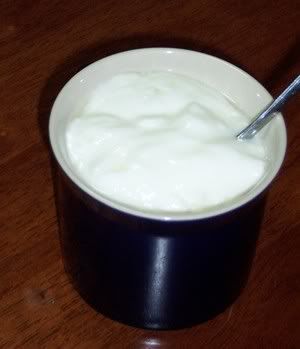
Here's a serving sample of my yogurt! Dig in! I haven't mixed in the maple syrup and jam yet, so you can see the plain product.
Flavored yogurt is often one of the worst offenders, so I buy plain yogurt and mix in a bit of sweetener (usually a spoonful of maple syrup) and jam. Since I also try to avoid dairy products that have been made with herds fed growth hormones (to stimulate more milk production), I've ended up paying a lot more for yogurt than I used to--not just in the actual price, but by going out of my way to the specialty grocery store to find the yogurt I like best.
So I decided to make my own. I've done so before, but it's been several years. Last weekend I tried it and forgot one of the cardinal rules in yogurt-making. This weekend I succeeded again, yay!
For a quart of yogurt you need:
2-3 tablespoons plain yogurt for 'starter' (must contain active yogurt cultures--just look on the package)
one quart milk
a clean quart-size jar and lid
a kettle or large saucepan
food thermometer (preferably with a clip)
low-temperature heat source--heating pad, oven with light on, crockpot, etc. (more on this later)
optional: up to 1/2 cup powdered milk (also more later)
Take your starter yogurt and let it sit at room temperature while you perform the other steps. Adding cold starter to warmed milk can drop the temperature.
Heat the milk up to 185 degrees. This is to kill some of the bad bacteria. A lot of places recommend using a double-boiler to do this. I don't have the patience, though I will admit, there are tiny flecks of slightly scalded milk from the bottom of the pan in my final product. (It doesn't bother me. Much. Hm.)
Cool the milk to 110-120 degrees. You can cool it faster by putting the whole pan of milk in a sink full of cool water, but pay close attention so the milk doesn't get too cold. If you're going to do so, add the powdered milk to the liquid milk now. The only reason for doing this is to create a less-runny final product. I don't mind runny yogurt, though, and I've also discovered that the yogurt brand I like best sets up quite well without adding in more milk solids. So I don't bother.
Add the starter yogurt. Gently stir. With the one-jar technique, you don't have to worry about distributing the starter evenly, so do less stirring. Warning: do NOT shake the warmed milk at any time. You can end up creating curds instead of yogurt. Blech.
If you're planning to make the yogurt in several smaller containers, try using a whisk to make sure the starter is mixed in well with the warm milk.
Pour the milk into your clean jar and close the jar. (Some people recommend sterilizing everything. I'm pretty blasé about it. If it's clean, it's good enough for me.) Now place the jar where it will stay above 100 degrees (but below 120) for the next several hours.
Suggestions! Use a heating pad wrapped around the jar, and a towel wrapped around that. I used to use this method and just leave it all night long. Last weekend I discovered that my current heating pad has an automatic off switch, so that didn't work. Also, even the lowest setting on this heating pad is rather high. So yesterday I did the first steps early in the day and then switched the heating pad on and off every so often. (I kept the thermometer rolled up inside the heating pad.)
I've also seen the idea of using a crock pot filled with warm water and turned on and off, putting jars in an ice chest filled with hot water, and so forth. You can find all kinds of useful suggestions simply by googling "make yogurt." (If you're wanting to make a larger batch, I found a half-gallon recipe using a crockpot without water.)
Oh, and some people have oven lights that generate enough heat to keep the yogurt at the right temperature. Mine doesn't, so I wasn't able to go that route.
Leave the 'brewing' yogurt for four to eight hours. It's pretty easy to tell if you've made yogurt by the end of that time--there's a more solid white product rather than milk, and a clear liquid left over with a slight yellow-green tinge. That's whey, I believe. You can mix it in the yogurt or pour it off--but if you want to do that, wait until your yogurt is cooled down. The yogurt will be more solid, making it easier to remove the whey. (I just leave it alone and dump whatever whey is left over when the yogurt is gone.)
Oh, almost forgot! The longer the yogurt stays in the heat, the more tangy it gets. If you like a milder product, four hours should be plenty. But it will be more liquidy than if you wait longer.
Here's my yogurt yesterday, just after removing it from the towel-heating pad roll.
And that's the last step! Put it in the fridge, cool it down, then eat! Save a bit at the end for your next starter.
Even though the jar of yogurt has been in the refrigerator overnight, you can still see that it was 'set' while on its side. Easy to see the difference now between the yogurt and the whey. Look how nicely solid the yogurt is! Go Brown Cow brand yogurt! It's got the champion solid-set bacteria!
You do need 'fresh' starter every so often. So what I do is I freeze the store-bought yogurt in an ice-cube tray, then put the cubes in a baggy in the freezer. Pull out three cubes to thaw when you want to make another batch. (Doing this will also help you avoid the temptation of not making yogurt since you already have some on hand. Heh.)
Here's a serving sample of my yogurt! Dig in! I haven't mixed in the maple syrup and jam yet, so you can see the plain product.