Vidding tutorials: HuffyUV in Win 7 64-bit and Selective Coloring in Sony Vegas
How to install HuffyUV in Win 7 64-bit
HuffyUV and Lagarith are the two lossless video codecs that I like using, but until this past week, I couldn't figure out how to install HuffyUV in Windows 7 64-bit. If Handbrake could open Lagarith files, I wouldn't even bother with HuffyUV, but it can't. *sadface* So I was using this complicated workaround involving ffdshow to get my HuffyUV files rendered. Well, now I can encode directly to HuffUV in Vegas and VirtualDub, making life a whole lot easier. So here's how to do it:
1) Download HuffyUV (pre-built DLL). There's a v2.2.0 floating around somewhere, but v.2.1.1 is the last official version as far as I know. Unzip the file somewhere on your hard drive.
2) If you're running Windows XP/Vista/7 32-bit, just right-click on the huffy.inf file to install the codec.
3) For Windows 7 64-bit, go to Start and type in cmd in the Search field.
4) Under Programs at the top, right click on cmd.exe and "Run as administrator"
5) In Command prompt window that opens, you should be in C:\Windows\system32. Type in cd c:\windows\syswow64 and hit Enter to change directories.
6) After C:\Windows\SysWOW64, type in the following:
rundll32 C:\Windows\SysWOW64\setupapi.dll,InstallHinfSection DefaultInstall 0 C:\PATH \TO\YOUR\huffy.inf
If you don't get any error messages, HuffyUV should be properly installed and will show up among your list of codecs available for AVI rendering.
Selective Color in Sony Vegas
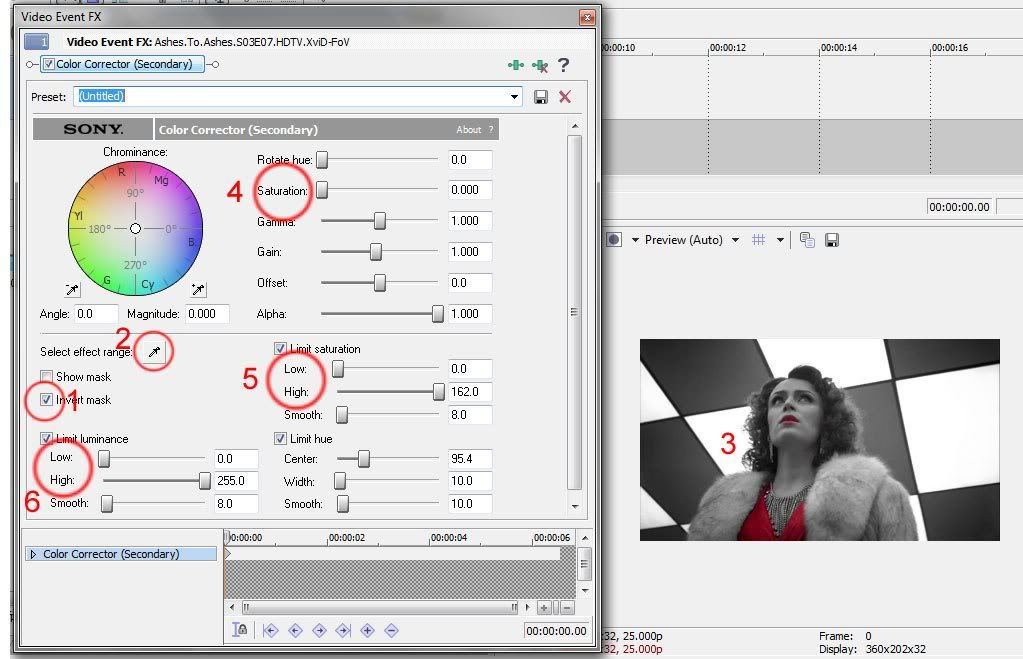
This is one quick way to make one color show up while the rest of your clip is black and white. To do this, add the Video Event FX "Color Corrector (Secondary)" to your clip. Then:
1) Check Invert Mask
2) Click on the dropper tool
3) In the preview window, click on the color you want to select (in this case, I chose the red in Alex's dress)
4) Lower the Saturation all the way to 0.
5) Under Limit Saturation, drag the Low all the way to the left, and the High all the way to the right.
6) Do the same for Limit Luminance.
The Video Event FX window should look something like this:
ETA: Not all colors will work well for this effect, and you may need to play with other settings to get your clip to look the way you want it.
Questions? :)
Originally posted at Dreamwidth. Comments: