tutorial - make some sweet light textures
I am currently procrastinating writing an analysis on Mrs. Dalloway, so I figured, hey!, I'll write a tutorial and impart some of my knowledge on to my beloved watchers. Before you all start reading, I should mention this tutorial requires Photoshop, so make sure you've got one of those suckers. Good? On we go.

1. Open a New Image. Make sure "Background Contents:" is set to Transparent.
2. Select the Pen Tool. Set it to Paths and Pen Tool.

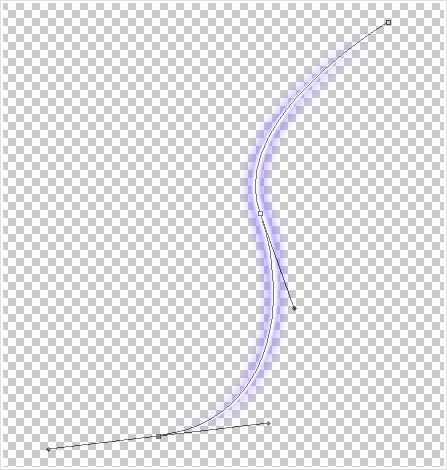
3. Click a point either in the top right or top left, then click another point somewhere in the middle, but do not let go of the mouse! Instead drag your cursor, and a curve will appear. Then, click somewhere in the bottom and drag to complete the curve. You should now have a selected curve.

4. Now, select your brush, and set the diameter to 12px and the Hardness to 0%. Make sure your foreground colour is white.
5. Select your pen tool once more. Right-click the object, select "Stroke Path...", choose "Brush" under Tool, and make sure "Simulate Pressure" is checked, then click Ok.
6. Right-click the Layer the object is on (probably Layer 1 unless you were ridiculous and have obsessive organizational issues and renamed it something else) and go to "Blending Options".
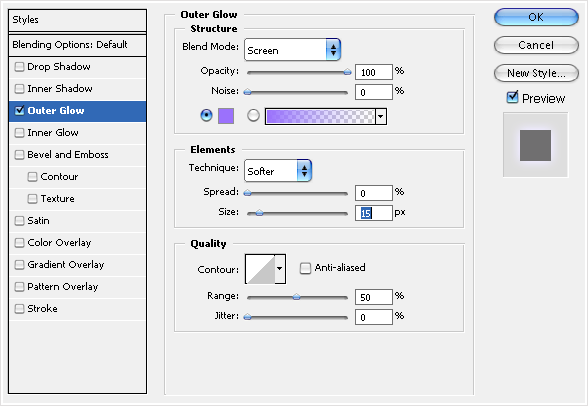
7. Under Styles, go to "Outer Glow". Click the little square (probably some sort of yellow) and pick a colour, any colour! Go wild. Then, set Opacity to 100% and Size to something around 15px. The smaller this number, the skinnier and more intense the beam. Conversely, the higher this number, the wider but less intense the beam. Press Ok. Your settings should look like this:
8. Admire how pretty your beam looks. Ooooh shiny. Okay, great, but we can make this even better! I present to you... Inner Glow. Right-click the layer again, and go back to Blending Options. This time though, under Styles, select "Inner Glow". Just like before, change the opacity to 100% and the size to around 15px, perhaps a little lower. Then, choose a colour that is slightly lighter than your previous colour. Press Ok.
Yay!
9. Save it! But, if you plan on uploading it to the internet, make sure to save it as a .png to ensure the transparency is kept intact.
10. Wait that's it?? ... Yep, that's it.
1. Open a New Image. Make sure "Background Contents:" is set to Transparent.
2. Select the Pen Tool. Set it to Paths and Pen Tool.
3. Click a point either in the top right or top left, then click another point somewhere in the middle, but do not let go of the mouse! Instead drag your cursor, and a curve will appear. Then, click somewhere in the bottom and drag to complete the curve. You should now have a selected curve.
4. Now, select your brush, and set the diameter to 12px and the Hardness to 0%. Make sure your foreground colour is white.
5. Select your pen tool once more. Right-click the object, select "Stroke Path...", choose "Brush" under Tool, and make sure "Simulate Pressure" is checked, then click Ok.
6. Right-click the Layer the object is on (probably Layer 1 unless you were ridiculous and have obsessive organizational issues and renamed it something else) and go to "Blending Options".
7. Under Styles, go to "Outer Glow". Click the little square (probably some sort of yellow) and pick a colour, any colour! Go wild. Then, set Opacity to 100% and Size to something around 15px. The smaller this number, the skinnier and more intense the beam. Conversely, the higher this number, the wider but less intense the beam. Press Ok. Your settings should look like this:
8. Admire how pretty your beam looks. Ooooh shiny. Okay, great, but we can make this even better! I present to you... Inner Glow. Right-click the layer again, and go back to Blending Options. This time though, under Styles, select "Inner Glow". Just like before, change the opacity to 100% and the size to around 15px, perhaps a little lower. Then, choose a colour that is slightly lighter than your previous colour. Press Ok.
Yay!
9. Save it! But, if you plan on uploading it to the internet, make sure to save it as a .png to ensure the transparency is kept intact.
10. Wait that's it?? ... Yep, that's it.