➨69. coloring tutorial
I finally got around to making a coloring tutorial! It took longer than I expected but it's finally done and here it is. There's two tutorials in here. One for coloring with SAI, using a tablet and another for coloring with Photoshop, using the mouse.
By the way it's very image-heavy as well as tl;dr so... basically because I tried to explain everything with as much detail as I could. But if it's still confusing, feel free to ask questions afterward.
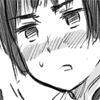
to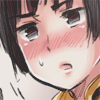

Here’s your original picture, Kiku Honda from Axis Powers Hetalia!

1. To start things off, make sure your line art (or the original uncolored manga) is set to multiply over a blank/white background layer. In between these two layers is where most of the color layers will go.
*tip: It would be a good idea to fill the bottom layer with a darker color (I use gray but any dark or vibrant color will work). This works to better see your coloring, especially when you're using white or light colors like skin tones.

2. Create your first layer and make sure it's in-between the bottom layer (which I've named 'BG') and the line art layer (named 'line art' obviously; on that note, naming your layers is certainly helpful for organization but you don't have to do it). Use the brush tool to just color the skin area. It's okay to go outside the lines. Since this is the bottom-most color layer, the color layers above it will cover up anything outside the lines.

3. Now using the brush tool again, color in the rest of the picture and make sure that every part/color has its own layer. For example, the skin has its own layer, as does the eye whites, eyes, hair, etc. These will serve as your base colors. Sometimes people just stop coloring here. Sometimes it looks good, sometimes it doesn't. I'll go on to add shading…

4. Before that though, another organization tip is to put similar color layers in their own folders like so. Once again, not mandatory but it makes things less cluttered and easier to find later on.

5. On to shading. To make sure your shading doesn't go outside the base colors, click on the thumbnail of the layer while holding down the [control] key. This will create a selection around the base color like so. Create a layer above the base; this will serve as the first of your many shading layers.

6. First pick out a color that’s not only darker but also a bit more saturated than the base color. Usually for skin shading I use like a mocha color but in this case I also use a more reddish tint for paler skin.
Now using the airbrush tool (or if you're on Photoshop, use a softer brush), start shading. Truth be told, I kinda suck at consistent light sources and such but if it helps, sometimes I make a new layer on top of everything and draw little sunbeams from where I want my light source to come from (Didn’t try it out this time though which is why there’s no screencap |D)

7. I usually create a few more layers for more shading as each layer adds on and adds on, making a more obvious difference from the base color. For the shading itself I use the marker or water tool on SAI but if you’re using Photoshop I just mess around with the opacity of the brushes.

8. On to cel-shading. Or rather, just using a hard brush to shade as opposed to a softer airbrush. Pick out a darker shade of the color you were already using for shading and using the pen tool (or hard brush for Photoshop users) simply go over some of the parts you think need the darkest shading.

9. You’ll be using the pen tool/hard brush once again but this time for highlights. Either pick out a lighter shade of your base color or just use white to do this. Remember where your light sources are and draw in your highlights on places like the cheeks (whichever is facing the light source), the nose or under the eyes.

10. For the blush, I just go over the cross-hatched (?) area with a rosy color using the airbrush tool/soft brush. You can also pick out darker shades of that color and kinda shade in the parts that would give the cheeks more of a contour. If the blush seems like it’s a bit too vibrant, you can lower the opacity until it looks right.

11. For relatively small parts like the eye whites, eyes and mouth, you don’t necessarily need to create a new layer for their shading. One option I use is to just lock the layers (highlight the layer and check the box that reads Opacity lock) and do the shading within that layer.

12. You can shade the sweat if you want but you’re going to be setting that layer to Overlay anyway so any shading won’t be too obvious.

13. Now just repeat the shading and highlighting process with the hair and clothes. For the hair highlights, sometimes it looks better to set it to Overlay. If that looks too vibrant you can also reduce the opacity or just leave it set on Normal.

For the clothing highlights I tried to imitate Himaruya’s style of highlighting with little circles? Yeah you don’t have to do that…

14. Now you’ll be adding the finishing touches. Above all the layers, create a new layer for some additional highlights to the eyes. If it’s over the line art, I find that it stands out more.
Now one final layer for additional blush. Set it to Screen and go over the blush lines with a darker rose color. It looks weird now but if you merge that screen layer to the line art later on, you’ll find that they bring out the blush a bit more.

15. And here’s our finished product after merging that screen layer! If some parts don’t look right to you, switch it over to photoshop and adjust the brightness or hue & saturation until you’re satisfied.
Okay, now we’ll be coloring the same picture but using a different program and technique. Why? Well not everyone has the luxury of a tablet (or Paint Tool SAI but you could… torrent that somewhere. I’m pretty sure that’s what I did) And for years, I had to color only using the mouse… so that’s what I’ll be teaching~ Now there are a lot more steps for this tutorial but also more tips to help you color whether it’s with a tablet of mouse. Afterward we’ll compare the results as well.

to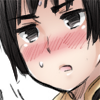
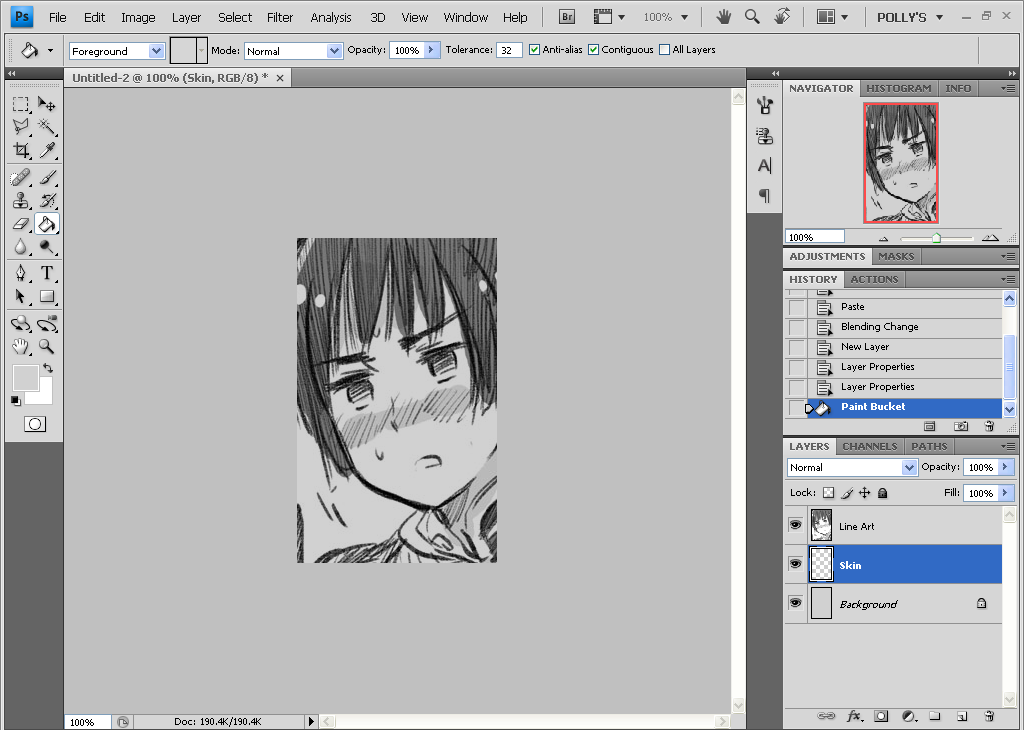
1. We’ll be starting off the same way as last time with making sure that your line art layer is set to Multiply above a colored background layer. In between these layers will be the color layers, etc.
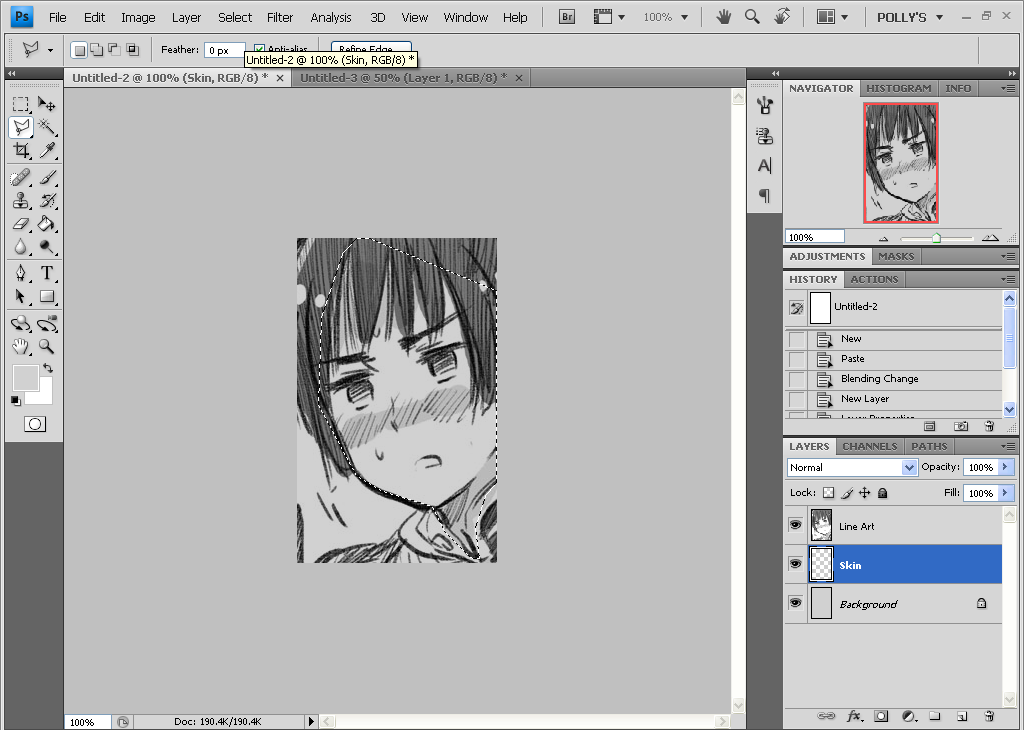
2. We’ll be coloring all the base colors first and do all the shading afterward. Now if you’re just using a mouse to color, one of the more useful tools you’ll be using is the polygonal lasso tool (in between the rectangular marquee tool and crop tool). I find that using it in conjunction with the bucket fill tool makes for cleaner and speedier coloring, especially when it comes to larger sections of coloring like the skin, clothing or hair.
That aside, start using the polygonal lasso tool and select the area along Kiku’s face. Since the skin will be the bottommost color layer, you don’t have to worry about staying inside the lines since later color layers will overlap and cover it up.
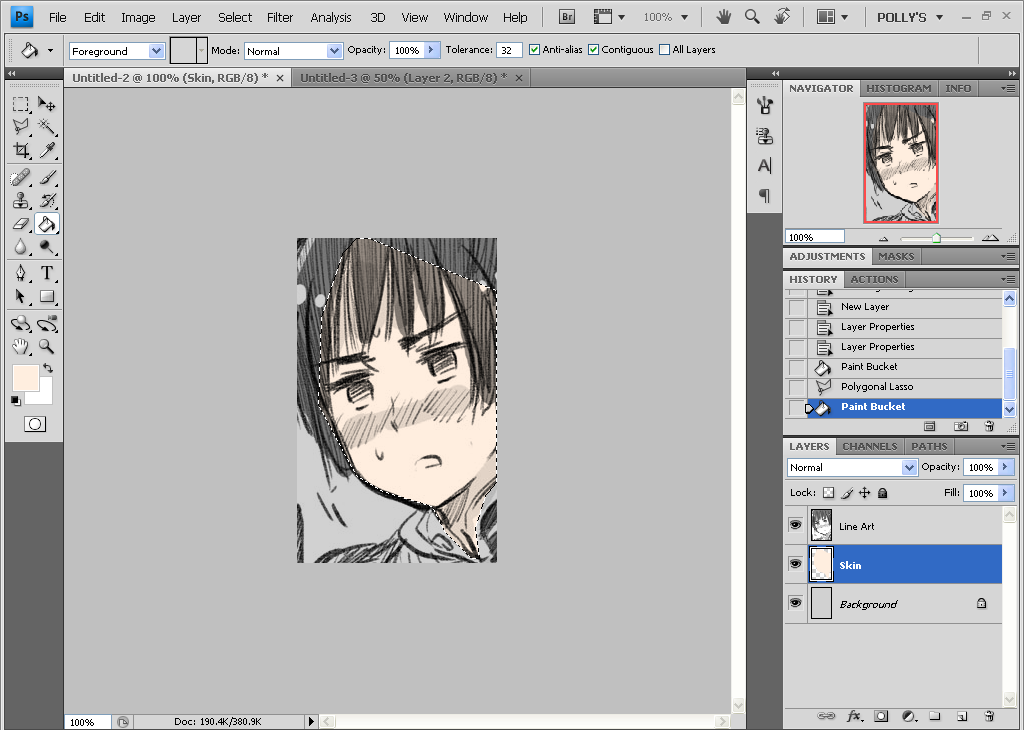
3. Pick out a light skin tone (I used #ffeedf) and use the bucket fill tool to color in your selection.
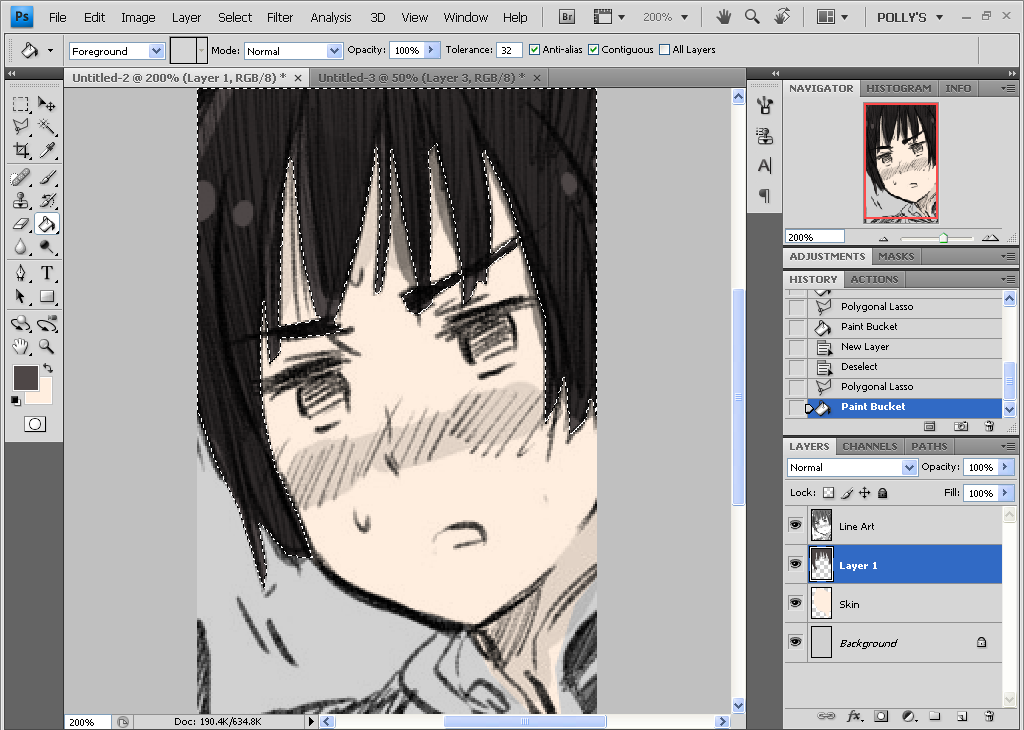
4. As I mentioned in the previous tutorial, make sure all the different colors/parts have their own layers (skin, hair, eyes, etc.). On this new layer, repeat the polygonal lasso + bucket fill process with the hair. Like I said before, since this layer is above the skin layer, it will cover up any of the coloring underneath it.
Though another tip if you’re still having trouble using the polygonal lasso tool, remember to zoom into your picture more to get around tight corners and such (like when you’re coloring strands of hair or something).
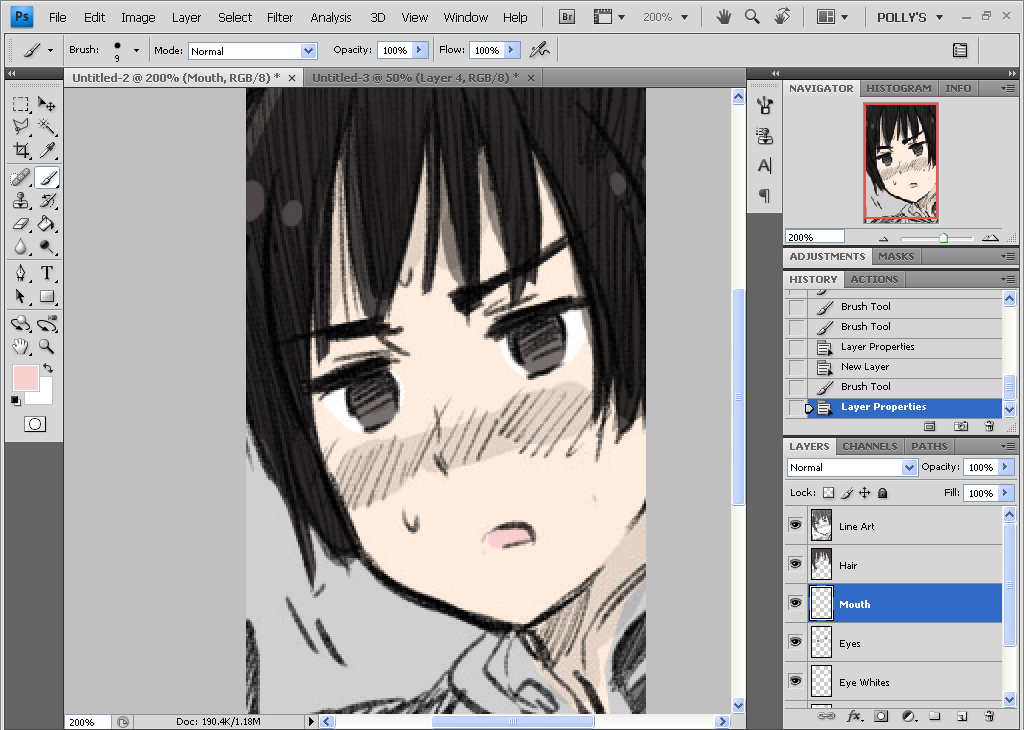
5. Create new layers for the eye whites, irises and mouth and repeat the coloring process. Though since they’re relatively small in comparison to the whole picture, you don’t have to use the polygonal lasso tool and can just use the brush tool.

6. Alright here’s another little tip that’ll help speed up the coloring process; it’s called masking. Now, I want to color the black parts on Kiku’s uniform but the two black parts aren’t connected (the part on his shoulder, which I’ve already selected here, and the part on the collar of his jacket). You could easily just fill in the first part and select + fill the second part separately but you can also use masking.
The first part is already selected here and to go into quick mask mode simply press [Q].
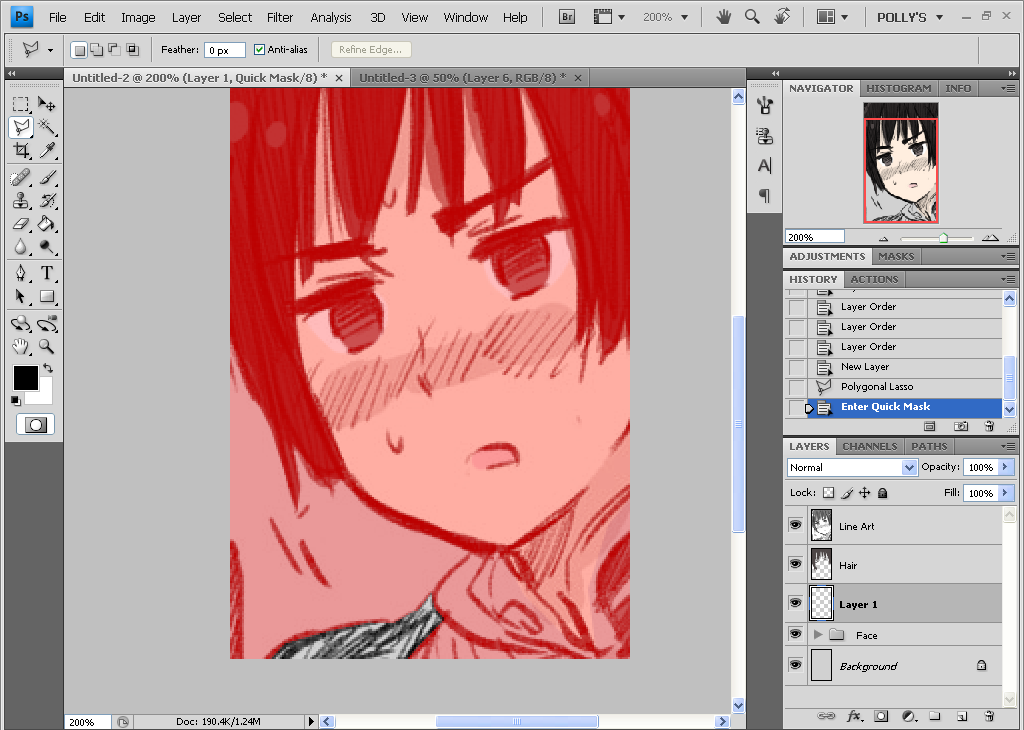
7. The part you selected is visible while everything else is covered in red (kinda like how masking tape works in real painting… I think?). In quick mask mode however, you can select more things even if they’re not connected to the part already selected.

8. With the selection tool, pick out the part of Kiku’s jacket collar that’s to be colored black and then press the [delete] key. This clears the selection from the mask and makes it part of what you already selected. Press the [Q] key again…

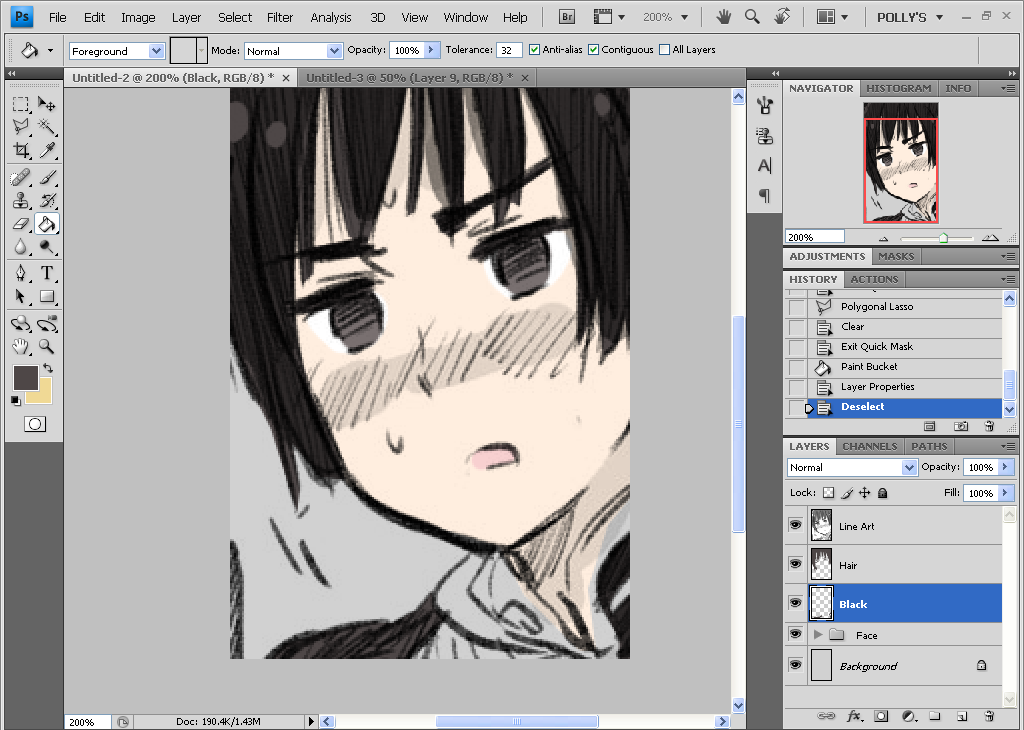
9. And voila~ Now you have both parts selected and ready for filling! Like I said before, you could have also easily selected and filled them both separately but the point of teaching this is so you can use it for other situations later on where it’d be quicker to use the quick mask instead. It also comes in handy when you’re selecting something and screw up, like do a mis-click or something. You can easily fix it using quick mask.
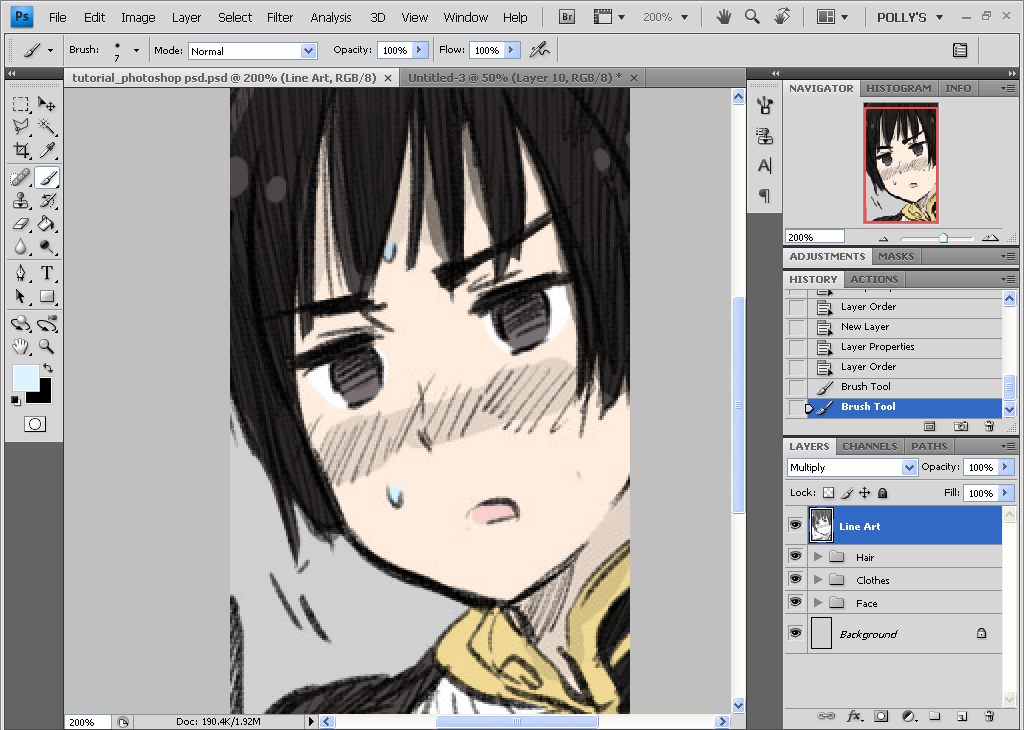
10. Alright now finish up coloring the rest of his uniform using whatever tool you want so we can move on to shading.
I forgot to take a screencap of this tip (though I did talk about it in the above tutorial) but you’re gonna want to make a selection of your base color layer so you don’t accidentally shade outside of it. To do that, simply click on the thumbnail of the layer while holding down the [control] key. This will create a selection around the colored area of the layer but make sure you make a new layer above the base color to do your shading.
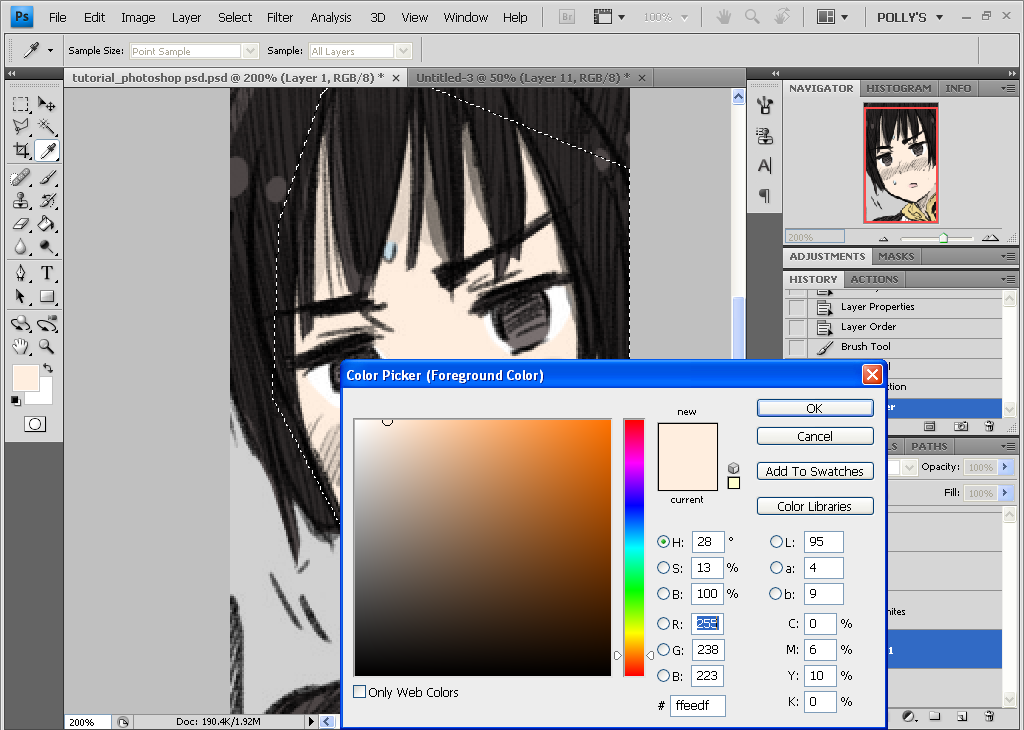
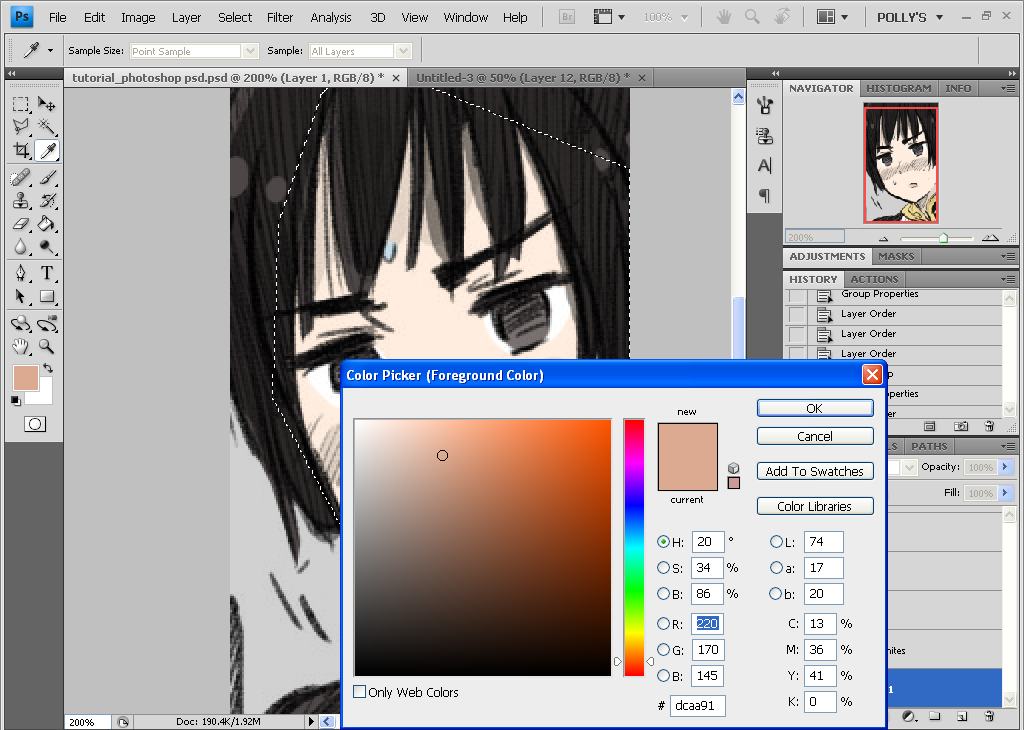
11. Now let’s move on to choosing your colors for shading. Basically I just go from the base color and make it darker and more saturated. Though I also make the hue redder just a teensy bit.
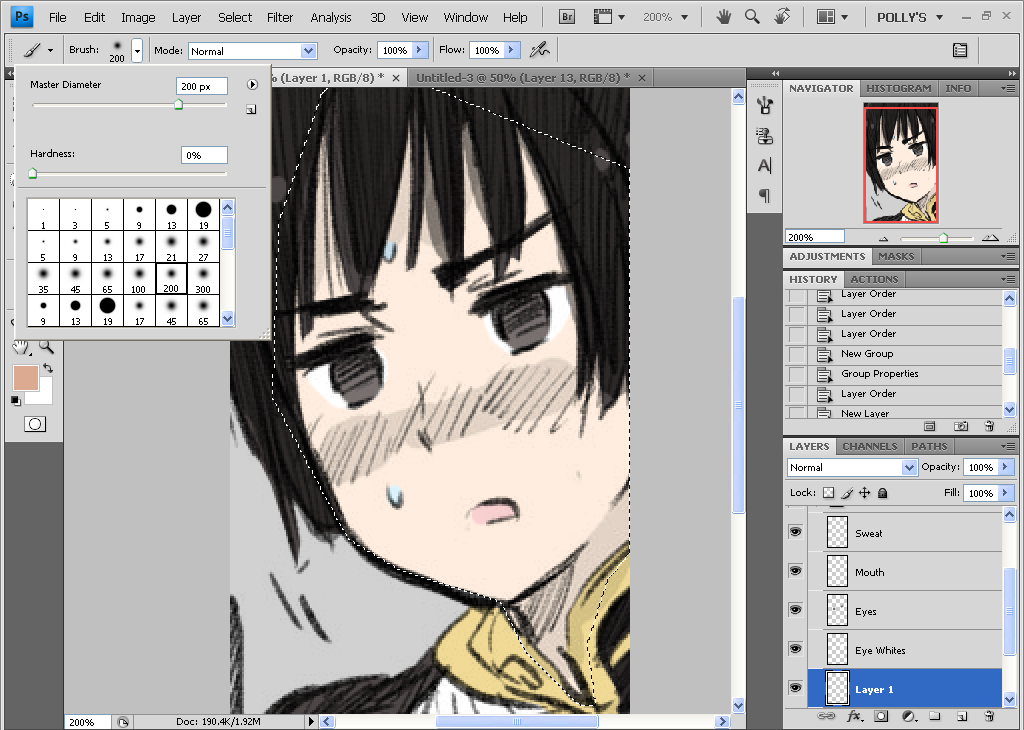
12. And for brush settings, to imitate the airbrush style on SAI, use a softer brush. I usually start out with one of the bigger sizes like 200 or 300 but you can always decrease the size quickly by using the [ and ] keys
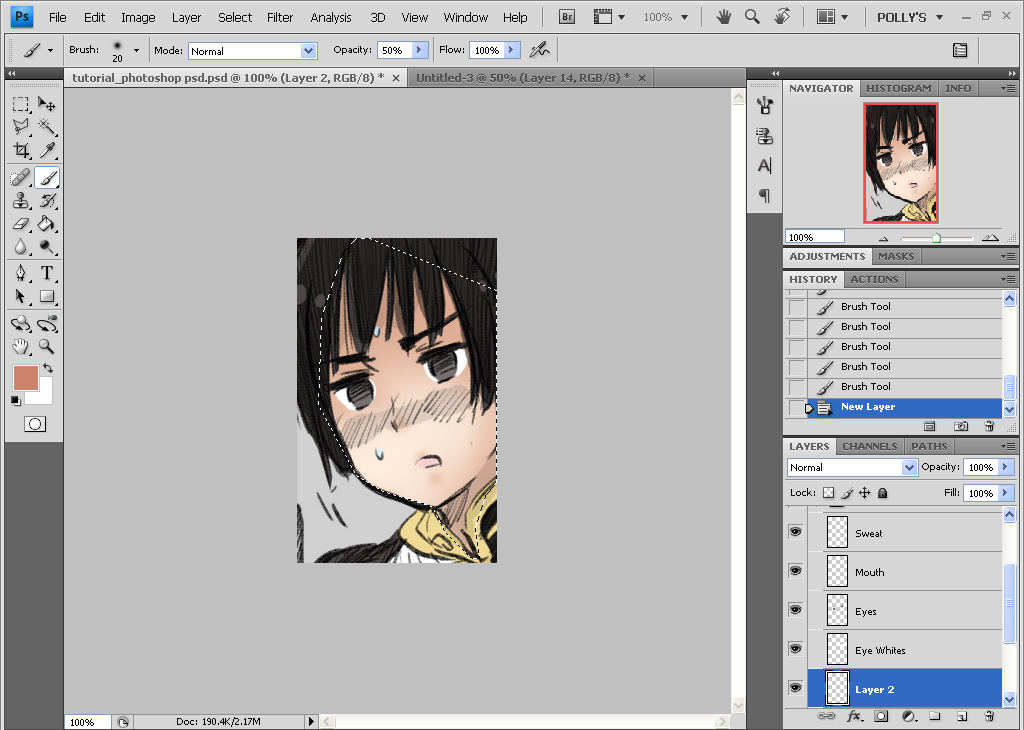
13. Start shading! While remembering your light sources, shade in the areas away from the source with special attention to the bangs of the hair or neck and contours of his cheeks.
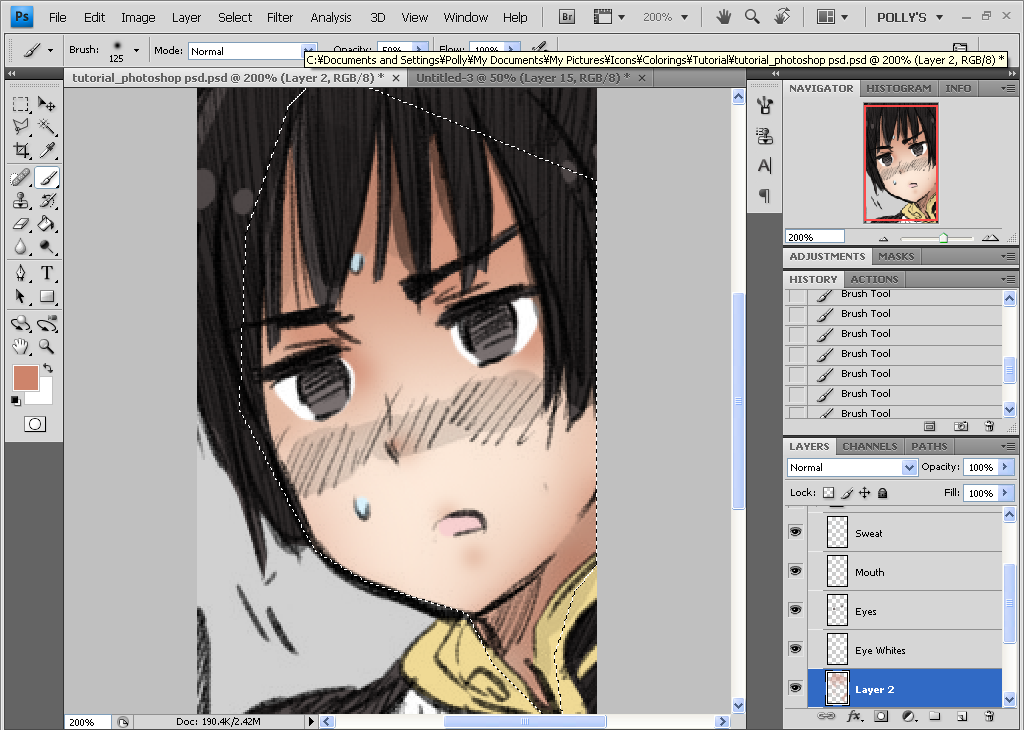
14. For deeper shading, create more new layers and shade over the places that need more shading by using darker colors. All these shading layers will continue to add-on and build to create darker shading… just don’t over-do it too much!
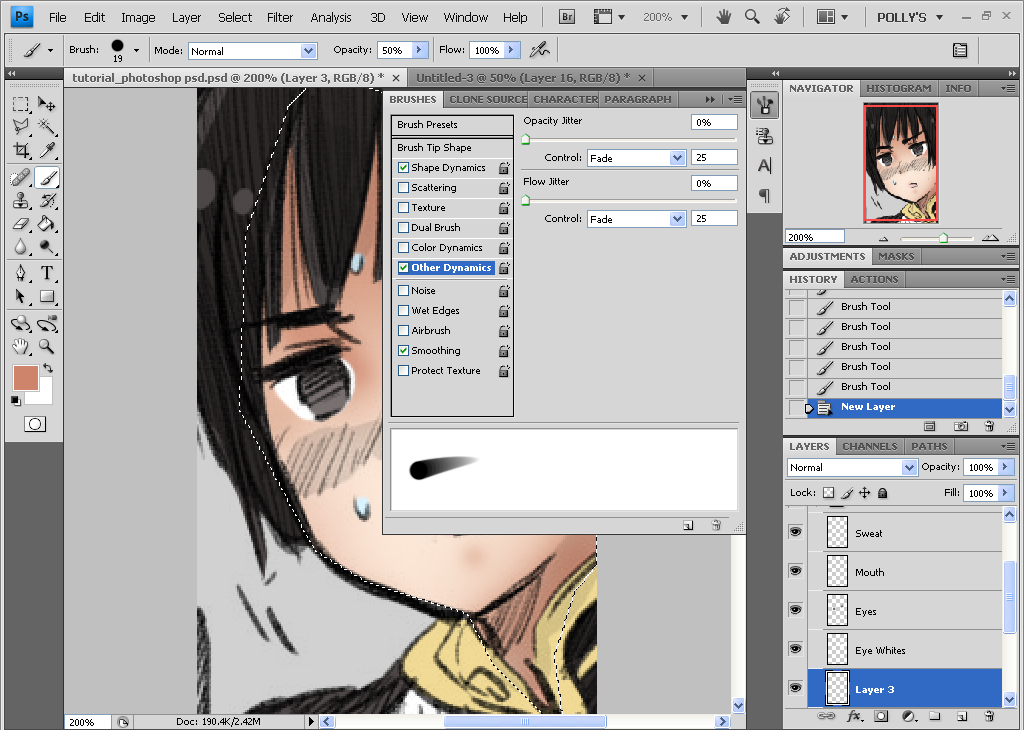
15. Cel-shading (hard brush shading) is a bit harder using the mouse since you can’t exactly utilize pen pressure and control over a mouse isn’t exactly the same as control of a pen. But despite that, you can still get some good results if you have good control of the mouse or if you know how to mess around with your brush settings.
Open up the Brush Window in Photoshop (a shortcut to this would be pressing [F5]) and go to Opacity Dynamics on both drop-down windows, click Fade. This will make your brush stroke fade-off. I’s good for imitating the pen pressure effect for tablet users though the down side is that it fades off a little too soon.
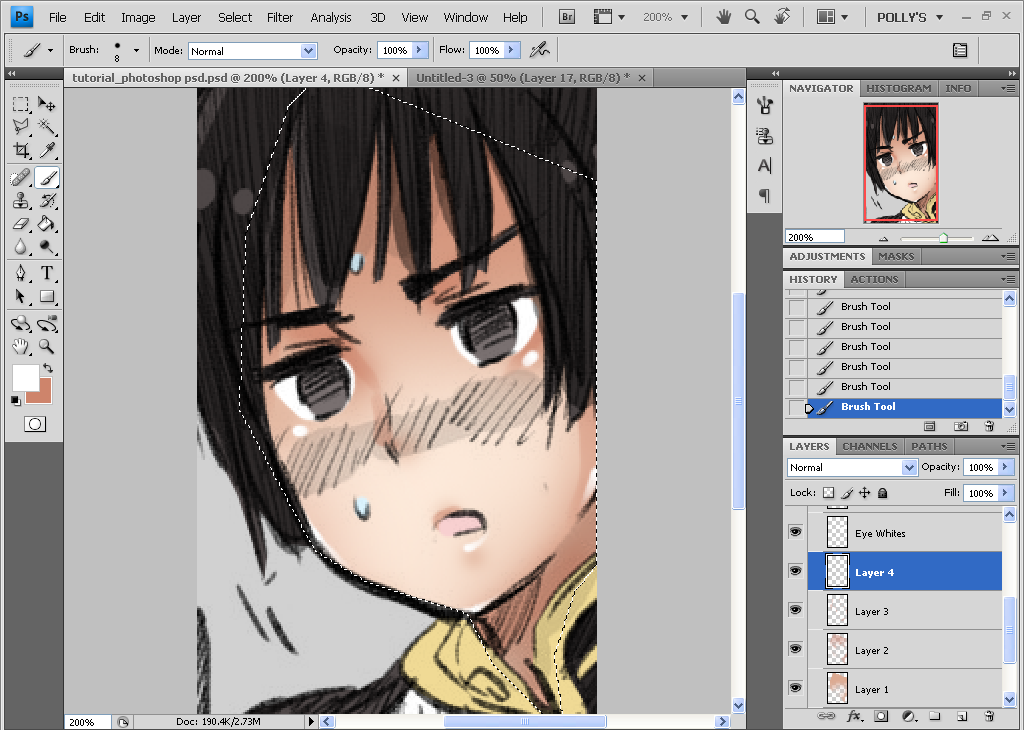
16. With these settings go over the parts that need the darkest shading with the hard brush. If the brush fades out too soon, you can either try increasing the brush size or painting over the faded spot to kinda extend the line. After the hard shading, switch over to white and do your highlighting using the same brush settings.
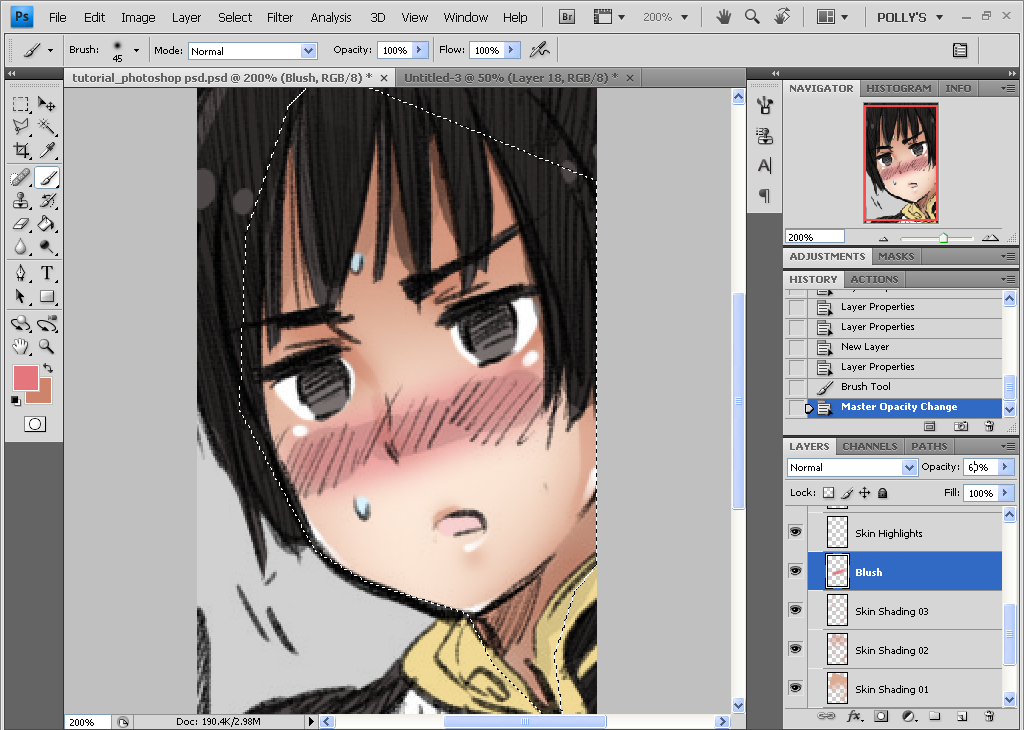
17. Doing the blush with the mouse is basically the same as with a tablet. Create a new layer and just go over the area with a large, soft brush and adjust the opacity if you need to.
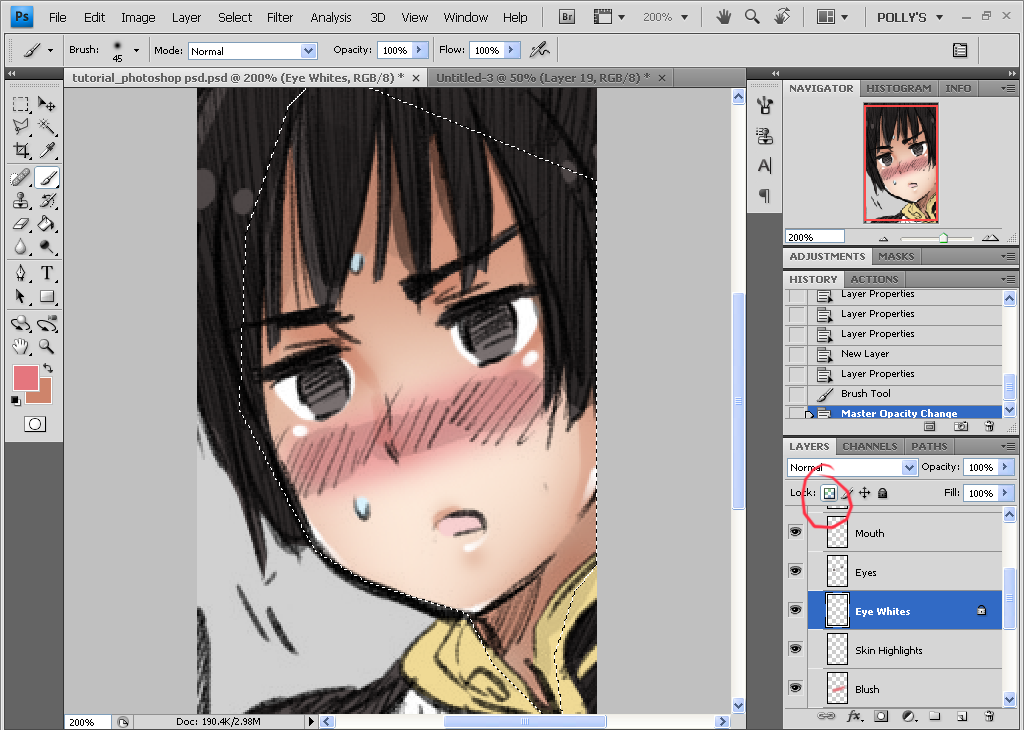
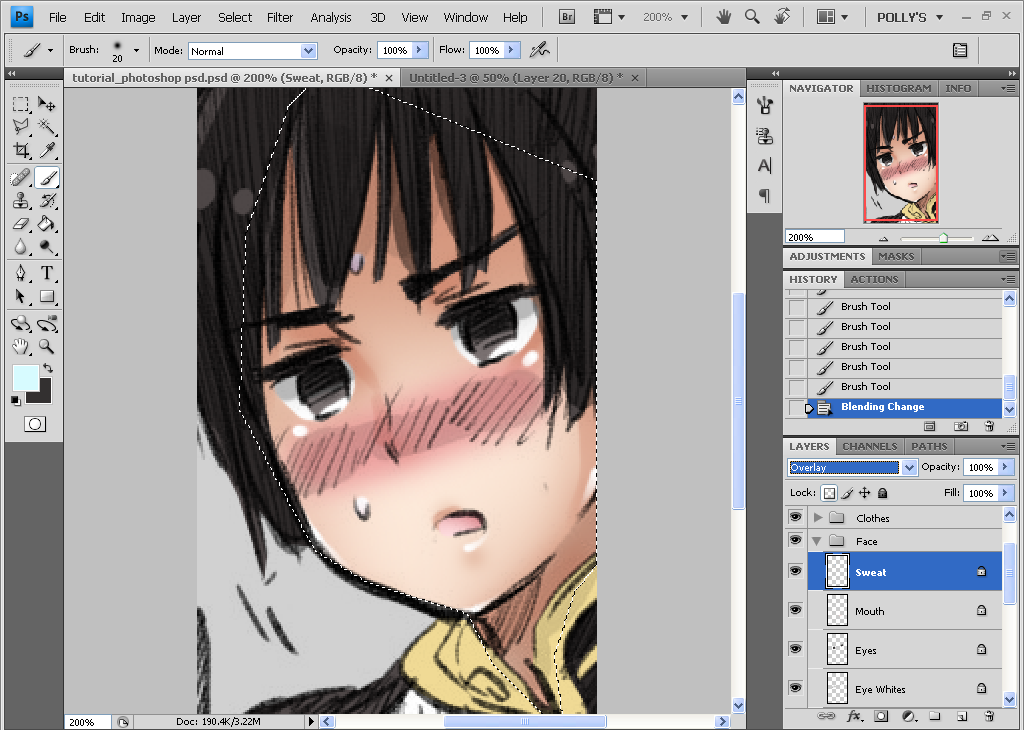
18. Similar to how we shaded the eyes and mouth in the last tutorial, you don’t have to create new layers for the shading and can just do it on that layer itself. To lock a layer on Photoshop simply highlight that layer and click on the circled button seen here. After that, pick out colors darker than the base and shade using the soft brush, hard brush or a combination. Whatever looks good to you!
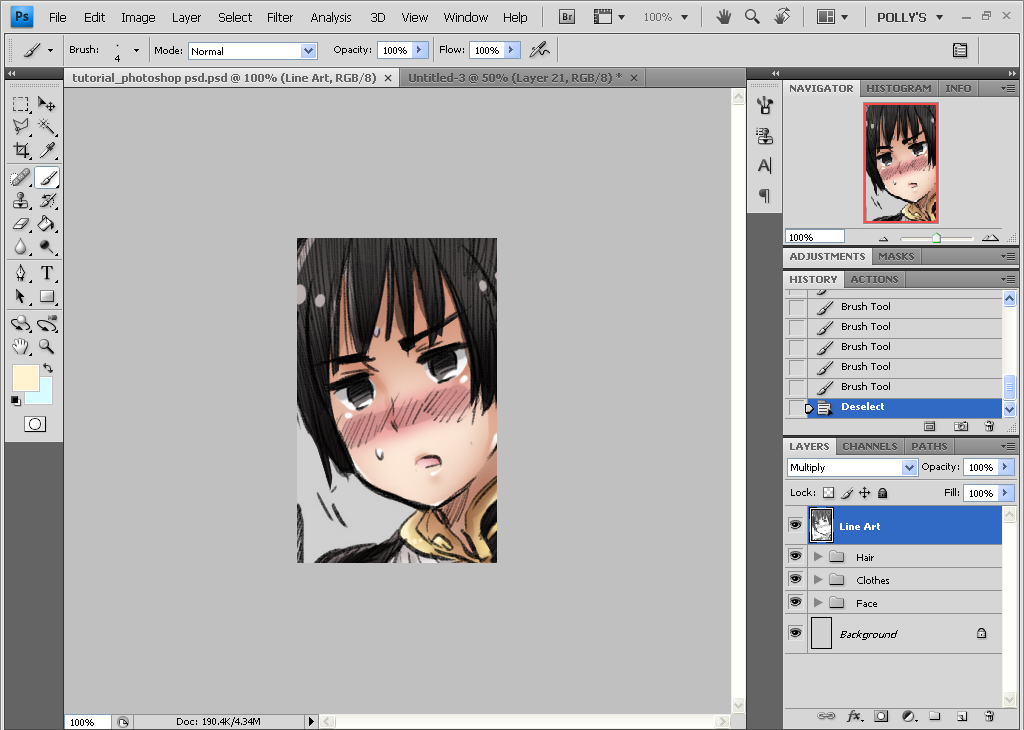
19. Repeat the whole shading process with the hair and clothes (yeah I’m too lazy to repeat everything again). Also use lighter colors for highlights while remembering your light sources.
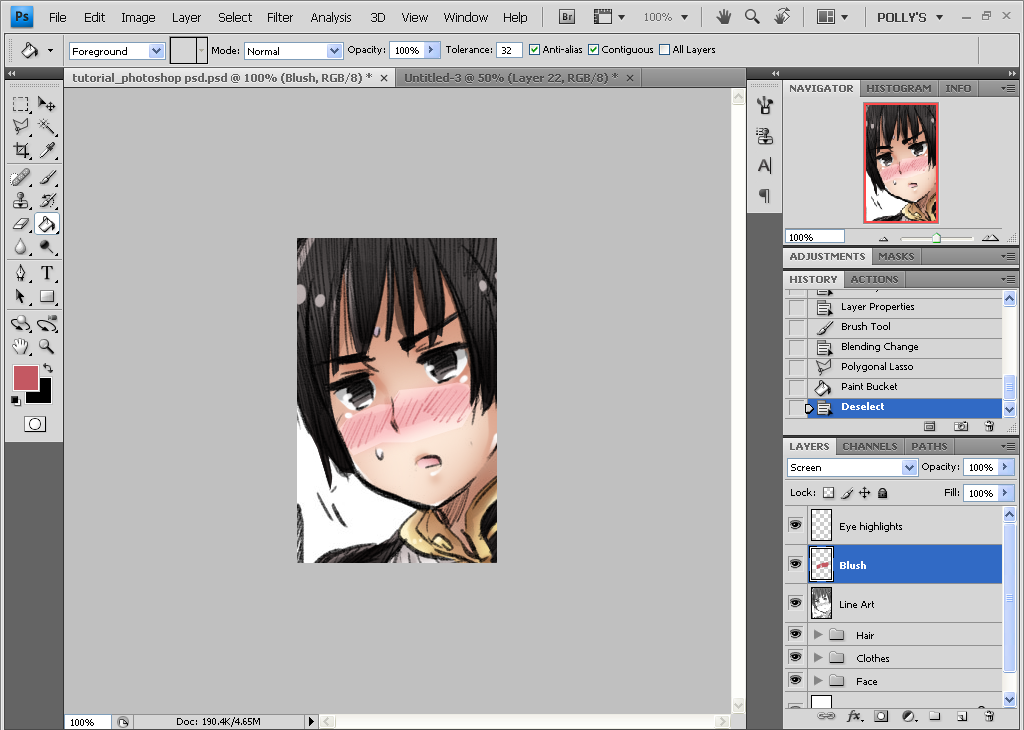
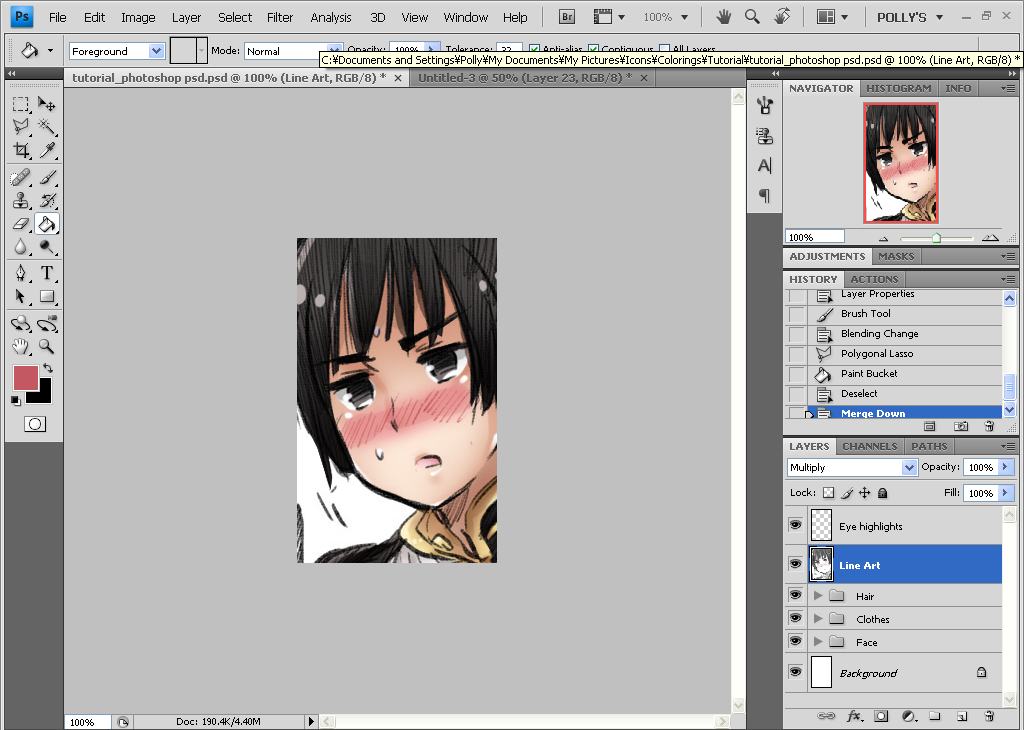
20. The finishing touches are the same as last time. Create two new layers; one for the additional eye highlights and another set to screen for additional blush. And yes, it looks weird now but once you merge that screen layer down…
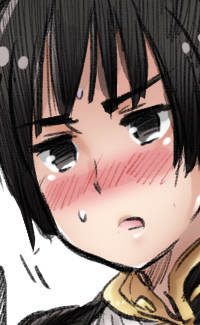
Voila! The finished product.
Now comparing it to the SAI coloring, they don’t look all too different, right? The main difference would be the colors used like the skin tones and in my opinion there’s a bit more dimension in the SAI coloring but that’s not to say there isn’t any in the Photoshop one. Some might even say that the Photoshop coloring looks better since the colors are a bit more subdued... though they both don’t look too shabby.
The main thing missing from coloring with a mouse is that you can’t use pen pressure and you can’t control the mouse as easily as you can control a pen. But with enough practice, there’s no reason why you can’t produce some good colorings with just using the mouse~
And I know this’ll sound all campy and generic but you also have to remember that when it comes to coloring, drawing, iconing or just anything in general, you have to both experiment and practice, practice! Just… idk, fuck around with the settings of your Photoshop or SAI programs and try out lot’s of different things so you can teach yourself. Anyway, hope you enjoyed the tutorial. And yeah… sorry for all the tl;dr. Hope you guys got the big picture anyway~ Feel free to ask questions on any parts that were confusing 'cause I know there's probably a lot of that. |D
Helpful Hotkeys/Shortcuts
[ - Decrease brush size
] - Increase brush size
F5 - opens the Brush window (Photoshop only)
ctrl + z - undo
ctrl + alt + z - undo each step
*pressing ctrl+z repeatedly on Paint Tool SAI repeatedly undoes all actions performed until a certain point. ctrl+z on Photoshop just undoes the first step and re-does it if you press ctrl+z again. Meanwhile, ctrl+alt+z is what undoes each step with repetitive use. I suck at explaining it so just test it out for yourself.
Q - Quick Mask mode
delete - clears selected area and during selecting, it backtracks to the last place you clicked
extra icons.

→ NO HOTLINKING.
→ do you like what you see? then feel free to watch
→ want to affiliate with the comm? go here
→ comments, criticism, suggestions & questions are welcome
→ be sure to read the rules
By the way it's very image-heavy as well as tl;dr so... basically because I tried to explain everything with as much detail as I could. But if it's still confusing, feel free to ask questions afterward.

to


Here’s your original picture, Kiku Honda from Axis Powers Hetalia!

1. To start things off, make sure your line art (or the original uncolored manga) is set to multiply over a blank/white background layer. In between these two layers is where most of the color layers will go.
*tip: It would be a good idea to fill the bottom layer with a darker color (I use gray but any dark or vibrant color will work). This works to better see your coloring, especially when you're using white or light colors like skin tones.

2. Create your first layer and make sure it's in-between the bottom layer (which I've named 'BG') and the line art layer (named 'line art' obviously; on that note, naming your layers is certainly helpful for organization but you don't have to do it). Use the brush tool to just color the skin area. It's okay to go outside the lines. Since this is the bottom-most color layer, the color layers above it will cover up anything outside the lines.

3. Now using the brush tool again, color in the rest of the picture and make sure that every part/color has its own layer. For example, the skin has its own layer, as does the eye whites, eyes, hair, etc. These will serve as your base colors. Sometimes people just stop coloring here. Sometimes it looks good, sometimes it doesn't. I'll go on to add shading…

4. Before that though, another organization tip is to put similar color layers in their own folders like so. Once again, not mandatory but it makes things less cluttered and easier to find later on.

5. On to shading. To make sure your shading doesn't go outside the base colors, click on the thumbnail of the layer while holding down the [control] key. This will create a selection around the base color like so. Create a layer above the base; this will serve as the first of your many shading layers.

6. First pick out a color that’s not only darker but also a bit more saturated than the base color. Usually for skin shading I use like a mocha color but in this case I also use a more reddish tint for paler skin.
Now using the airbrush tool (or if you're on Photoshop, use a softer brush), start shading. Truth be told, I kinda suck at consistent light sources and such but if it helps, sometimes I make a new layer on top of everything and draw little sunbeams from where I want my light source to come from (Didn’t try it out this time though which is why there’s no screencap |D)

7. I usually create a few more layers for more shading as each layer adds on and adds on, making a more obvious difference from the base color. For the shading itself I use the marker or water tool on SAI but if you’re using Photoshop I just mess around with the opacity of the brushes.

8. On to cel-shading. Or rather, just using a hard brush to shade as opposed to a softer airbrush. Pick out a darker shade of the color you were already using for shading and using the pen tool (or hard brush for Photoshop users) simply go over some of the parts you think need the darkest shading.

9. You’ll be using the pen tool/hard brush once again but this time for highlights. Either pick out a lighter shade of your base color or just use white to do this. Remember where your light sources are and draw in your highlights on places like the cheeks (whichever is facing the light source), the nose or under the eyes.

10. For the blush, I just go over the cross-hatched (?) area with a rosy color using the airbrush tool/soft brush. You can also pick out darker shades of that color and kinda shade in the parts that would give the cheeks more of a contour. If the blush seems like it’s a bit too vibrant, you can lower the opacity until it looks right.

11. For relatively small parts like the eye whites, eyes and mouth, you don’t necessarily need to create a new layer for their shading. One option I use is to just lock the layers (highlight the layer and check the box that reads Opacity lock) and do the shading within that layer.

12. You can shade the sweat if you want but you’re going to be setting that layer to Overlay anyway so any shading won’t be too obvious.

13. Now just repeat the shading and highlighting process with the hair and clothes. For the hair highlights, sometimes it looks better to set it to Overlay. If that looks too vibrant you can also reduce the opacity or just leave it set on Normal.

For the clothing highlights I tried to imitate Himaruya’s style of highlighting with little circles? Yeah you don’t have to do that…

14. Now you’ll be adding the finishing touches. Above all the layers, create a new layer for some additional highlights to the eyes. If it’s over the line art, I find that it stands out more.
Now one final layer for additional blush. Set it to Screen and go over the blush lines with a darker rose color. It looks weird now but if you merge that screen layer to the line art later on, you’ll find that they bring out the blush a bit more.

15. And here’s our finished product after merging that screen layer! If some parts don’t look right to you, switch it over to photoshop and adjust the brightness or hue & saturation until you’re satisfied.
Okay, now we’ll be coloring the same picture but using a different program and technique. Why? Well not everyone has the luxury of a tablet (or Paint Tool SAI but you could… torrent that somewhere. I’m pretty sure that’s what I did) And for years, I had to color only using the mouse… so that’s what I’ll be teaching~ Now there are a lot more steps for this tutorial but also more tips to help you color whether it’s with a tablet of mouse. Afterward we’ll compare the results as well.

to


1. We’ll be starting off the same way as last time with making sure that your line art layer is set to Multiply above a colored background layer. In between these layers will be the color layers, etc.

2. We’ll be coloring all the base colors first and do all the shading afterward. Now if you’re just using a mouse to color, one of the more useful tools you’ll be using is the polygonal lasso tool (in between the rectangular marquee tool and crop tool). I find that using it in conjunction with the bucket fill tool makes for cleaner and speedier coloring, especially when it comes to larger sections of coloring like the skin, clothing or hair.
That aside, start using the polygonal lasso tool and select the area along Kiku’s face. Since the skin will be the bottommost color layer, you don’t have to worry about staying inside the lines since later color layers will overlap and cover it up.

3. Pick out a light skin tone (I used #ffeedf) and use the bucket fill tool to color in your selection.

4. As I mentioned in the previous tutorial, make sure all the different colors/parts have their own layers (skin, hair, eyes, etc.). On this new layer, repeat the polygonal lasso + bucket fill process with the hair. Like I said before, since this layer is above the skin layer, it will cover up any of the coloring underneath it.
Though another tip if you’re still having trouble using the polygonal lasso tool, remember to zoom into your picture more to get around tight corners and such (like when you’re coloring strands of hair or something).

5. Create new layers for the eye whites, irises and mouth and repeat the coloring process. Though since they’re relatively small in comparison to the whole picture, you don’t have to use the polygonal lasso tool and can just use the brush tool.

6. Alright here’s another little tip that’ll help speed up the coloring process; it’s called masking. Now, I want to color the black parts on Kiku’s uniform but the two black parts aren’t connected (the part on his shoulder, which I’ve already selected here, and the part on the collar of his jacket). You could easily just fill in the first part and select + fill the second part separately but you can also use masking.
The first part is already selected here and to go into quick mask mode simply press [Q].

7. The part you selected is visible while everything else is covered in red (kinda like how masking tape works in real painting… I think?). In quick mask mode however, you can select more things even if they’re not connected to the part already selected.

8. With the selection tool, pick out the part of Kiku’s jacket collar that’s to be colored black and then press the [delete] key. This clears the selection from the mask and makes it part of what you already selected. Press the [Q] key again…


9. And voila~ Now you have both parts selected and ready for filling! Like I said before, you could have also easily selected and filled them both separately but the point of teaching this is so you can use it for other situations later on where it’d be quicker to use the quick mask instead. It also comes in handy when you’re selecting something and screw up, like do a mis-click or something. You can easily fix it using quick mask.

10. Alright now finish up coloring the rest of his uniform using whatever tool you want so we can move on to shading.
I forgot to take a screencap of this tip (though I did talk about it in the above tutorial) but you’re gonna want to make a selection of your base color layer so you don’t accidentally shade outside of it. To do that, simply click on the thumbnail of the layer while holding down the [control] key. This will create a selection around the colored area of the layer but make sure you make a new layer above the base color to do your shading.


11. Now let’s move on to choosing your colors for shading. Basically I just go from the base color and make it darker and more saturated. Though I also make the hue redder just a teensy bit.

12. And for brush settings, to imitate the airbrush style on SAI, use a softer brush. I usually start out with one of the bigger sizes like 200 or 300 but you can always decrease the size quickly by using the [ and ] keys

13. Start shading! While remembering your light sources, shade in the areas away from the source with special attention to the bangs of the hair or neck and contours of his cheeks.

14. For deeper shading, create more new layers and shade over the places that need more shading by using darker colors. All these shading layers will continue to add-on and build to create darker shading… just don’t over-do it too much!

15. Cel-shading (hard brush shading) is a bit harder using the mouse since you can’t exactly utilize pen pressure and control over a mouse isn’t exactly the same as control of a pen. But despite that, you can still get some good results if you have good control of the mouse or if you know how to mess around with your brush settings.
Open up the Brush Window in Photoshop (a shortcut to this would be pressing [F5]) and go to Opacity Dynamics on both drop-down windows, click Fade. This will make your brush stroke fade-off. I’s good for imitating the pen pressure effect for tablet users though the down side is that it fades off a little too soon.

16. With these settings go over the parts that need the darkest shading with the hard brush. If the brush fades out too soon, you can either try increasing the brush size or painting over the faded spot to kinda extend the line. After the hard shading, switch over to white and do your highlighting using the same brush settings.

17. Doing the blush with the mouse is basically the same as with a tablet. Create a new layer and just go over the area with a large, soft brush and adjust the opacity if you need to.


18. Similar to how we shaded the eyes and mouth in the last tutorial, you don’t have to create new layers for the shading and can just do it on that layer itself. To lock a layer on Photoshop simply highlight that layer and click on the circled button seen here. After that, pick out colors darker than the base and shade using the soft brush, hard brush or a combination. Whatever looks good to you!

19. Repeat the whole shading process with the hair and clothes (yeah I’m too lazy to repeat everything again). Also use lighter colors for highlights while remembering your light sources.


20. The finishing touches are the same as last time. Create two new layers; one for the additional eye highlights and another set to screen for additional blush. And yes, it looks weird now but once you merge that screen layer down…

Voila! The finished product.
Now comparing it to the SAI coloring, they don’t look all too different, right? The main difference would be the colors used like the skin tones and in my opinion there’s a bit more dimension in the SAI coloring but that’s not to say there isn’t any in the Photoshop one. Some might even say that the Photoshop coloring looks better since the colors are a bit more subdued... though they both don’t look too shabby.
The main thing missing from coloring with a mouse is that you can’t use pen pressure and you can’t control the mouse as easily as you can control a pen. But with enough practice, there’s no reason why you can’t produce some good colorings with just using the mouse~
And I know this’ll sound all campy and generic but you also have to remember that when it comes to coloring, drawing, iconing or just anything in general, you have to both experiment and practice, practice! Just… idk, fuck around with the settings of your Photoshop or SAI programs and try out lot’s of different things so you can teach yourself. Anyway, hope you enjoyed the tutorial. And yeah… sorry for all the tl;dr. Hope you guys got the big picture anyway~ Feel free to ask questions on any parts that were confusing 'cause I know there's probably a lot of that. |D
Helpful Hotkeys/Shortcuts
[ - Decrease brush size
] - Increase brush size
F5 - opens the Brush window (Photoshop only)
ctrl + z - undo
ctrl + alt + z - undo each step
*pressing ctrl+z repeatedly on Paint Tool SAI repeatedly undoes all actions performed until a certain point. ctrl+z on Photoshop just undoes the first step and re-does it if you press ctrl+z again. Meanwhile, ctrl+alt+z is what undoes each step with repetitive use. I suck at explaining it so just test it out for yourself.
Q - Quick Mask mode
delete - clears selected area and during selecting, it backtracks to the last place you clicked
extra icons.


→ NO HOTLINKING.
→ do you like what you see? then feel free to watch
→ want to affiliate with the comm? go here
→ comments, criticism, suggestions & questions are welcome
→ be sure to read the rules