Tutorial #3
Go from 
to
Made in Photoshop CS2, using Selective colouring.
1.Take your base, duplicate and set your duplicated layer on Screen 100%

-->
2. Go to: Layer -> New Adjustment Layer -> Selective Color, and use these settings:
Reds:
Cyan: -100%
Magenta: -28%
Yellow: +100%
Black: +10%
Yellows:
Cyan: -100%
Magenta: +9%
Yellow: +78%
Black: +100%
Whites:
Cyan: -100%
Magenta: +41%
Yellow: +100%
Black: +14%
Neutrals:
Cyan: +23%
Magenta: +5%
Yellow: +12%
Black: -15%
Blacks:
Cyan: +100%
Magenta: +7%
Yellow: -9%
Black: 0%

-->
3. Merge all your layers. (Layer -> Merge Visible) and duplicate your new base.
4. Go to: Filter -> Blur -> Radial Blur, and use these settings:
Amount: 25
Blur Method: Spin
Quality: Best

-->
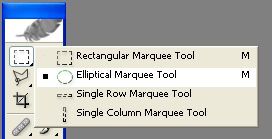
5. Select your Elliptical Tool

Now select the area that you want (If you want a good circle, hold Shift while selecting).

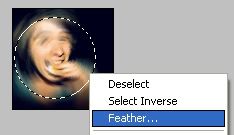
Then right click and select feather. Set to 2px. Then delete the selected part. (ctrl + x)

-->
6. Make a new layer and fill it with #000000. Then take a soft, round brush and make a little bulb in #ED0000. Set this layer
on Lighten 100%. If your not happy with the position of your red bulb, your can drag it around a little bit with your Move
Tool.

-->
7. Add some text and you're done. (I used the Beth Hand font for this icon).

-->

to

Made in Photoshop CS2, using Selective colouring.
1.Take your base, duplicate and set your duplicated layer on Screen 100%

-->

2. Go to: Layer -> New Adjustment Layer -> Selective Color, and use these settings:
Reds:
Cyan: -100%
Magenta: -28%
Yellow: +100%
Black: +10%
Yellows:
Cyan: -100%
Magenta: +9%
Yellow: +78%
Black: +100%
Whites:
Cyan: -100%
Magenta: +41%
Yellow: +100%
Black: +14%
Neutrals:
Cyan: +23%
Magenta: +5%
Yellow: +12%
Black: -15%
Blacks:
Cyan: +100%
Magenta: +7%
Yellow: -9%
Black: 0%

-->

3. Merge all your layers. (Layer -> Merge Visible) and duplicate your new base.
4. Go to: Filter -> Blur -> Radial Blur, and use these settings:
Amount: 25
Blur Method: Spin
Quality: Best

-->

5. Select your Elliptical Tool

Now select the area that you want (If you want a good circle, hold Shift while selecting).

Then right click and select feather. Set to 2px. Then delete the selected part. (ctrl + x)

-->

6. Make a new layer and fill it with #000000. Then take a soft, round brush and make a little bulb in #ED0000. Set this layer
on Lighten 100%. If your not happy with the position of your red bulb, your can drag it around a little bit with your Move
Tool.

-->

7. Add some text and you're done. (I used the Beth Hand font for this icon).

-->
