Tutorial: Outlining A picture in a picture
Ok, this is my first time trying to explain to other people how to do anything with this. It drove me crazy trying to learn this (I even looked on here) and could never figure it out. I figured now that I some what (or at least think) I know what i'm doing that I would help you guys out now.
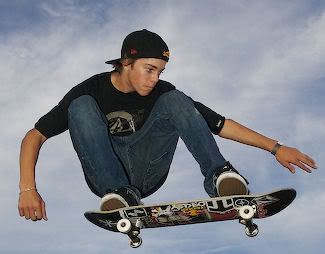
Ok, we are going to take this:
and turn it into this:

One: First your going to open up your PSP and choose which picture you would like to use.
or of course you can use the one I put up. (this may be eaiser expecially if you have questions for me as you go along)
Two: Open a new image. You want these settings:
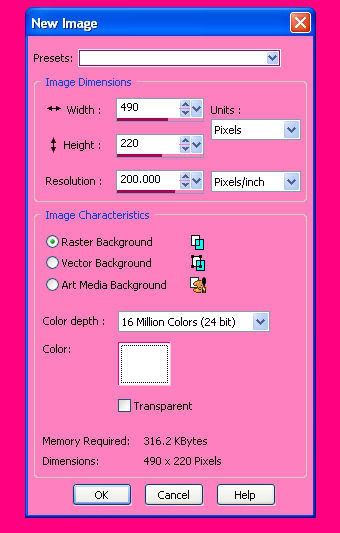
BUT DONT CLICK ON OK JUST YET!
where you see the white square (or whatever color yours may be right now) click on it so that you now see:
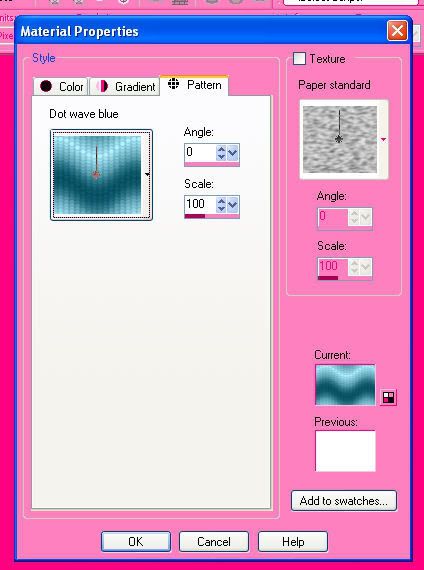
(make sure you click on the tab that says pattern)
then click ok which will bring you back and then click ok again!
Now you should have yourself a nice little rectangle with some kind of pattern in it.

(feel free to add thing's to the background of it. On this piece you can take some brushes and add them to random places)
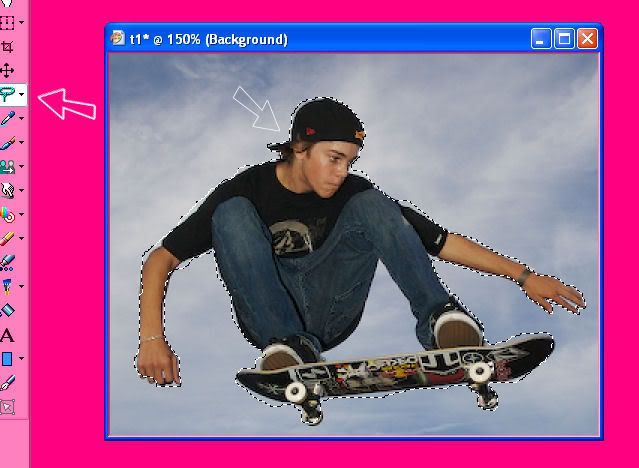
Three: forget about the background for now and go back to the picture were going to outline.
Go to your freehand selection tool (looks like a little lasso) Once you click on that then carefully trace around his body or what your going to outline in case you didn't use the picture I did. It should look something like this (although mine is far from perfect ;))
Four: Selections>>Invert
Then make a duplicate of your picture
Five: Once you make the duplicate you need to hit delete on your keyboard and this should get ride of the background! :)
Six: Selections>>Invert again
{now it should only be around him or whatever your outlining)
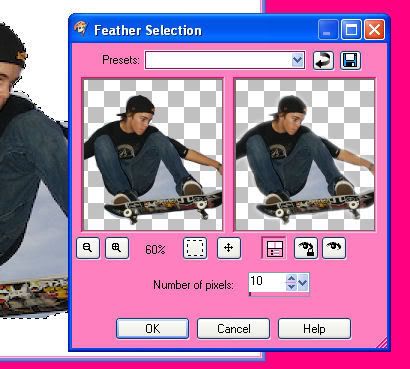
Seven: Selections>>Modify>>feather
You can make this as big as you want depending on how big your picture is and or just how thick you want the outline to be.
Eight: there is probably an easier way to this, but this is how I learned which means it is the only way I know how to show you guys as of now.
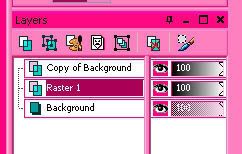
You now need to make a new raster layer BUT make sure it is inbtween Background and copy of background:
Nine: Once you have done that your ganna want to click on your flood fill tool and pic the color you want the outline to. (If the outline color you chose is the same as the background you wont be able to see it until the end.)
Click inside the dotted lines a few times. (I normally have to click about 10 times or so)now, you wont see anything changing if the color is the same as the background, but dont think nothing is happening because it is.
Ten: Right click on Raster 1 and duplicate it >> Repeate this 2 more times. (again, if it's the same color it's looks as if nothing is changing dont worry it is!)
Eleven: Right click on background under where it says raster 1 (view image above)
Right click background>>promote background layer
(it should now say raster 2)
You can now right click on raster 2 and delete it completely.
Twelve: Once you have clicked yes and finish that you are ganna want to go to
Selections>>select none
The lines will finally be gone, lol!
Thirteen: hold down Ctrl+Shift+C (you can hide that picture now. Your pretty much done!)
Bring the background picture back up that we had been working on and hit Ctrl+L and your outlined picture should now be on your background.
You can use the raster defrom tool to move the image around to where you would like to have it sit. Then feel free to add a boarder around your background and maybe even some text! And now we have this:
So how did your's come out? :) hope I helped..
-Crystal
Ok, we are going to take this:
and turn it into this:
One: First your going to open up your PSP and choose which picture you would like to use.
or of course you can use the one I put up. (this may be eaiser expecially if you have questions for me as you go along)
Two: Open a new image. You want these settings:
BUT DONT CLICK ON OK JUST YET!
where you see the white square (or whatever color yours may be right now) click on it so that you now see:
(make sure you click on the tab that says pattern)
then click ok which will bring you back and then click ok again!
Now you should have yourself a nice little rectangle with some kind of pattern in it.
(feel free to add thing's to the background of it. On this piece you can take some brushes and add them to random places)
Three: forget about the background for now and go back to the picture were going to outline.
Go to your freehand selection tool (looks like a little lasso) Once you click on that then carefully trace around his body or what your going to outline in case you didn't use the picture I did. It should look something like this (although mine is far from perfect ;))
Four: Selections>>Invert
Then make a duplicate of your picture
Five: Once you make the duplicate you need to hit delete on your keyboard and this should get ride of the background! :)
Six: Selections>>Invert again
{now it should only be around him or whatever your outlining)
Seven: Selections>>Modify>>feather
You can make this as big as you want depending on how big your picture is and or just how thick you want the outline to be.
Eight: there is probably an easier way to this, but this is how I learned which means it is the only way I know how to show you guys as of now.
You now need to make a new raster layer BUT make sure it is inbtween Background and copy of background:
Nine: Once you have done that your ganna want to click on your flood fill tool and pic the color you want the outline to. (If the outline color you chose is the same as the background you wont be able to see it until the end.)
Click inside the dotted lines a few times. (I normally have to click about 10 times or so)now, you wont see anything changing if the color is the same as the background, but dont think nothing is happening because it is.
Ten: Right click on Raster 1 and duplicate it >> Repeate this 2 more times. (again, if it's the same color it's looks as if nothing is changing dont worry it is!)
Eleven: Right click on background under where it says raster 1 (view image above)
Right click background>>promote background layer
(it should now say raster 2)
You can now right click on raster 2 and delete it completely.
Twelve: Once you have clicked yes and finish that you are ganna want to go to
Selections>>select none
The lines will finally be gone, lol!
Thirteen: hold down Ctrl+Shift+C (you can hide that picture now. Your pretty much done!)
Bring the background picture back up that we had been working on and hit Ctrl+L and your outlined picture should now be on your background.
You can use the raster defrom tool to move the image around to where you would like to have it sit. Then feel free to add a boarder around your background and maybe even some text! And now we have this:
So how did your's come out? :) hope I helped..
-Crystal