033
In case anyone is wondering how to make icons similar to the batch posted here, I made a quick tutorial. ♥
Going from this: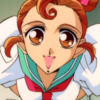
to this: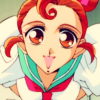
Keep in mind that I'm using Paint Shop, but I think it should still translate pretty well to other programs too.
First, go to layers and duplicate your base. Set it to screen → 30%. It should now look something like this:
Merge your layers, and duplicate again. This time set it to hard light → 50%, and you'll have this:
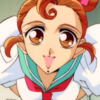
Merge your layers again. This time go to adjust → hue and saturation → hue/saturation/lightness. Set the hue to -5 and the saturation to 10. This is what you should now have:
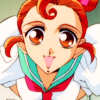
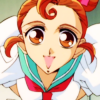
Almost done! You can leave it the way it is now if you want, or you can move on to the final step. Create a new layer, 100x100 pixels in size, and set the color to #02044c. Set it to exclusion → 40%. You now have the finished product:
Really, I just suggest playing around with the settings until you find something that you like. Of course, there is always the option of adding textures, text, whatever else you want at this point too. ♥
Going from this:
to this:
Keep in mind that I'm using Paint Shop, but I think it should still translate pretty well to other programs too.
First, go to layers and duplicate your base. Set it to screen → 30%. It should now look something like this:
Merge your layers, and duplicate again. This time set it to hard light → 50%, and you'll have this:
Merge your layers again. This time go to adjust → hue and saturation → hue/saturation/lightness. Set the hue to -5 and the saturation to 10. This is what you should now have:
Almost done! You can leave it the way it is now if you want, or you can move on to the final step. Create a new layer, 100x100 pixels in size, and set the color to #02044c. Set it to exclusion → 40%. You now have the finished product:
Really, I just suggest playing around with the settings until you find something that you like. Of course, there is always the option of adding textures, text, whatever else you want at this point too. ♥